どもども。
Hi there!!
皆様、いかがお過ごしでしょうか?
How's it going today?
さて、便利な現在、Hit-chanにとって、無くては困るという家電はいっぱいあると思いますが、洗濯機もその中の一つです。
So, nowadays I'm not the only person who has such a convenient life surrounded by so many home appliances, and I'd say that washer is one of the most essential items in life.
アメリカに来てから、洗濯機の他に乾燥機のある生活に慣れてしまったので、乾燥機もなくなったらすっごく大変なんですが、それでも洗濯機に比べれば乾燥機は無くても何とかやっていけそうな気はします。
Since I moved to MN, I've been so used to my life with a dryer besides a washer, but if I had to choose only one of those in my life, I'd definitely pick a washer because I feel like I could live without a dryer somehow.
で、ですね、我が家の洗濯機、最近回すたびにギ―、ギーと変な音がするようになったんです。
Anyways, our washer started making weird noises when it spins from a couple of months ago.
ただ、音がするだけでちゃんと洗えるし脱水もできていたので、「ん―、大丈夫かな。。。」と変わらず使い続けていたんですが、その内にその音が大きくなってきてしまい、「やばいなぁ、このまま使っていると確実に壊れそうな気がする。。。」と思い始めました。
All I was concerned about our washer was the weird noise, and it still could wash, drain and do everything fine, so I kept using it anyways. Though, the noise gradually got louder and louder and made me start considering, "Oh my, it'll probably go break sometime soon...."
で、こんな時はネットの時代。早速ネットでこの音の原因を調べてみることにしました。
So, thanks to this internet era, I tried to research about the weird noise online.
「我が家の洗濯機のブランド名」&「変な音の直し方」で検索をかけると、YouTubeで動画がヒット
I entered "Amana(The brand)" and "Weird noise" on the search engine and then hit a YouTube video!
※音量注意!(Volume Warning!) Amana washing machine grinding noise resolved
上の動画がそうなんですけど、型番は違えども同じブランドの洗濯機が我が家の洗濯機と同じ音を出しているではないですか!
The type of the washer in the video was different from ours, but I could tell that the noises from the washer were same as the ones our washer made!
どうも、音の原因は洗濯機の底にあるゴムベルトを止めるナットが緩んでいるからで、そのボルトを締め直すだけで解決するようです。
The video explained that the cause of the noises was the loosen nut holding the rubber belt and you could fix the problem just by retightening it.
よし、原因と解決法が分かったぞ!という事で、Hit-chan一人では洗濯機を倒したりはできないなぁと思い、Andyっちに手伝ってもらう事にしました。(というか、Andyっちが主導で、Hit-chanが助手になるんですけどね。笑)
Okay, now I found out the cause and the solution, but it seemed an impossible mission for me to put it down on my own. So, I asked Andy for a help, of course. (Yeah, it's more likely Andy's the project leader and I was his assistant. Hehe)
こういう夫婦二人協力してプロジェクトをする時は、今までみたいに「さぁ、やるかぁ。」とすぐに出来るわけではないので、「よし、明日めいちゃんがお昼寝したら始めよう!」と事前に決めておきました。
We used to do a project like this whenever we wanted to, but now we need to plan it ahead like, "Okay, let's work on it when May-chan takes nap tomorrow!"

で、早速この日、めいがお昼寝し始めたところで作業開始。制限時間は1時間半くらいと予想。
So, on this day, after I put May-chan in bed, we started the project. We estimated the limit time about for 1.5hour.

まずは洗濯機に繋がっている、温水と冷水のバルブを閉めて、パイプを外します。
First off, we shut the water bulbs, both cold and hot, and detached the pipes from the washer.
洗濯機の後ろは狭いので、助手のHit-chanが後ろに回ってAndyっちの指導のもと作業。
There was not much space behind the washer, so I went in there and did a couple of the processes following Andy's direction.

洗濯機からの汚水を流すパイプを外します。このパイプを留めてあるクリップを一つ外すのも、Hit-chanにとっては初体験。
Then, we detached the drain pipe from the washer. It was the first time for me to touch the kind of clip to hold the pipe too.

何とか頑張って外し、Andyっちが洗濯機を倒すのに成功。うん、Hit-chan一人では無理だったな。何より重すぎる。
I barely could take the clip off and then Andy could put the washer down on his own. Yeah, it'd have been too heavy for me to do it even if I tried by myself.

底のカバーを外せました。
Okay, we could get the bottom cover off.
ゴムベルトの部分にもプラスチックのカバーが付いていたので、それも外します。
There was a plastic cover on the rubber belt, and Andy took it off too.

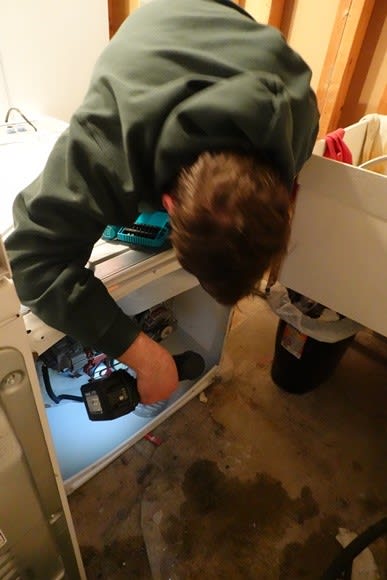
で、ようやく問題のナットに到着。
Finally, we reached the nut.

結構無理な体勢で、Andyっち、これでもかっ!!ってくらい、力の限りボルトを締め直してくれました。
Andy was working in the very uncomfortable position, but tried his best to retighten the nut.
そこから順を辿って元の通りにしたんですが、何しろ問題の音もYouTubeのビデオを観て「これと似ている!」と思っただけで、本当にこれで直ってくれるのかは半信半疑だったんですが、試しに回してみたら、「音がしな~い!!」と大成功でございました。(拍手)
After we fixed the nut, we just followed all the processes back to the beginning. The video made me believe that we had the same noise issue with our washer, but it's still my own guess, so I honestly wasn't sure if this project would really solve the noise problem. But, it really did!!!
我が家で使っている洗濯機、引っ越してきた時についていた物で、もうかれこれ8年くらい使っています。
The washer actually came with the house, and we've used it about for 8years since we moved in.
当初、この洗濯機の不調をAndyっちに伝えた時、「いっその事、新しいのを買おうか~。」とAndyっちは買い替えの方に心が傾いていました。
When I first let Andy know about the noise problem, he said, "I kind of wanna buy a new one."
というのも、この洗濯機、Hit-chanは気づかなかったんですが、液体洗剤で洗うと何故かAndyっちのYシャツにシミがついちゃうという事があったんです。
The reason why he wanted to buy a new one was because the washer had made some stain from liquid detergent on his work shorts before.
なので、Andyっちは機械あらば新しい洗濯機を買いたいみたいなんですが、まぁ、シミの件は粉洗剤で洗えば無問題なので、こうやって直った事だし、頑張ってもらえるところまで使わせてもらいたいと思ってます。(まぁ、基本洗濯はHit-chan担当なので、Hit-chanが良ければそれで良し!)
So, Andy slightly wanted to take the noise problem as an excuse to purchase a new washer, but I'm totally happy to keep using the current one for a while since it's now fixed. Plus, I can avoid the stain problem by using powder detergent too. (Yeah, I'm in charge of laundry in the house, so if I'm happy, it'll be fine.)
YouTubeに動画をあげてくれた方に大大大感謝、作業をしてくれたAndyっちに大感謝。
Anyways, I just want to send a huge thank you to the man for sharing his experience on YouTube and a big thank you to my hubby for doing the project with me.
お陰で部品の取り換えなども一切しないで、コストゼロで我が家の洗濯機を直すことができました!
We even didn't need a new part or something, and could repair the washer with no expense!!
という訳で、今日はこの辺で~!!!
Okay, this is all for today. Thank you for reading again!!!
↓応援クリックお願いします。(Please click these buttons to vote for my blog.)

 にほんブログ村
Hi there!!
皆様、いかがお過ごしでしょうか?
How's it going today?
さて、便利な現在、Hit-chanにとって、無くては困るという家電はいっぱいあると思いますが、洗濯機もその中の一つです。
So, nowadays I'm not the only person who has such a convenient life surrounded by so many home appliances, and I'd say that washer is one of the most essential items in life.
アメリカに来てから、洗濯機の他に乾燥機のある生活に慣れてしまったので、乾燥機もなくなったらすっごく大変なんですが、それでも洗濯機に比べれば乾燥機は無くても何とかやっていけそうな気はします。
Since I moved to MN, I've been so used to my life with a dryer besides a washer, but if I had to choose only one of those in my life, I'd definitely pick a washer because I feel like I could live without a dryer somehow.
で、ですね、我が家の洗濯機、最近回すたびにギ―、ギーと変な音がするようになったんです。
Anyways, our washer started making weird noises when it spins from a couple of months ago.
ただ、音がするだけでちゃんと洗えるし脱水もできていたので、「ん―、大丈夫かな。。。」と変わらず使い続けていたんですが、その内にその音が大きくなってきてしまい、「やばいなぁ、このまま使っていると確実に壊れそうな気がする。。。」と思い始めました。
All I was concerned about our washer was the weird noise, and it still could wash, drain and do everything fine, so I kept using it anyways. Though, the noise gradually got louder and louder and made me start considering, "Oh my, it'll probably go break sometime soon...."
で、こんな時はネットの時代。早速ネットでこの音の原因を調べてみることにしました。
So, thanks to this internet era, I tried to research about the weird noise online.
「我が家の洗濯機のブランド名」&「変な音の直し方」で検索をかけると、YouTubeで動画がヒット
I entered "Amana(The brand)" and "Weird noise" on the search engine and then hit a YouTube video!
※音量注意!(Volume Warning!) Amana washing machine grinding noise resolved
上の動画がそうなんですけど、型番は違えども同じブランドの洗濯機が我が家の洗濯機と同じ音を出しているではないですか!
The type of the washer in the video was different from ours, but I could tell that the noises from the washer were same as the ones our washer made!
どうも、音の原因は洗濯機の底にあるゴムベルトを止めるナットが緩んでいるからで、そのボルトを締め直すだけで解決するようです。
The video explained that the cause of the noises was the loosen nut holding the rubber belt and you could fix the problem just by retightening it.
よし、原因と解決法が分かったぞ!という事で、Hit-chan一人では洗濯機を倒したりはできないなぁと思い、Andyっちに手伝ってもらう事にしました。(というか、Andyっちが主導で、Hit-chanが助手になるんですけどね。笑)
Okay, now I found out the cause and the solution, but it seemed an impossible mission for me to put it down on my own. So, I asked Andy for a help, of course. (Yeah, it's more likely Andy's the project leader and I was his assistant. Hehe)
こういう夫婦二人協力してプロジェクトをする時は、今までみたいに「さぁ、やるかぁ。」とすぐに出来るわけではないので、「よし、明日めいちゃんがお昼寝したら始めよう!」と事前に決めておきました。
We used to do a project like this whenever we wanted to, but now we need to plan it ahead like, "Okay, let's work on it when May-chan takes nap tomorrow!"
で、早速この日、めいがお昼寝し始めたところで作業開始。制限時間は1時間半くらいと予想。
So, on this day, after I put May-chan in bed, we started the project. We estimated the limit time about for 1.5hour.
まずは洗濯機に繋がっている、温水と冷水のバルブを閉めて、パイプを外します。
First off, we shut the water bulbs, both cold and hot, and detached the pipes from the washer.
洗濯機の後ろは狭いので、助手のHit-chanが後ろに回ってAndyっちの指導のもと作業。
There was not much space behind the washer, so I went in there and did a couple of the processes following Andy's direction.
洗濯機からの汚水を流すパイプを外します。このパイプを留めてあるクリップを一つ外すのも、Hit-chanにとっては初体験。
Then, we detached the drain pipe from the washer. It was the first time for me to touch the kind of clip to hold the pipe too.
何とか頑張って外し、Andyっちが洗濯機を倒すのに成功。うん、Hit-chan一人では無理だったな。何より重すぎる。
I barely could take the clip off and then Andy could put the washer down on his own. Yeah, it'd have been too heavy for me to do it even if I tried by myself.
底のカバーを外せました。
Okay, we could get the bottom cover off.
ゴムベルトの部分にもプラスチックのカバーが付いていたので、それも外します。
There was a plastic cover on the rubber belt, and Andy took it off too.
で、ようやく問題のナットに到着。
Finally, we reached the nut.
結構無理な体勢で、Andyっち、これでもかっ!!ってくらい、力の限りボルトを締め直してくれました。
Andy was working in the very uncomfortable position, but tried his best to retighten the nut.
そこから順を辿って元の通りにしたんですが、何しろ問題の音もYouTubeのビデオを観て「これと似ている!」と思っただけで、本当にこれで直ってくれるのかは半信半疑だったんですが、試しに回してみたら、「音がしな~い!!」と大成功でございました。(拍手)
After we fixed the nut, we just followed all the processes back to the beginning. The video made me believe that we had the same noise issue with our washer, but it's still my own guess, so I honestly wasn't sure if this project would really solve the noise problem. But, it really did!!!
我が家で使っている洗濯機、引っ越してきた時についていた物で、もうかれこれ8年くらい使っています。
The washer actually came with the house, and we've used it about for 8years since we moved in.
当初、この洗濯機の不調をAndyっちに伝えた時、「いっその事、新しいのを買おうか~。」とAndyっちは買い替えの方に心が傾いていました。
When I first let Andy know about the noise problem, he said, "I kind of wanna buy a new one."
というのも、この洗濯機、Hit-chanは気づかなかったんですが、液体洗剤で洗うと何故かAndyっちのYシャツにシミがついちゃうという事があったんです。
The reason why he wanted to buy a new one was because the washer had made some stain from liquid detergent on his work shorts before.
なので、Andyっちは機械あらば新しい洗濯機を買いたいみたいなんですが、まぁ、シミの件は粉洗剤で洗えば無問題なので、こうやって直った事だし、頑張ってもらえるところまで使わせてもらいたいと思ってます。(まぁ、基本洗濯はHit-chan担当なので、Hit-chanが良ければそれで良し!)
So, Andy slightly wanted to take the noise problem as an excuse to purchase a new washer, but I'm totally happy to keep using the current one for a while since it's now fixed. Plus, I can avoid the stain problem by using powder detergent too. (Yeah, I'm in charge of laundry in the house, so if I'm happy, it'll be fine.)
YouTubeに動画をあげてくれた方に大大大感謝、作業をしてくれたAndyっちに大感謝。
Anyways, I just want to send a huge thank you to the man for sharing his experience on YouTube and a big thank you to my hubby for doing the project with me.
お陰で部品の取り換えなども一切しないで、コストゼロで我が家の洗濯機を直すことができました!
We even didn't need a new part or something, and could repair the washer with no expense!!
という訳で、今日はこの辺で~!!!
Okay, this is all for today. Thank you for reading again!!!
↓応援クリックお願いします。(Please click these buttons to vote for my blog.)