


2018-11-30
プログラムサイズはIDEの環境を再セットアップしたところサイズダウンできました。
赤外線受信も何とか実装して、童友社のバトルタンクJRをバトルが出来るようになりました。
【赤外線バトル信号送信機能付きArduino NANOのスケッチ】
| /* PS3BT_arduino_NANO_tank_TB6612_FIRE_IR_D5RB モータドライバはTB6612 A4ピンでサーボモータ(砲身上下)を動かす A5ピンでサーボモータ(砲塔旋回)を動かす 連続回転改造サーボ 砲撃時のリコイルアクション A1,A2,A3ピンでLED点灯 irremote PIN3 赤外線発光(砲撃)システム A0ピンに赤外線受光モジュール出力を接続し、被弾処理を追加 最大30720バイトのフラッシュメモリのうち、スケッチが26886バイト(87%)を使っています。 最大2048バイトのRAMのうち、グローバル変数が1342バイト(65%)を使っていて、ローカル変数で706バイト使うことができます。 PWM速度制御していなかったのを訂正。 後進系は1/2速度 */ #include <PS3BT.h> #include <usbhub.h> #ifdef dobogusinclude #include <spi4teensy3.h> #endif //#include <Usb.h> // needed by Arduino IDE USB Usb; BTD Btd(&Usb); PS3BT PS3(&Btd); //PS3BT PS3(&Btd, 0x00, 0x1B, 0xDC, 0xF2, 0x54, 0x32); //for Dongke A /*シリアルモニタにBluetooth DongleのアドレスがSerial.printされる。 書き出された6個のコードをスケッチを変更し、 ドングルを指した状態でArduinoに書き込む(電源は切らない) ドングルを抜いてUSBケーブルでPS3コントローラを接続する(電源は切らない) ケーブルを抜いてドングルを指し直す(Arduinoを再起動する) PS3コントローラのPS ボタンを押してペアリングする。 */ #include <IRremote.h> IRsend irsend; int RECV_PIN = A0 ; //赤外線受光部をPIN A0に IRrecv irrecv(RECV_PIN); decode_results results; //受信信号を格納する const long sign_hit = 0x4CB0FADD; int cnt = 0 ; //#include <Servo.h> //Servo myservo; #include <VarSpeedServo.h> VarSpeedServo myservo; VarSpeedServo myservo_1; int servo_pos = 90; const int servo_sp = 50; const int servo1_sp = 50; const int d_time = 20; int ch = 0; int val = 0; int pos_y; int pos_x; int pos_ry; int pos_rx; int PWMA = 5; // Aモータ PWM 左側モータ int AIN1 = 4; // Aモータ IN1 ( 9ピンはUSBホストシールド使用 int AIN2 = 2; // Aモータ IN2 int BIN1 = 8; // Bモータ IN1 int BIN2 = 7; // Bモータ IN2 int PWMB = 6; // Bモータ PWM 右側モータ( 10ピンはUSBホストシールド使用 int motor_speed; //int motor_sp; //モータスピード max=255 //const int LED_1 = A1; //主砲 D3にLED_IRとパラ接続 const int LED_2 = A2; //機銃 const int LED_3 = A1 ; //ブレーキランプ //const int LED_4 = ; //主砲準備中 const int LED_8 = A3; //ヘッドランプ const int SVCH1 = A4; //servo 1 const int SVCH2 = A5; //servo 2 void setup() { irrecv.enableIRIn(); // Start the receiver pinMode(RECV_PIN, INPUT) ; // 赤外線受信モジュールに接続ピンをデジタル入力に設定 pinMode(PWMA, OUTPUT); pinMode(AIN1, OUTPUT); pinMode(AIN2, OUTPUT); pinMode(BIN1, OUTPUT); pinMode(BIN2, OUTPUT); pinMode(PWMB, OUTPUT); // pinMode(LED_1, OUTPUT); pinMode(LED_2, OUTPUT); pinMode(LED_3, OUTPUT); // pinMode(LED_4, OUTPUT); pinMode(LED_8, OUTPUT); pinMode(SVCH1, OUTPUT); pinMode(SVCH2, OUTPUT); myservo.attach(SVCH1); //servo1 砲身上下 myservo.write(servo_pos); myservo_1.attach(SVCH2); //servo2 砲塔旋回 myservo_1.write(servo_pos); Serial.begin(115200); while (!Serial); // Wait for serial port to connect - used on Leonardo, Teensy and other boards with built-in USB CDC serial connection if (Usb.Init() == -1) { Serial.print(F("\r\nOSC did not start")); while (1); //halt } Serial.print(F("\r\nPS3 Bluetooth Library Started")); } void loop() { Usb.Task(); if (irrecv.decode(&results)) { // 受信コードの値が if (results.value == sign_hit) { // 0x4CB0FADDだったら被弾 Serial.println("HIT!"); Hit(); } irrecv.resume(); } if (PS3.PS3Connected) { //スティックの中央は127だけどピタリと止まらないので+-10ほど余裕を持たせる。 //左スティック上下の値(最上部0、中央127、最下部255)を読み込む pos_y = PS3.getAnalogHat(LeftHatY); pos_x = PS3.getAnalogHat(LeftHatX); pos_ry = PS3.getAnalogHat(RightHatY); pos_rx = PS3.getAnalogHat(RightHatX); /* 砲身 UP/DOWN スティックが下(20未満)の時は1ずつ下に動く。 スティックが上(235より上)の時1ずつ上に動く。 スティックを中間に戻すと、サーボはその位置で停止。 ボタン(SQUARE)を押すと90°にセット。 */ if (pos_ry > 235 && servo_pos < 179 ) { // UP servo_pos++; myservo.write(servo_pos, servo_sp, true); } else if (pos_ry < 20 && servo_pos > 1 ) { //DOWN servo_pos--; myservo.write(servo_pos, servo_sp, true); } else if (PS3.getButtonClick(SQUARE)) { //90° servo_pos = 90; myservo.write(servo_pos, servo_sp, true); // delay(d_time); } //砲塔旋回 if (pos_rx > 235) { //右旋回 myservo_1.write(0, servo1_sp); } else if (pos_rx < 20) { //左旋回 myservo_1.write(180, servo1_sp); } else { //停止 myservo_1.write(90, servo1_sp); } //delay(d_time); //砲撃 + リコイル if (PS3.getButtonClick(R1) && ch == 0 ) { int khz = 38; // 38kHz carrier frequency for the NEC protocol unsigned int irSignal[] = {4100, 1000, 2000, 2050, 1000}; // vs BATTLE TANK jr T-72 40MHz // AnalysIR Batch Export (IRremote) - RAW irsend.sendRaw(irSignal, sizeof(irSignal) / sizeof(irSignal[0]), khz); irrecv.enableIRIn(); // 受信を再開する //digitalWrite(LED_1, HIGH); motor_run(255, 0, 1, 0, 1, 1); ch = 20000; //約5秒間は砲撃不可 delay(70); motor_run(0, 0, 0, 0, 0, 1); delay(20); //digitalWrite(LED_1, LOW); motor_run(255, 1, 0, 1, 0, 1); delay(130); } else { if (ch > 0) { ch--; // digitalWrite(LED_4, HIGH); //装填中 } else { // digitalWrite(LED_4, LOW); //砲撃可 } } //銃撃 if ( PS3.getButtonClick(L1)) { for ( int i = 0; i < 5 ; i++) { val++; digitalWrite(LED_2, HIGH); delay(50); digitalWrite(LED_2, LOW); delay(50); } } //ヘッドライト if (PS3.getButtonClick(RIGHT)) { //点灯 digitalWrite(LED_8, HIGH); } if (PS3.getButtonClick(LEFT)) { //消灯 digitalWrite(LED_8, LOW); } //左スティックがセンター付近は停止(ブレーキ) if (pos_x >= 117 && pos_x <= 137 && pos_y >= 117 && pos_y <= 137) { motor_run(0, 1, 1, 1, 1, 1); } //前進 else if (pos_y < 117 && pos_x > 117 && pos_x < 137) { //左スティック中央(127)から最上部(0)の値をモーターのスピード0から255に変換 motor_speed = map(pos_y, 117, 0, 0, 255); motor_run(motor_speed, 1, 0, 1, 0, 0); } //後進 else if ( pos_y > 137 && pos_x > 117 && pos_x < 137) { motor_speed = map(pos_y, 137, 255, 0, 255); motor_speed = motor_speed / 2; motor_run(motor_speed, 0, 1, 0, 1, 0); } //前進右旋回 else if ( pos_y < 117 && pos_x > 137) { motor_speed = map(pos_y, 117, 0, 0, 255); //motor_speed = motor_speed / 2; motor_run(motor_speed, 1, 0, 0, 0, 0); } //前進左旋回 else if ( pos_y < 117 && pos_x < 117) { motor_speed = map(pos_y, 117, 0, 0, 255); //motor_speed = motor_speed / 2; motor_run(motor_speed, 0, 0, 1, 0, 0); } //後進右旋回 else if ( pos_y > 137 && pos_x > 137) { motor_speed = map(pos_y, 137, 255, 0, 255); motor_speed = motor_speed / 2; motor_run(motor_speed, 0, 1, 0, 0, 0); } //後進左旋回 else if ( pos_y > 137 && pos_x < 117) { motor_speed = map(pos_y, 137, 255, 0, 255); motor_speed = motor_speed / 2; motor_run(motor_speed, 0, 0, 0, 1, 0); } //右超信地旋回 else if ( pos_y > 117 && pos_y < 137 && pos_x > 137) { motor_speed = map(pos_x, 137, 255, 0, 255); motor_speed = motor_speed / 2; motor_run(motor_speed, 1, 0, 0, 1, 0); } //左超信地旋回 else if ( pos_y > 117 && pos_y < 137 && pos_x < 117) { motor_speed = map(pos_x, 117, 0, 0, 255); motor_speed = motor_speed / 2; motor_run(motor_speed, 0, 1, 1, 0, 0); } } } void motor_run(int D0, int D1, int D2, int D3, int D4, int D5) { /* D0 : モータスピード D1 : モータA(左)CH1 , D2 : モータA(左)CH2 1 = HIGH / 0 = LOW D3 : モータB(右)CH1 , D4 : モータB(右)CH2 1 = HIGH / 0 = LOW D5 : LED_3 ON/OFF 1 = HIGH / 0 = LOW */ analogWrite(PWMA, D0); analogWrite(PWMB, D0); digitalWrite(AIN1, D1); digitalWrite(AIN2, D2); digitalWrite(BIN1, D3); digitalWrite(BIN2, D4); digitalWrite(LED_3, D5); } // ====被弾==== void Hit() { motor_run(255, 0, 1, 0, 1, 0); delay(100); motor_run(0, 1, 1, 1, 1, 1); delay(50); motor_run(160, 1, 0, 1, 0, 0); delay(80); motor_run(0, 1, 1, 1, 1, 1); delay(50); cnt++; if ( cnt >= 5 ) { motor_run(0, 1, 1, 1, 1, 0); delay(10000); cnt = 0; } else { delay(1000); } } |
モータードライバICはアールエスコンポーネンツのオンライン販売サイトでも購入できます。
規格ごとに検索ソートがかけられ商品選択がしやすく、業者価格での部品購入が可能です。
2018-11-16
前回の(小型化1)から2週間経過している。
その間、MEGA搭載戦車の赤外線バトルシステムの実験やNANO+サーボドライバPCA9685のテストをしました。
左からArduino MEGA、UNO、NANOです。
先日、発注していたミニUSBホストシールドがお届け予定日から2日遅れではあるが2週間で深川から届きました。
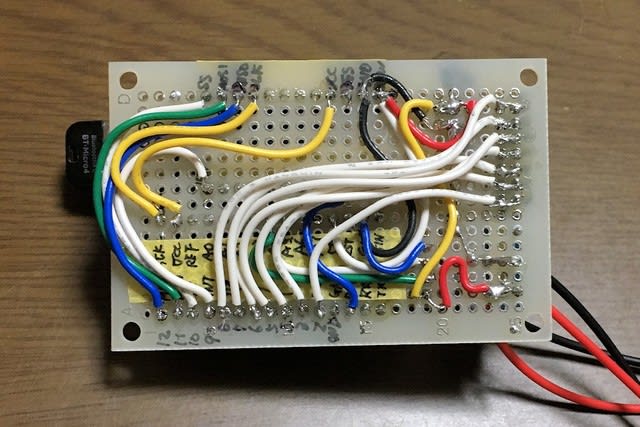
早速、ユニバーサル基板にヘッダーを取付け配線をします。
数ヶ所迷うところが有りますが、ネットなどで情報を入手しながら進めます。
ミニUSBホストシールドはArduino Pro Miniとは結合が良いのですが、NANOにはプラグインできず配線する必要が有りました。
デジタルPINが足りません。
PIN D3は赤外線発光用にリザーブ
PIN D2,D4~D8は2個のDCモータのPWM制御用に使います。
PIN D9~D13はミニUSBホストシールドで使います。
2個のサーボモータと、6個のLEDはサーボドライバPCA9685で動かす予定でしたが、小型化のためPCA9685は使うのを見送ります。
従ってLEDと、赤外線受光モジュールの信号入力ピンが足りません。
なんて、ずっと悩んでいましたが、解決方法をネットで発見しました。
テキスト「Arduinoをはじめよう」にも182頁に〔補足〕として書かれていました。
アナログ入力ピンをデジタルピンとして使えます。
早速、回路を組み、スケッチを書いて確認します。
使えました。
これで、何とかなりそうです。
Arduino NANO + ミニUSB ホストシールド + モータドライバ 接続回路図です。
赤外線受光部は未取付けです。
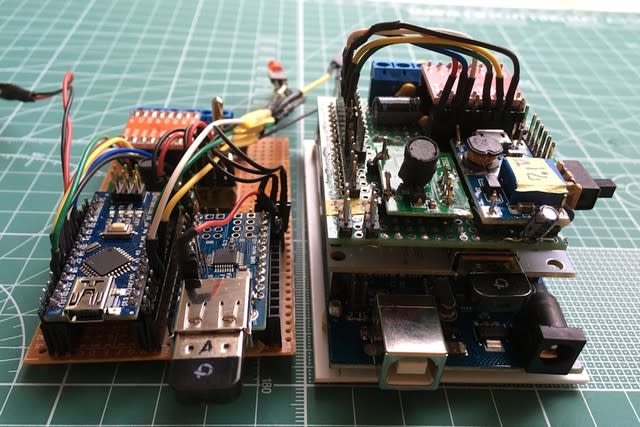
組み立てたものを比較してみます。
床面積的には同じくらいでしょうか。
以前のタイプが3階建てでしたが、今回は平屋なので高さは抑えることが出来ました。
画像左側がコンパクト化したArduino NANO版です。

赤外線受光モジュールを組み込み、被弾処理をするスケッチも書きましたが、スケッチのサイズが許容量の10%オーバーと言う事で実行できませんでした。
赤外線受光システム無しだと、「最大30720バイトのフラッシュメモリのうち、スケッチが27878バイト(90%)を使っています。」で、何とかクリアー。
MEGAはフラッシュメモリのサイズが8倍有るため実行できますが、UNOやNANO等では難しいです。
一部追記 2019-11-07
名古屋で電子部品のオンラインマーケティングを行なっております、ANCHOR代表の森下と申します。
この度、貴サイトを拝見しまして、ぜひ弊社顧客(電子部品関連のグローバル企業)とのタイアップをお願いできないかと考えております。
つきましては、詳細についてお伺いさせていただくことは可能でしょうか。
何卒、よろしくお願い申し上げます。
森下彰大
メールアドレス:info@anchor2018.com
事業紹介HP:https://www.anchor2018.com/
お問い合わせの件に関しては、別途メールにてご連絡申し上げます。