goo blog サービス終了のお知らせ 

Ganponブログ

趣味の模型作り、ドライブ、旅行など
since Mar.2017

M5Stamp PicoでRC可動戦車

2022-10-16 10:46:25 | RC可動コントロール

2022-10-16
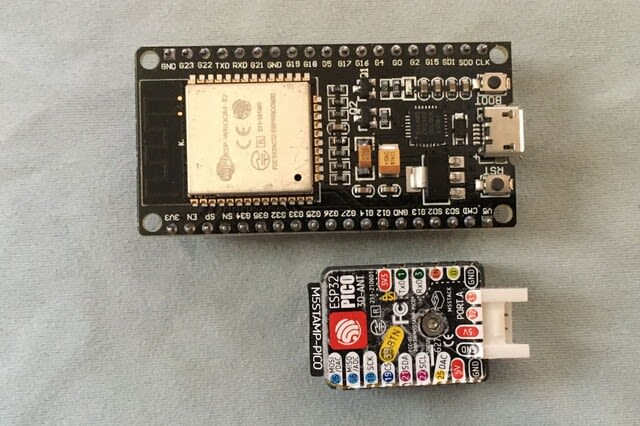
模型製作の合間に手持ちのM5Stamp Pico(以下 Picoと称す)でアリイのリモコン戦車をRC化してみました。
砲塔旋回も砲身上下、リコイルなどしない走るだけの仕様です。
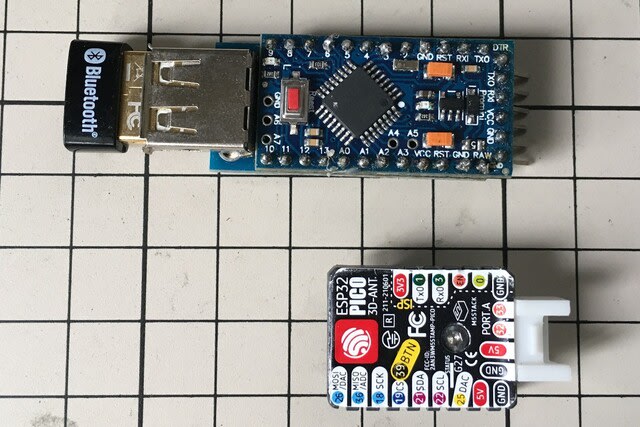
 

▼M5Stamp Pico
サイズは18 x 24 x 4.4 mmの小さなユニットですが、Wi-FiもBluetoothもできます 。

しかし、PS3コントローラとペアリングできません。
過去にPicoでRCカーを作ったのですが、今回は何か設定がおかしいようです。
PicoをPS3コントローラで無線操縦するスケッチ(プログラム)のポイントを忘れていました。
そんな訳で備忘録として書き留めておくことにしました。

ペアリングできない原因は、Arduino IDEでスケッチを書き込むとき、ボードの設定が違っています。
通常はPicoを使う時のボードはSTAMP-PICOで良いです。

しかし、どう言う訳かは判りませんが、PS3コントローラとペアリングさせるには
ESP32 Pico Kitを選定する必要が有ります。


私の場合、PS3コントローラのMACアドレスを書き換えて使用しています。
(あくまでも個人責任です。)
方法は、sixaxispairtool というツールで現在のアドレスの確認、書き換えができます。
PCとPS3コントローラが接続されている状態でSixaxisPairToolを起動すると現在のBlueToothアドレスが上に表示されます。


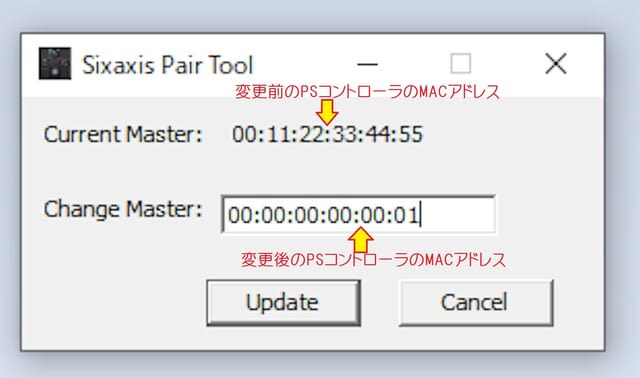
この様にPS3コントローラのMACアドレスを書き換え、スケッチの中でも同じアドレスを書き込んでおくと、一つのコントローラで違うユニットを動かす事が出来て便利です。
勿論ユニット(ESP32やPICO)の本来のMACアドレスは変更されていません。
あくまでもこのスケッチで動かしている間だけの暫定的なものです。
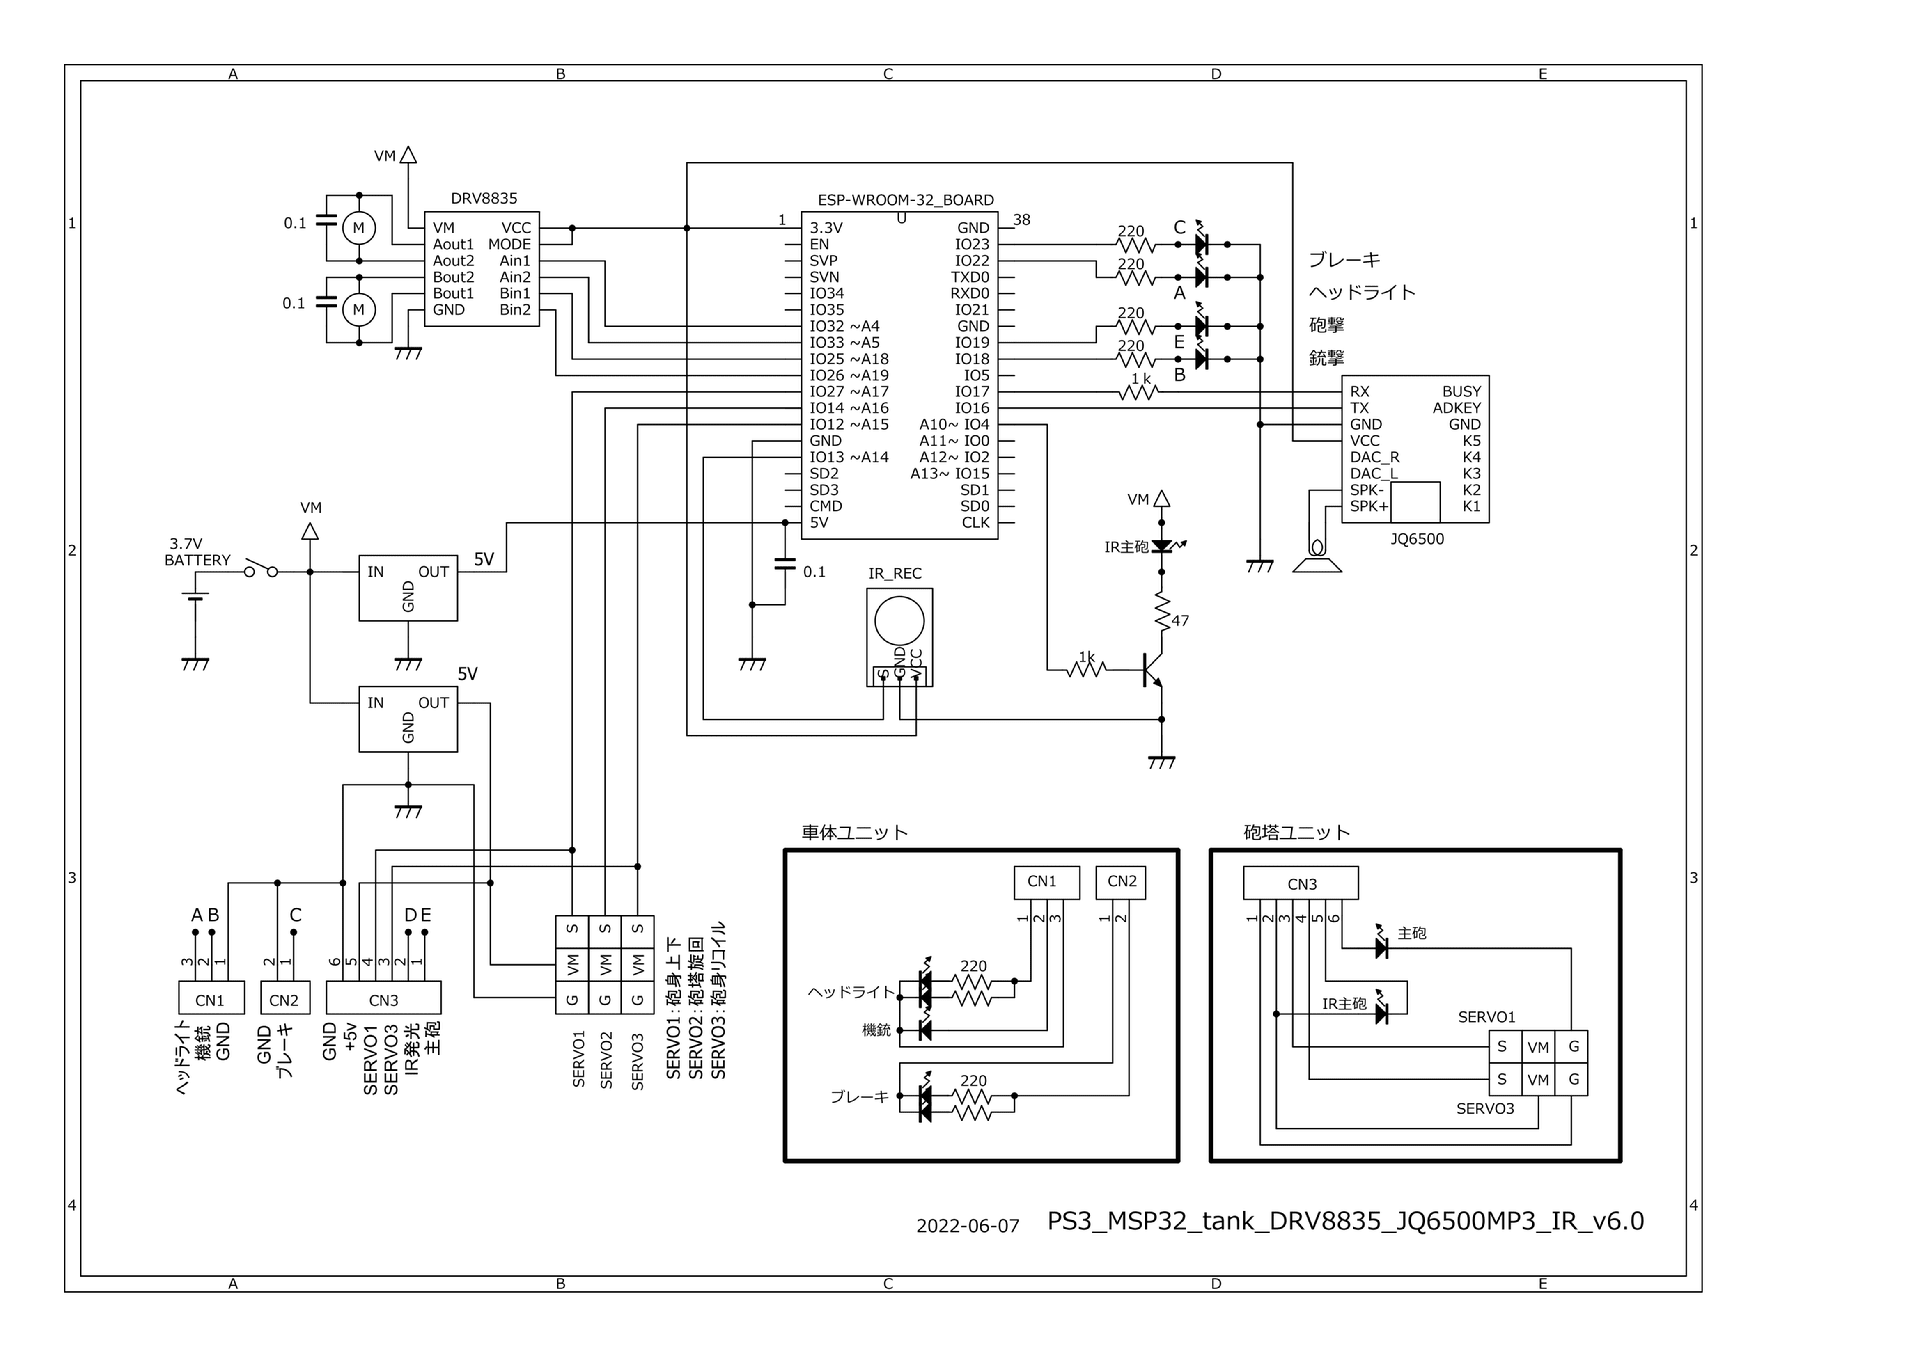
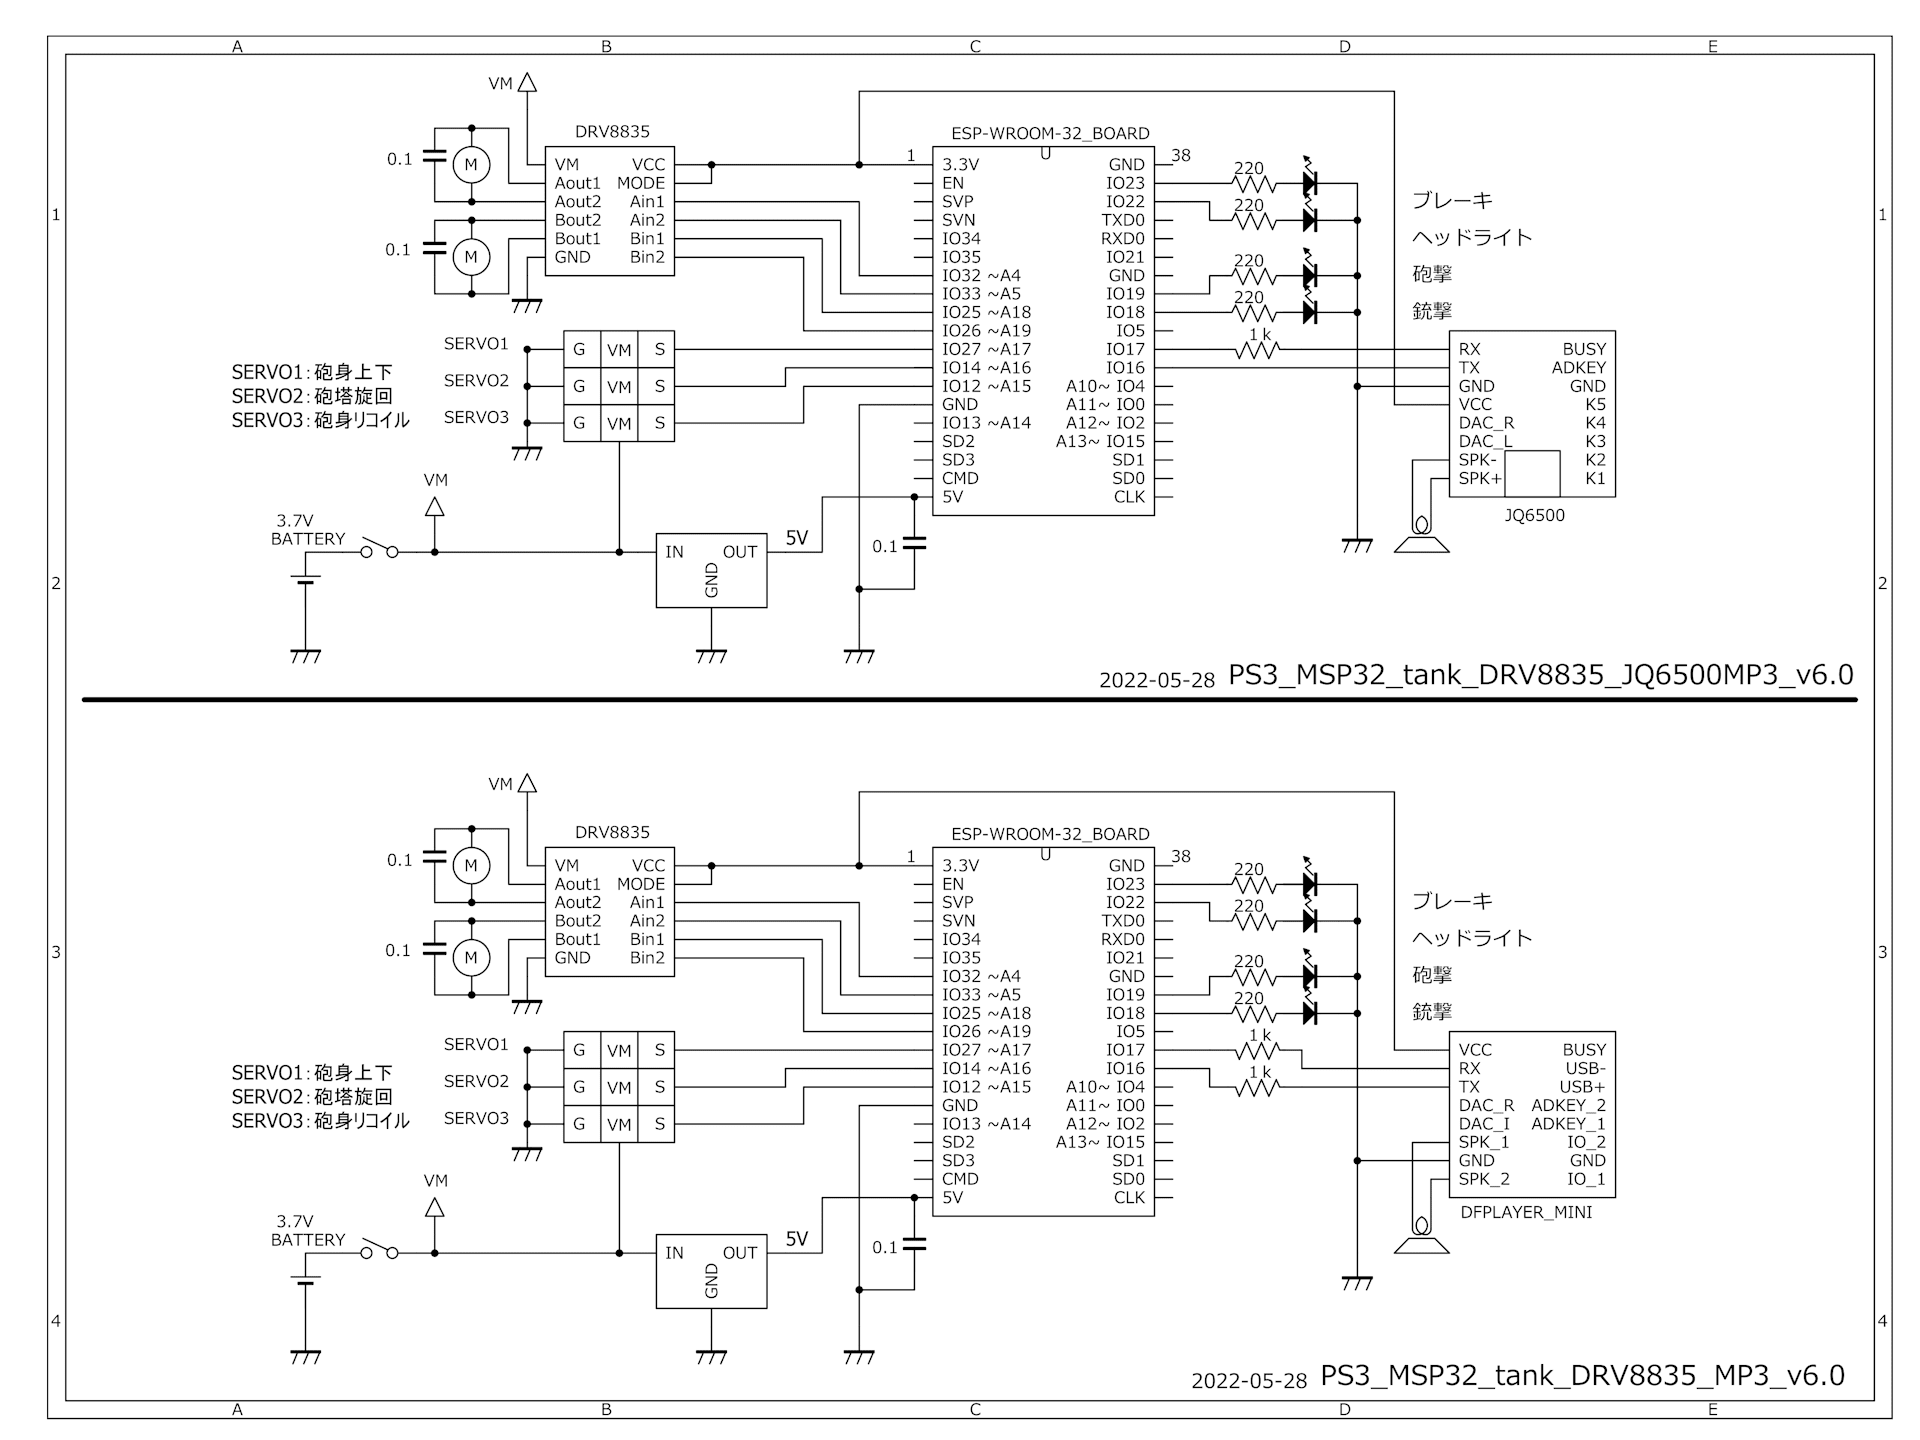
 

▼回路図


▼【スケッチ】

  1. /* PS3_M5PICO_tank_DRV8835_basic01b
  2.   最大1310720バイトのフラッシュメモリのうち、スケッチが954986バイト(72%)を使っています。
  3.   最大327680バイトのRAMのうち、グローバル変数が32116バイト(9%)を使っていて、
  4.   ローカル変数で295564バイト使うことができます。
  5.  
  6.   2022-10-15
  7.   M5Stamp Pico
  8.   ボードはESP32 Pico Kit を選択すること。
  9.   STAMP PICOではBluetoothが接続できなかった。
  10.   ボードマネージャESP32ライブラリはV1.0.4、V1.0.6でもOK
  11.  
  12.    【操作手順】
  13.     PSボタンでペアリング。
  14.  
  15.    【走行コントロール】
  16.     コントローラーの左スティック上下で前後進、
  17.     右スティックの左右でステアリングを制御。
  18.     ステアリングを振っていくと回転軸側が減速していき(緩旋回から信地旋回)、
  19.     一杯に倒すと回転軸側は停止。(信地旋回)
  20.     左スティック中央で右ステアリングを一杯に振ると超信地旋回(速度80%) ←ver1.0a
  21.  
  22. */
  23.  
  24. /*
  25.   G0・・・IN/OUT
  26.   G1・・・IN/OUT *** NG
  27.   G3・・・IN/OUT *** NG
  28.   G26・・・IN/OUT DAC2
  29.   G36・・・IN ONLY ADC
  30.   G18・・・OIN/OUT
  31.   G19・・・IN/OUT
  32.   G21・・・IN/OUT
  33.   G22・・・IN/OUT
  34.   G25・・・IN/OUT DAC1
  35.   G32・・・IN/OUT ADC Grove
  36.   G33・・・IN/OUT ADC Grove
  37. */
  38.  
  39. #include <Arduino.h> // Arduino ヘッダインクルード
  40. #include "M5Atom.h"
  41. #include <Ps3Controller.h>
  42.  
  43. #include <FastLED.h> // LED操作用ライブラリインクルード(3.5.0を使用)
  44. #define NUM_LEDS 1
  45. #define DATA_PIN 27
  46. CRGB leds[NUM_LEDS];
  47.  
  48. int cnt = 0 ;
  49. int motor_speed;
  50. int steering;
  51.  
  52. int AIN1 = 22; // A入力1/APHASE 左モータ AIN1
  53. int BIN1 = 21; // B入力1/BPHASE 右モータ BIN1
  54. int PWMApin = 25; // A入力2/AENABLE 左モータ AIN2
  55. int PWMBpin = 26; // B入力2/BENABLE 右モータ BIN2
  56. int PWMA = 2; //PWMAチャンネル 0=NG 1=NG 0〜15
  57. int PWMB = 3; //PWMAチャンネル 0=NG 1=NG 0〜15
  58.  
  59. int pos_y;
  60. int pos_x;
  61. int LED_8 = 19 ; // ヘッドランプ
  62.  
  63. void onConnect() {
  64.   Serial.println("Connected.");
  65.   for (int cnt = 0; cnt < 2; cnt++) {
  66.     digitalWrite(LED_8, HIGH);
  67.     delay(500);
  68.     digitalWrite(LED_8, LOW);
  69.     delay(500);
  70.   }
  71. }
  72.  
  73. void setup() {
  74.   Serial.begin(115200);
  75.   M5.begin(false, false , true); //SerialEnable, I2CEnable ,DisplayEnable
  76.   FastLED.addLeds<SK6812, DATA_PIN, RGB>(leds, NUM_LEDS); // GRB ordering is typical
  77.   leds[0] = 0xf00000; //green
  78.   FastLED.show();
  79.  
  80.   ledcSetup(PWMA, 5000, 8); //チャンネル,周波数,解像度(8bit=256段階)
  81.   ledcAttachPin(PWMApin, PWMA); //ledPinをPWMCHチャンネルに接続
  82.   ledcSetup(PWMB, 5000, 8); //チャンネル,周波数,解像度(8bit=256段階)
  83.   ledcAttachPin(PWMBpin, PWMB); //ledPinをPWMCHチャンネルに接続
  84.  
  85.   //pinMode(PWMApin, OUTPUT);
  86.   //pinMode(PWMBpin, OUTPUT);
  87.   pinMode(AIN1, OUTPUT);
  88.   pinMode(BIN1, OUTPUT);
  89.   pinMode(LED_8, OUTPUT);
  90.  
  91.   Ps3.attachOnConnect(onConnect);
  92.   //Ps3.begin("00:11:22:33:44:55"); //SixaxisPairToolで調べたmac adresに修正
  93.   Ps3.begin("00:00:00:00:00:26"); // PS3-sony
  94.   Serial.println("PS3 Ready");
  95.  
  96. }
  97.  
  98. void loop() {
  99.   if (Ps3.isConnected()) {
  100.     //走行コントロール
  101.     pos_y = Ps3.data.analog.stick.ly;
  102.     pos_x = Ps3.data.analog.stick.rx;
  103.     pos_y = pos_y + 128;
  104.     pos_x = pos_x + 128;
  105.  
  106.     //左スティックがセンター付近は停止(ブレーキ)
  107.     if (pos_x >= 117 && pos_x <= 137 && pos_y >= 117 && pos_y <= 137) {
  108.       motor_run(0, 0, 0, 0, 1);
  109.     }
  110.  
  111.     //前進
  112.     if (pos_y <= 102 && pos_x >= 102 && pos_x <= 152) {
  113.       motor_speed = map(pos_y, 102, 0, 0, 255);
  114.       motor_run(motor_speed, 0, motor_speed, 0, 0);
  115.     }
  116.  
  117.     //後進
  118.     else if ( pos_y >= 152 && pos_x >= 102 && pos_x <= 152) {
  119.       motor_speed = map(pos_y, 152, 255, 0, 255) ;
  120.       motor_run(motor_speed, 1, motor_speed, 1, 0);
  121.     }
  122.  
  123.     //前進右緩旋回、信地旋回
  124.     //else if ( pos_y <= 102 && pos_x > 152 && pos_x <= 245) {
  125.     else if ( pos_y <= 102 && pos_x >= 152) {
  126.       motor_speed = map(pos_y, 102, 0, 0, 255);
  127.       steering = motor_speed * (1.00 - (map(pos_x, 152, 255, 0, 255) / 255.00));
  128.       motor_run(motor_speed, 0, steering, 0, 0);
  129.     }
  130.  
  131.     //前進左緩旋回、信地旋回
  132.     //else if ( pos_y <= 102 && pos_x < 102 && pos_x >= 10) {
  133.     else if ( pos_y <= 102 && pos_x <= 102) {
  134.       motor_speed = map(pos_y, 102, 0, 0, 255);
  135.       steering = motor_speed * (1.00 - (map(pos_x, 102, 0, 0, 255) / 255.00));
  136.       motor_run(steering, 0, motor_speed, 0, 0);
  137.     }
  138.  
  139.     //後進右緩旋回、信地旋回
  140.     //else if ( pos_y >= 152 && pos_x > 152 && pos_x <= 245) {
  141.     else if ( pos_y >= 152 && pos_x >= 152 ) {
  142.       motor_speed = map(pos_y, 152, 255, 0, 255);
  143.       steering = motor_speed * (1.00 - (map(pos_x, 152, 255, 0, 255) / 255.00));
  144.       motor_run(motor_speed, 1, steering, 1, 0);
  145.     }
  146.  
  147.     //後進左緩旋回、信地旋回
  148.     //else if ( pos_y >= 152 && pos_x < 102 && pos_x >= 10) {
  149.     else if ( pos_y >= 152 && pos_x <= 102 ) {
  150.       motor_speed = map(pos_y, 152, 255, 0, 255);
  151.       steering = motor_speed * (1.00 - (map(pos_x, 102, 0, 0, 255) / 255.00));
  152.       motor_run(steering, 1, motor_speed, 1, 0);
  153.     }
  154.  
  155.     //右超信地旋回
  156.     else if (pos_x >= 245 && pos_y >= 102 && pos_y <= 152) {
  157.       motor_speed = 165;
  158.       motor_run(motor_speed, 0, motor_speed, 1, 0);
  159.     }
  160.  
  161.     //左超信地旋回
  162.     else if (pos_x <= 10 && pos_y >= 102 && pos_y <= 152) {
  163.       motor_speed = 165;
  164.       motor_run(motor_speed, 1, motor_speed, 0, 0);
  165.     }
  166.  
  167.     else { //停止(ブレーキ)
  168.       motor_run(0, 0, 0, 0, 1);
  169.     }
  170.   }
  171. }
  172.  
  173.  
  174. void motor_run(int D0, int D1, int D2, int D3, int D4) {
  175.   /* D0 : モータスピード(左)
  176.      D1 : モータA(左)1 = HIGH / 0 = LOW
  177.      D2 : モータスピード(右)
  178.      D3 : モータB(右)1 = HIGH / 0 = LOW
  179.      D4 : LED_3 ON/OFF 1 = HIGH / 0 = LOW
  180.   */
  181.   //analogWrite(PWMA, D0);
  182.   ledcWrite(PWMA, D0); //(チャンネル,解像度)
  183.   digitalWrite(AIN1, D1);
  184.   //analogWrite(PWMB, D2);
  185.   ledcWrite(PWMB, D2); //(チャンネル,解像度)
  186.   digitalWrite(BIN1, D3);
  187.   digitalWrite(LED_8, D4);
  188.  
  189.   /*Serial.print(" D0="); Serial.print(D0);
  190.   Serial.print(" D1="); Serial.print(D1);
  191.   Serial.print(" D2="); Serial.print(D2);
  192.   Serial.print(" D3="); Serial.print(D3);
  193.   Serial.print(" D4="); Serial.println(D4);
  194.   */
  195. }
 

ESP32 Dev ModuleでRC戦車コントロール(IR対戦仕様)

2022-06-08 22:40:35 | RC可動コントロール

2022-06-08
ESP32 Dev ModuleでRC可動戦車コントロールの第2段、今回はIR対戦仕様の実験です。

Arduino用に作成したスケッチをESP32用に変更します。
ESP32用のIR送受信のライブラリは IRremoteESP8266.h を使います。
コマンドは少し変更するだけで利用できました。
注意が必要なのは、自分の送信した赤外線信号の反射を誤受信しない様に、
送信の前後は受信中止にしておくことが必要ということです。
Arduino用は受信再開コマンドだけでよかったのですが、ESP32用は受信中止コマンドも必要でした。

▼M26実装基板と同じ形に組上げました。
左下がモータドライバーDVR8835(秋月電子)、右下は5V出力DC昇圧コンバータ(Amazon)。
ESP32の左側にJQ6500(MP3プレーヤー)のUSBコネクタが覗いています。

▼ギヤードモータx2、サーボモータx3(内1個は連続回転仕様)、
LED、赤外線LED、赤外線受光素子、スピーカなどを接続。

▼IR対戦用送受信チェッカ

▼テスト機器全景


▼実験中の動画です。
ESP32 Dev ModuleでRC戦車コントロール(IR対戦仕様)  

追伸:画像撮影後ですが、技適取得済の正規PS3コントローラの中古を○○カリで入手しました。


▼回路
回路図中でブレーキ、ヘッドライトのLEDは1個で書いてありますが、
実態は太線枠内の様に左右2個です。
IR発光LEDの電流はトランジスタ(2SC1815など)を介して増幅しています。

画像をクリックすると拡大します

▼スケッチ(プログラム)

  1. /*PS3_ESP32_tank_JQ6500mp3_DRV8835_IR_v6.0a
  2.   2022-06-07
  3.    【操作方法】
  4.   PS3コントローラで操縦します。
  5.   車体の電源をONし、コントローラのPSボタンでペアリング開始。
  6.   インジケータランプ4個高速点滅後に1個点灯でペアリング完了。
  7.   コントローラーの左スティック上下で前後進、右スティックの左右でステアリングを制御。
  8.   ステアリングを切っていくと緩旋回、一杯切るとで信地旋回する。
  9.   また、左スティック中央でステアリング左右一杯で超信地旋回。
  10.   △ボタンで砲身UP、?ボタンで砲身DOWN、□ボタンでセンター位置になる。
  11.   左スティック左右で砲塔旋回。離した位置で止まる。
  12.   R1ボタンで主砲発射。L1ボタンで機銃射撃。
  13.   RIGHTボタンでヘッドライト点灯、LEFTボタンで消灯。
  14.   砲撃時のリコイルアクション車体+砲身
  15.   IR発光、受光装置を付けるとIR対戦可能。
  16.   メインCPU:  ESP32 DevKitC
  17.   モータドライバ:DRV8835
  18.   MP3プレイヤー:JQ6500 MP3プレイヤーモジュール
  19. */
  20.  
  21. #include <Arduino.h>
  22. //#include "SoftwareSerial.h"
  23. //#include "DFRobotDFPlayerMini.h"
  24. #include <JQ6500_Serial.h>
  25. #include <IRremoteESP8266.h>
  26. #include <IRsend.h>
  27. const uint16_t kIrLed = 4;
  28. IRsend irsend(kIrLed);
  29. uint16_t rawData[5] = {4150, 1000, 2050, 2000, 1000};
  30.  
  31. #include <IRrecv.h>
  32. //#include <IRac.h>
  33. //#include <IRtext.h>
  34. #include <IRutils.h>
  35.  
  36. const uint16_t kRecvPin = 13;
  37. IRrecv irrecv(kRecvPin);
  38.  
  39. decode_results results;
  40. //const long sign_hit = 0x4CB0FADD;
  41. const uint32_t value = 0x4CB0FADD;
  42.  
  43. HardwareSerial Serial_df(2);
  44. JQ6500_Serial mp3(Serial_df);
  45. void printDetail(uint8_t type, int value);
  46. #include <Ps3Controller.h>
  47. #include <ESP32Servo.h>
  48. Servo servo1;
  49. int servo1Pin = 27;
  50. Servo servo2;
  51. int servo2Pin = 14;
  52. Servo servo3;
  53. int servo3Pin = 12;
  54.  
  55. int LED_1 = 23; //ブレーキランプ
  56. int LED_2 = 22; //ヘッドライト
  57. int LED_3 = 19; //砲撃
  58. int LED_4 = 18; //銃撃
  59. int k = 0;
  60. int s = 0;
  61. int d_time = 30;
  62. int angle_servo1 = 95; // 上下
  63. int anglenow = angle_servo1 ;
  64. int angle_servo3 = 90; // リコイル
  65. int motor_speed;
  66. float steering;
  67. int pos_y;
  68. int pos_x;
  69. int pos_lx;
  70.  
  71. int AIN1 = 32; // A入力1/APHASE 左モータ AIN1
  72. int BIN1 = 25; // B入力1/BPHASE 右モータ BIN1
  73. int PWMApin = 33; //A5; // A入力2/AENABLE 左モータ AIN2 IO33 A5
  74. int PWMBpin = 26; //A19; // B入力2/BENABLE 右モータ BIN2 IO26 (IO0は起動時不安定)A19
  75. int PWMA = 2; //PWMAチャンネル 0=NG 1=NG 0〜15
  76. int PWMB = 3; //PWMBチャンネル 0=NG 1=NG 0〜15 
  77. int cnt = 0;
  78.  
  79. void setup() {
  80.   irsend.begin();
  81.   irrecv.enableIRIn();
  82.  
  83.   servo1.setPeriodHertz(50);
  84.   servo1.attach(servo1Pin, 500, 2400);
  85.   servo2.setPeriodHertz(50);
  86.   servo2.attach(servo2Pin, 900, 2100);
  87.   servo3.setPeriodHertz(50);
  88.   servo3.attach(servo3Pin, 500, 2400);
  89.   Serial.begin(115200);
  90.   Serial_df.begin(9600); // RX2 = 16, TX2 = 17
  91.   mp3.reset();
  92.   mp3.setVolume(25);
  93.  
  94.   Ps3.begin("00:11:22:33:44:55"); // PS3-Eコントローラ SixaxisPairToolで調べたmac adresに修正
  95.   Serial.println("PS3 Ready");
  96.  
  97.   ledcSetup(PWMA, 12000, 8); //チャンネル,周波数,解像度(8bit=256段階)
  98.   ledcAttachPin(PWMApin, PWMA); //ledPinをPWMCHチャンネルに接続
  99.   ledcSetup(PWMB, 12000, 8); //チャンネル,周波数,解像度(8bit=256段階)
  100.   ledcAttachPin(PWMBpin, PWMB); //ledPinをPWMCHチャンネルに接続
  101.   pinMode(AIN1, OUTPUT);
  102.   pinMode(BIN1, OUTPUT);
  103.   pinMode(LED_1, OUTPUT);
  104.   pinMode(LED_2, OUTPUT);
  105.   pinMode(LED_3, OUTPUT);
  106.   pinMode(LED_4, OUTPUT);
  107.  
  108.   LEDtenmetsu(LED_2);
  109.  
  110.   servo1.write(angle_servo1); // 0 - 180
  111.   delay(100);
  112.   servo2.write(90); // 0 - 180
  113.   delay(100);
  114.   servo3.write(angle_servo3); // 0 - 180
  115.   delay(100);
  116.  
  117.   //myDFPlayer.play(3); //エンジン始動
  118.   mp3.playFileByIndexNumber(3);
  119.   delay(1000);
  120.  
  121. }
  122.  
  123. void loop() {
  124.   //被弾チェック
  125.   HitCHK();
  126.  
  127.   if (Ps3.isConnected()) {
  128.     pos_lx = Ps3.data.analog.stick.lx;
  129.     pos_lx = pos_lx + 128;
  130.  
  131.     //砲塔旋回
  132.     if ( pos_lx > 230) { //右旋回
  133.       servo2.write(80);
  134.     } else if (pos_lx < 25) { //左旋回
  135.       servo2.write(100);
  136.     } else { //停止
  137.       servo2.write(90);
  138.     }
  139.  
  140.     //砲身上下
  141.     if ( Ps3.event.button_down.square) { // center
  142.       if (anglenow > angle_servo1) {
  143.         for (anglenow = anglenow; anglenow >= angle_servo1; anglenow -= 1) {
  144.           servo1.write(anglenow);
  145.           delay(40);
  146.         }
  147.       }
  148.       else {
  149.         for (anglenow = anglenow; anglenow <= angle_servo1; anglenow += 1) {
  150.           servo1.write(anglenow);
  151.           delay(40);
  152.         }
  153.       }
  154.     }
  155.  
  156.     if ( Ps3.event.button_down.triangle) { // up
  157.       for (anglenow = anglenow; anglenow <= (angle_servo1+60); anglenow += 1 ) {
  158.         servo1.write(anglenow);
  159.         delay(40);
  160.       }
  161.     }
  162.  
  163.     if ( Ps3.event.button_down.cross) { // down
  164.       for (anglenow = anglenow; anglenow >= (angle_servo1-15); anglenow -= 1 ) {
  165.         servo1.write(anglenow);
  166.         delay(40);
  167.       }
  168.     }
  169.  
  170.     if (Ps3.event.button_down.circle) {
  171.       if (s == 0) {
  172.         s = 1;
  173.         //myDFPlayer.play(3); //エンジン始動
  174.         mp3.playFileByIndexNumber(3);
  175.         delay(1000);
  176.         mp3.playFileByIndexNumber(5);
  177.         mp3.setLoopMode(MP3_LOOP_ONE);
  178.         delay(d_time);
  179.       } else {
  180.         mp3.setLoopMode(MP3_LOOP_ONE_STOP);
  181.         s = 0;
  182.         delay(100);
  183.       }
  184.     }
  185.  
  186.     if (Ps3.event.button_down.r3) {
  187.       mp3.setLoopMode(MP3_LOOP_ONE_STOP);
  188.       s = 0;
  189.     }
  190.  
  191.     if (Ps3.event.button_down.right) {
  192.       digitalWrite(LED_2, HIGH); // Headlight ON
  193.     }
  194.  
  195.     if (Ps3.event.button_down.left) {
  196.       digitalWrite(LED_2, LOW); // Headlight off
  197.     }
  198.  
  199.     if (Ps3.event.button_down.r1) { //砲撃 + リコイル(砲身&車体)
  200.       digitalWrite(LED_3, HIGH); //主砲発光
  201.       fire();
  202.       //myDFPlayer.play(26);
  203.       mp3.playFileByIndexNumber(2);
  204.       delay(50);
  205.       servo3.write(angle_servo3 - 40); // 砲身リコイル
  206.       delay(20);
  207.       motor_run(180, 1, 180, 1, 1); // 車体リコイル
  208.       delay(60);
  209.       motor_run(0, 0, 0, 0, 1);
  210.       digitalWrite(LED_3, LOW);
  211.       for (int ang3 = (angle_servo3 - 30); ang3 <= angle_servo3; ang3 += 1 ) {
  212.         servo3.write(ang3);
  213.         delay(20);
  214.       }
  215.       //digitalWrite(LED_3, LOW);
  216.       motor_run(100, 0, 100, 0, 1);
  217.       delay(80);
  218.       motor_run(0, 0, 0, 0, 1);
  219.       delay(100);
  220.       if (s == 1) {
  221.         //myDFPlayer.loop(5); //Loop 5th mp3 アイドリング
  222.         mp3.playFileByIndexNumber(5);
  223.         mp3.setLoopMode(MP3_LOOP_ONE);
  224.         delay(d_time);
  225.       }
  226.     }
  227.  
  228.     if (Ps3.event.button_down.l1) { //銃撃
  229.       mp3.playFileByIndexNumber(24);
  230.       for ( k = 0; k < 6; k++) {
  231.         digitalWrite(LED_4, HIGH); //発光
  232.         delay(80);
  233.         digitalWrite(LED_4, LOW);
  234.         delay(120);
  235.       }
  236.       if (s == 1) {
  237.         mp3.playFileByIndexNumber(5);
  238.         mp3.setLoopMode(MP3_LOOP_ONE);
  239.         delay(d_time);
  240.       }
  241.     }
  242.  
  243.     //走行コントロール
  244.     pos_y = Ps3.data.analog.stick.ly;
  245.     pos_x = Ps3.data.analog.stick.rx;
  246.     pos_y = pos_y + 128;
  247.     pos_x = pos_x + 128;
  248.  
  249.     //前進
  250.     if (pos_y <= 102 && pos_x >= 102 && pos_x <= 152) {
  251.       motor_speed = map(pos_y, 102, 0, 0, 255);
  252.       motor_run(motor_speed, 0, motor_speed, 0, 0);
  253.     }
  254.  
  255.     //後進
  256.     else if ( pos_y >= 152 && pos_x >= 102 && pos_x <= 152) {
  257.       motor_speed = map(pos_y, 152, 255, 0, 255) ;
  258.       motor_run(motor_speed, 1, motor_speed, 1, 0);
  259.     }
  260.  
  261.     //前進右緩旋回、信地旋回
  262.     //else if ( pos_y <= 102 && pos_x > 152 && pos_x <= 245) {
  263.     else if ( pos_y <= 102 && pos_x >= 152) {
  264.       motor_speed = map(pos_y, 102, 0, 0, 255);
  265.       steering = motor_speed * (1.00 - (map(pos_x, 152, 255, 0, 255) / 255.00));
  266.       motor_run(motor_speed, 0, steering, 0, 0);
  267.     }
  268.  
  269.     //前進左緩旋回、信地旋回
  270.     //else if ( pos_y <= 102 && pos_x < 102 && pos_x >= 10) {
  271.     else if ( pos_y <= 102 && pos_x <= 102) {
  272.       motor_speed = map(pos_y, 102, 0, 0, 255);
  273.       steering = motor_speed * (1.00 - (map(pos_x, 102, 0, 0, 255) / 255.00));
  274.       motor_run(steering, 0, motor_speed, 0, 0);
  275.     }
  276.  
  277.     //後進右緩旋回、信地旋回
  278.     //else if ( pos_y >= 152 && pos_x > 152 && pos_x <= 245) {
  279.     else if ( pos_y >= 152 && pos_x >= 152 ) {
  280.       motor_speed = map(pos_y, 152, 255, 0, 255);
  281.       steering = motor_speed * (1.00 - (map(pos_x, 152, 255, 0, 255) / 255.00));
  282.       motor_run(motor_speed, 1, steering, 1, 0);
  283.     }
  284.  
  285.     //後進左緩旋回、信地旋回
  286.     //else if ( pos_y >= 152 && pos_x < 102 && pos_x >= 10) {
  287.     else if ( pos_y >= 152 && pos_x <= 102 ) {
  288.       motor_speed = map(pos_y, 152, 255, 0, 255);
  289.       steering = motor_speed * (1.00 - (map(pos_x, 102, 0, 0, 255) / 255.00));
  290.       motor_run(steering, 1, motor_speed, 1, 0);
  291.     }
  292.  
  293.     //右超信地旋回
  294.     else if (pos_x >= 245 && pos_y >= 102 && pos_y <= 152) {
  295.       motor_speed = 204;
  296.       motor_run(motor_speed, 0, motor_speed, 1, 0);
  297.     }
  298.  
  299.     //左超信地旋回
  300.     else if (pos_x <= 10 && pos_y >= 102 && pos_y <= 152) {
  301.       motor_speed = 204;
  302.       motor_run(motor_speed, 1, motor_speed, 0, 0);
  303.     }
  304.  
  305.     else { //停止(ブレーキ)
  306.       motor_run(0, 0, 0, 0, 1);
  307.     }
  308.   }
  309. }
  310.  
  311.  
  312. void motor_run(int D0, int D1, int D2, int D3, int D4) {
  313.  
  314.   ledcWrite(PWMA, D0); //(チャンネル,解像度)
  315.   digitalWrite(AIN1, D1);
  316.   ledcWrite(PWMB, D2); //(チャンネル,解像度)
  317.   digitalWrite(BIN1, D3);
  318.   digitalWrite(LED_1, D4);
  319. }
  320.  
  321. void LEDtenmetsu(int LED) {
  322.   for (int i = 0; i < 2; i++) {
  323.     digitalWrite(LED, HIGH);
  324.     delay(500);
  325.     digitalWrite(LED, LOW);
  326.     delay(500);
  327.   }
  328. }
  329.  
  330. void fire() {
  331.   irrecv.disableIRIn(); // 自らの送信を誤受信しないように受信を停止  
  332.   irsend.sendRaw(rawData, 5, 38); //irsend.sendRaw(data buf, length, hertz)
  333.   delay(10);
  334.   irrecv.enableIRIn(); // 受信を再開する  
  335. }
  336.  
  337. void HitCHK() {
  338.   if (irrecv.decode(&results)) { // 受信コードの値が
  339.     if (results.value == value) { // 0x4CB0FADDだったら被弾
  340.       mp3.playFileByIndexNumber(17);
  341.       Hit(); //被弾
  342.     }
  343.     irrecv.resume();
  344.     delay(10);
  345.   }
  346. }
  347.  
  348. // ====被弾====
  349. void Hit() {
  350.   motor_run(180, 1, 180, 0, 0);
  351.   delay(100);
  352.   motor_run(0, 0, 0, 0, 1);
  353.   delay(50);
  354.   motor_run(180, 0, 180, 1, 0);
  355.   delay(80);
  356.   motor_run(0, 0, 0, 0, 1);
  357.   delay(50);
  358.   cnt++;
  359.   if ( cnt >= 5 ) {
  360.     mp3.playFileByIndexNumber(18);
  361.     motor_run(0, 0, 0, 0, 0);
  362.     for ( int i = 0; i < 15 ; i++) {
  363.       digitalWrite(LED_2, HIGH);
  364.       delay(1000);
  365.       digitalWrite(LED_2, LOW);
  366.       delay(1000);
  367.     } //復活までに15秒
  368.     cnt = 0;
  369.   } else {
  370.     delay(1000);
  371.   }
  372. }

ESP32 Dev ModuleでRC可動戦車コントロール

2022-05-29 11:42:56 | RC可動コントロール

2002-05-29
前回、ArduinoでコントロールしていたものをM5Stamp PICOに換装する検討をしました。
結果、出力端子が足りないことも有って、RCカーで実現させました。
I2Cモータドライバを使用したり、子機と通信して対応すれば良さそうですが。。。。

今回はM5の親方に当たるESP32でRC可動戦車のコントロールを検討してみます。
プログラミングは使い慣れたArduino IDEを使用します。
利用できないライブラリーも有りますが、かなりの点でこれまで作ったスケッチが再利用できます。

▼画像上がESP32 Dev Modele、下がM5Stamp picoです。

▼ESP32をArduino IDEで使うための環境設定は他のブログなどを参照するとして、
ボードの設定は下記のとおりです。(細かな設定は変更していません)

▼ESP32にDCモータ2個、MP3プレーヤ、サーボモータ3個(1個は連続回転改造済み)を接続しています。
基板上にはDRV8835モータドライバ(秋月電子)、4個のLED、スイッチ、5V出力昇圧コンバータをセットしています。
電源は3.7v LiPoバッテリです。
MP3プレーヤはJQ6500を使っています。(スケッチは変更要ですがDFPlayer miniでも動作確認済みです)

ESP32 Dev ModuleでRC可動戦車コントロール

▼回路図
画像をクリックすると拡大します

▼スケッチ

  1. /*PS3_ESP32_tank_JQ6500mp3_DRV8835_v6.0
  2.    2022-05-28
  3. */
  4.  
  5. #include <Arduino.h> // Arduino ヘッダインクルード
  6. #include <JQ6500_Serial.h>
  7.  
  8. HardwareSerial Serial_df(2); // use HardwareSerial UART2 (16pin=RX, 17pin=TX)
  9. JQ6500_Serial mp3(Serial_df);
  10.  
  11. void printDetail(uint8_t type, int value);
  12. #include <Ps3Controller.h>
  13. #include <ESP32Servo.h>
  14. Servo servo1; // create four servo objects
  15. int servo1Pin = 27;
  16. Servo servo2;
  17. int servo2Pin = 14;
  18. Servo servo3;
  19. int servo3Pin = 12;
  20. int LED_1 = 23; //ブレーキランプ
  21. int LED_2 = 22; //ヘッドライト
  22. int LED_3 = 19; //砲撃
  23. int LED_4 = 18; //銃撃
  24. int k = 0;
  25. int s = 0;
  26. int d_time = 100;
  27. int angle_servo1 = 90; // 上下
  28. int anglenow = angle_servo1 ;
  29. int angle_servo3 = 90; // リコイル
  30. int motor_speed;
  31. float steering;
  32. int pos_y;
  33. int pos_x;
  34. int pos_lx;
  35. int AIN1 = 32; // A入力1/APHASE 左モータ AIN1
  36. int BIN1 = 25; // B入力1/BPHASE 右モータ BIN1
  37. int PWMApin = 33; //A5; // A入力2/AENABLE 左モータ AIN2 IO33 A5
  38. int PWMBpin = 26; //A19; // B入力2/BENABLE 右モータ BIN2 IO26 (IO0は起動時不安定)A19
  39. int PWMA = 2; //PWMAチャンネル 0=NG 1=NG 0〜15
  40. int PWMB = 3; //PWMBチャンネル 0=NG 1=NG 0〜15 
  41.  
  42. void setup() {
  43.   servo1.setPeriodHertz(50);
  44.   servo1.attach(servo1Pin, 500, 2400);
  45.   servo2.setPeriodHertz(50);
  46.   servo2.attach(servo2Pin, 900, 2100);
  47.   servo3.setPeriodHertz(50);
  48.   servo3.attach(servo3Pin, 500, 2400);
  49.   Serial.begin(115200);
  50.   Serial_df.begin(9600); // RX2 = 16, TX2 = 17
  51.   mp3.reset();
  52.   mp3.setVolume(22);
  53.  
  54.   Ps3.begin("00:11:22:33:44:55"); //SixaxisPairToolで調べたmac adresに修正
  55.   Serial.println("PS3 Ready");
  56.  
  57.   ledcSetup(PWMA, 12000, 8); //チャンネル,周波数,解像度(8bit=256段階)
  58.   ledcAttachPin(PWMApin, PWMA); //ledPinをPWMCHチャンネルに接続
  59.   ledcSetup(PWMB, 12000, 8); //チャンネル,周波数,解像度(8bit=256段階)
  60.   ledcAttachPin(PWMBpin, PWMB); //ledPinをPWMCHチャンネルに接続
  61.   pinMode(AIN1, OUTPUT);
  62.   pinMode(BIN1, OUTPUT);
  63.   pinMode(LED_1, OUTPUT);
  64.   pinMode(LED_2, OUTPUT);
  65.   pinMode(LED_3, OUTPUT);
  66.   pinMode(LED_4, OUTPUT);
  67.  
  68.   LEDtenmetsu(LED_2);
  69.  
  70.   servo1.write(angle_servo1); // 0 - 180
  71.   delay(100);
  72.   servo2.write(90); // 0 - 180
  73.   delay(100);
  74.   servo3.write(angle_servo3); // 0 - 180
  75.   delay(100);
  76.   mp3.playFileByIndexNumber(3);
  77.   delay(2000);
  78.  
  79. }
  80.  
  81. void loop() {
  82.   if (Ps3.isConnected()) {
  83.     pos_lx = Ps3.data.analog.stick.lx;
  84.     pos_lx = pos_lx + 128;
  85.  
  86.     //砲塔旋回
  87.     if ( pos_lx > 230) { //右旋回
  88.       servo2.write(80);
  89.     } else if (pos_lx //左旋回
  90.       servo2.write(100);
  91.     } else { //停止
  92.       servo2.write(90);
  93.     }
  94.  
  95.  
  96.     //砲身上下
  97.     if ( Ps3.event.button_down.square) { // center
  98.       if (anglenow > 90) {
  99.         for (anglenow = anglenow; anglenow >= 90; anglenow -= 1) {
  100.           servo1.write(anglenow);
  101.           delay(40);
  102.         }
  103.       }
  104.       else {
  105.         for (anglenow = anglenow; anglenow <= 90; anglenow += 1) {
  106.           servo1.write(anglenow);
  107.           delay(40);
  108.         }
  109.       }
  110.     }
  111.  
  112.     if ( Ps3.event.button_down.triangle) { // up
  113.       for (anglenow = anglenow; anglenow <= 135; anglenow += 1 ) {
  114.         servo1.write(anglenow);
  115.         delay(40);
  116.       }
  117.       //delay(100);
  118.     }
  119.  
  120.     if ( Ps3.event.button_down.cross) { // down
  121.       for (anglenow = anglenow; anglenow >= 45; anglenow -= 1 ) {
  122.         servo1.write(anglenow);
  123.         delay(40);
  124.       }
  125.     }
  126.  
  127.     if (Ps3.event.button_down.circle) {
  128.       if (s == 0) {
  129.         s = 1;
  130.         //myDFPlayer.play(3); //エンジン始動
  131.         mp3.playFileByIndexNumber(3);
  132.         delay(2000);
  133.         //myDFPlayer.loop(5); //Loop 5th mp3 アイドリング
  134.         mp3.playFileByIndexNumber(5);
  135.         mp3.setLoopMode(MP3_LOOP_ONE);
  136.         delay(d_time);
  137.       } else {
  138.         mp3.setLoopMode(MP3_LOOP_ONE_STOP);
  139.         s = 0;
  140.         delay(500);
  141.       }
  142.     }
  143.  
  144.     if (Ps3.event.button_down.r3) {
  145.       mp3.setLoopMode(MP3_LOOP_ONE_STOP);
  146.       s = 0;
  147.     }
  148.  
  149.     if (Ps3.event.button_down.right) {
  150.       digitalWrite(LED_2, HIGH); // Headlight ON
  151.     }
  152.  
  153.     if (Ps3.event.button_down.left) {
  154.       digitalWrite(LED_2, LOW); // Headlight off
  155.     }
  156.  
  157.     if (Ps3.event.button_down.r1) { //砲撃 + リコイル(砲身&車体)
  158.       digitalWrite(LED_3, HIGH); //主砲発光
  159.       //myDFPlayer.play(26);
  160.       mp3.playFileByIndexNumber(26);
  161.       delay(50);
  162.       servo3.write(angle_servo3 - 30); // 砲身リコイル
  163.       delay(20);
  164.       motor_run(180, 1, 180, 1, 1); // 車体リコイル
  165.       delay(80);
  166.       motor_run(0, 0, 0, 0, 1);
  167.       digitalWrite(LED_3, LOW);
  168.       for (int ang3 = (angle_servo3 - 30); ang3 <= angle_servo3; ang3 += 1 ) {
  169.         servo3.write(ang3);
  170.         delay(20);
  171.       }
  172.       motor_run(60, 0, 60, 0, 1);
  173.       delay(290);
  174.       motor_run(0, 0, 0, 0, 1);
  175.       delay(100);
  176.       if (s == 1) {
  177.         mp3.playFileByIndexNumber(5);
  178.         mp3.setLoopMode(MP3_LOOP_ONE);
  179.         delay(d_time);
  180.       }
  181.     }
  182.  
  183.     if (Ps3.event.button_down.l1) { //銃撃
  184.       mp3.playFileByIndexNumber(24);
  185.       for ( k = 0; k
  186.         digitalWrite(LED_4, HIGH); //発光
  187.         delay(80);
  188.         digitalWrite(LED_4, LOW);
  189.         delay(120);
  190.       }
  191.       if (s == 1) {
  192.         mp3.playFileByIndexNumber(5);
  193.         mp3.setLoopMode(MP3_LOOP_ONE);
  194.         delay(d_time);
  195.       }
  196.     }
  197.  
  198.     //走行コントロール
  199.     pos_y = Ps3.data.analog.stick.ly;
  200.     pos_x = Ps3.data.analog.stick.rx;
  201.     pos_y = pos_y + 128;
  202.     pos_x = pos_x + 128;
  203.  
  204.     //前進
  205.     if (pos_y <= 102 && pos_x >= 102 && pos_x <= 152) {
  206.       motor_speed = map(pos_y, 102, 0, 0, 255);
  207.       motor_run(motor_speed, 0, motor_speed, 0, 0);
  208.     }
  209.  
  210.     //後進
  211.     else if ( pos_y >= 152 && pos_x >= 102 && pos_x <= 152) {
  212.       motor_speed = map(pos_y, 152, 255, 0, 255) ;
  213.       motor_run(motor_speed, 1, motor_speed, 1, 0);
  214.     }
  215.  
  216.     //前進右緩旋回、信地旋回
  217.     //else if ( pos_y <= 102 && pos_x > 152 && pos_x <= 245) {
  218.     else if ( pos_y <= 102 && pos_x >= 152) {
  219.       motor_speed = map(pos_y, 102, 0, 0, 255);
  220.       steering = motor_speed * (1.00 - (map(pos_x, 152, 255, 0, 255) / 255.00));
  221.       motor_run(motor_speed, 0, steering, 0, 0);
  222.     }
  223.  
  224.     //前進左緩旋回、信地旋回
  225.     //else if ( pos_y <= 102 && pos_x < 102 && pos_x >= 10) {
  226.     else if ( pos_y <= 102 && pos_x <= 102) {
  227.       motor_speed = map(pos_y, 102, 0, 0, 255);
  228.       steering = motor_speed * (1.00 - (map(pos_x, 102, 0, 0, 255) / 255.00));
  229.       motor_run(steering, 0, motor_speed, 0, 0);
  230.     }
  231.  
  232.     //後進右緩旋回、信地旋回
  233.     //else if ( pos_y >= 152 && pos_x > 152 && pos_x <= 245) {
  234.     else if ( pos_y >= 152 && pos_x >= 152 ) {
  235.       motor_speed = map(pos_y, 152, 255, 0, 255);
  236.       steering = motor_speed * (1.00 - (map(pos_x, 152, 255, 0, 255) / 255.00));
  237.       motor_run(motor_speed, 1, steering, 1, 0);
  238.     }
  239.  
  240.     //後進左緩旋回、信地旋回
  241.     //else if ( pos_y >= 152 && pos_x < 102 && pos_x >= 10) {
  242.     else if ( pos_y >= 152 && pos_x <= 102 ) {
  243.       motor_speed = map(pos_y, 152, 255, 0, 255);
  244.       steering = motor_speed * (1.00 - (map(pos_x, 102, 0, 0, 255) / 255.00));
  245.       motor_run(steering, 1, motor_speed, 1, 0);
  246.     }
  247.  
  248.     //右超信地旋回
  249.     else if (pos_x >= 245 && pos_y >= 102 && pos_y <= 152) {
  250.       motor_speed = 204;
  251.       motor_run(motor_speed, 0, motor_speed, 1, 0);
  252.     }
  253.  
  254.     //左超信地旋回
  255.     else if (pos_x <= 10 && pos_y >= 102 && pos_y <= 152) {
  256.       motor_speed = 204;
  257.       motor_run(motor_speed, 1, motor_speed, 0, 0);
  258.     }
  259.  
  260.     else { //停止(ブレーキ)
  261.       motor_run(0, 0, 0, 0, 1);
  262.     }
  263.   }
  264. }
  265.  
  266.  
  267. void motor_run(int D0, int D1, int D2, int D3, int D4) {
  268.   ledcWrite(PWMA, D0); //(チャンネル,解像度)
  269.   digitalWrite(AIN1, D1);
  270.   //analogWrite(PWMB, D2);
  271.   ledcWrite(PWMB, D2); //(チャンネル,解像度)
  272.   digitalWrite(BIN1, D3);
  273.   digitalWrite(LED_1, D4);
  274. }
  275.  
  276. void LEDtenmetsu(int LED) {
  277.   for (int i = 0; i
  278.     digitalWrite(LED, HIGH);
  279.     delay(500);
  280.     digitalWrite(LED, LOW);
  281.     delay(500);
  282.   }
  283. }


▼私が購入した物(VKLSVAN 2個セット JQ6500:現在在庫切れ)ではないですが。。。。


ミニ四駆 ランドクルーザー 製作&RC化 (M5Stamp PICO編)

2022-05-16 22:00:37 | RC可動コントロール

2022-05-16

またまた寄り道です。

▼下記ブログでで書いた様にRC化の新しいツールを勉強中です。
いろいろ試している中で、何とかRCカーに利用できるところまでできました。


1/72 T-2 ブルーインパルス 製作(その3) - Ganponブログ

2022-05-11早い方なら1日で完成させる1/72ジェット機ですが、あまり進んでおりません。まさに牛の歩みです。▼主翼と水平尾翼を取付け、接合部を均し、不要な穴(赤丸)をイ...

goo blog


▼という事で、2年前にArduino pro miniで完成しているミニ四駆ランクルに換装しました。


「RC化ミニ四駆」のブログ記事一覧-Ganponブログ

「RC化ミニ四駆」のブログ記事一覧です。趣味の模型作り、ドライブ、旅行などsince Mar.2017【Ganponブログ】

goo blog


▼画像の上がArduino pro mini+ミニUSBホストシールド(Bluetooth USBアダプタ装着)、
下がM5Stamp PICOです。

▼M5Stamp PICOをセット。

換装して動作確認すると動かない。
プログラムや接続などチェックすると、リード線がはんだ付け部であちこち切れていました。
こんな事を繰り返して、やっと完成。

以下に、備忘録としてプログラムと回路を残します。


【スケッチを書き込む準備】

(注1)サーボを制御するために「ESP32Servo.h」をインストール。

(注2)ESP32ライブラリV1.0.4をインストール。

(注3)下記スケッチをM5Stamp PICOに書き込み実行。

void setup(void) {
Serial.begin(115200);
uint8_t btmac[6];
delay(500);
esp_read_mac(btmac, ESP_MAC_BT);
Serial.printf("[Bluetooth] Mac Address = %02X:%02X:%02X:%02X:%02X:%02X\r\n", btmac[0], btmac[1], btmac[2], btmac[3], btmac[4], btmac[5]);
}
void loop() {
}

シリアルモニタにアドレスが表示されるのでメモしておく。

次に、SixaxisPairTool でPS3のコントローラにMac Addressを書き込む
1. PS3コントローラをMiniUSBケーブルでPCに繋ぐ。
2. SixaxisPairToolを実行し、メモしたアドレスを入力してUpdateボタンを押すと書き込みが完了。

(参考)「ESP32でPS3コントローラを使う」をキーにネット検索すると参考になる記述が見つかります。


▼スケッチ(プログラム)/Arduino IDE用 

  1. /*PS4BT_Arduino_DRV8835_RCCAR_04a
  2.    2020/05/14
  3.   PS4BT_Arduino_DRV8835_RCCAR_02a
  4.   左十字キーTRIANGLEで高速モード、CROSSで低速(70%)モード
  5.   ステアリング角度をスティック角比例にする
  6.   モータドライバはDRV8835
  7.    3ピンでステアリングサーボを動かす
  8. */
  9.  
  10. #include <Arduino.h> // Arduino ヘッダインクルード
  11. #include "M5Atom.h"
  12.  
  13. #include <FastLED.h> // LED操作用ライブラリインクルード(3.5.0を使用)
  14. #define NUM_LEDS 1
  15. #define DATA_PIN 27
  16. CRGB leds[NUM_LEDS];
  17.  
  18. #include <Ps3Controller.h>
  19.  
  20. #include <ESP32Servo.h>
  21. Servo servo1; // create four servo objects
  22. int servo1Pin = 26;
  23.  
  24. int servo_pos = 90;
  25. int ang = 40;
  26.  
  27. int d_time = 10;
  28. float ratio = 0.6;
  29. int pos_y;
  30. int pos_x;
  31. float motor_speed;
  32. float steering;
  33.  
  34. int PWMApin = 25; // A入力2/AENABLE 左モータ AIN2
  35. int PWMA = 11; //PWMAチャンネル 11
  36. int AIN1 = 22; // A入力1/APHASE 左モータ AIN1
  37.  
  38. int LED_3 = 19 ; // ブレーキランプ
  39. int LED_2 = 18 ; // フォグランプ
  40. int LED_8 = 21 ; // ヘッドランプ
  41.  
  42. void onConnect() {
  43.   Serial.println("Connected.");
  44.   for (int cnt = 0; cnt
  45.     digitalWrite(LED_8, HIGH);
  46.     delay(500);
  47.     digitalWrite(LED_8, LOW);
  48.     delay(500);
  49.   }
  50. }
  51.  
  52. void setup() {
  53.   Serial.begin(115200);
  54.   M5.begin(false, false , true); //SerialEnable, I2CEnable ,DisplayEnable
  55.   FastLED.addLeds<SK6812, DATA_PIN, RGB>(leds, NUM_LEDS); // GRB ordering is typical
  56.   leds[0] = 0xf00000; //green
  57.  
  58.   ledcSetup(PWMA, 5000, 8); //チャンネル,周波数,解像度(8bit=256段階)
  59.   ledcAttachPin(PWMApin, PWMA); //ledPinをPWMCHチャンネルに接続
  60.  
  61.   pinMode(AIN1, OUTPUT);
  62.   pinMode(LED_2, OUTPUT);
  63.   pinMode(LED_3, OUTPUT);
  64.   pinMode(LED_8, OUTPUT);
  65.  
  66.   servo1.setPeriodHertz(50); // Standard 50hz servo PWMサイクル:20mS
  67.   servo1.attach(servo1Pin, 500, 2400); // (servo1Pin, minUs, maxUs)
  68.   servo1.write(servo_pos);
  69.  
  70.   Ps3.attachOnConnect(onConnect);
  71.   Ps3.begin("00:11:22:33:44:55"); //SixaxisPairToolで調べたmac adresに修正
  72.   Serial.println("Ready");
  73. }
  74.  
  75. void loop() {
  76.   if (Ps3.isConnected()) {
  77.     pos_y = Ps3.data.analog.stick.ly;
  78.     pos_x = Ps3.data.analog.stick.rx;
  79.     pos_y = pos_y + 128;
  80.     pos_x = pos_x + 128;
  81.  
  82.     if (Ps3.event.button_down.triangle) {
  83.       ratio = 1; //高速モード
  84.     }
  85.  
  86.     if (Ps3.event.button_down.cross) {
  87.       ratio = 0.7; //低速モード
  88.     }
  89.  
  90.     if (pos_x >= 152 ) { // R
  91.       //steering = map(pos_x, 152, 255, 0, 45);
  92.       steering = map(pow(pos_x, 2), 23104, 65025, 0, 55 );
  93.       servo1.write(servo_pos - steering);
  94.       //delay(d_time);
  95.     } else {
  96.       if (pos_x <= 103 ) { //L
  97.         //steering = map(pos_x, 103, 0, 0, 35);
  98.         steering = map(pow(pos_x, 2), 10609, 0, 0, 55 );
  99.         servo1.write(servo_pos + steering);
  100.         //delay(d_time);
  101.       }
  102.       else {
  103.         servo1.write(servo_pos);
  104.       }
  105.     }
  106.  
  107.     //左スティックがセンター付近は停止(ブレーキ)
  108.     if ( pos_y > 117 && pos_y
  109.       motor_run(0, 0, 1);
  110.     }
  111.  
  112.     //前進
  113.     else if (pos_y
  114.       //左スティック中央(117)から最上部(0)の値をモーターのスピード0から255に変換
  115.       // motor_speed = ratio * map(pos_y, 117, 0, 0, 255);
  116.       motor_speed = ratio * map(pow(pos_y, 2), 13689, 0, 0, 255 );
  117.       motor_run(motor_speed, 1, 0);
  118.     }
  119.  
  120.     //後進
  121.     else if ( pos_y > 137) {
  122.       //motor_speed = ratio * map(pos_y, 137, 255, 0, 255);
  123.       motor_speed = ratio * map(pow(pos_y, 2), 18769, 65025, 0, 255 );
  124.       motor_run(motor_speed, 0, 0);
  125.     }
  126.  
  127.     //ヘッドライト
  128.     if (Ps3.event.button_down.right) { //点灯
  129.       digitalWrite(LED_8, HIGH);
  130.     }
  131.  
  132.     if (Ps3.event.button_down.left) { //消灯
  133.       digitalWrite(LED_8, LOW);
  134.     }
  135.  
  136.     //フォグランプ
  137.     if (Ps3.event.button_down.up) { //点灯
  138.       digitalWrite(LED_2, HIGH);
  139.     }
  140.  
  141.     if (Ps3.event.button_down.down) { //消灯
  142.       digitalWrite(LED_2, LOW);
  143.     }
  144.   }
  145. }
  146.  
  147. void motor_run(float D0, int D1, int D4) {
  148.   //SPrint();
  149.   /* D0 : モータスピード(左)
  150.     D1 : モータA(左)1 = HIGH / 0 = LOW
  151.     D4 : LED_3 ON/OFF 1 = HIGH / 0 = LOW
  152.   */
  153.   //analogWrite(PWMA, D0);
  154.   ledcWrite(PWMA, D0); //(チャンネル,解像度)
  155.   digitalWrite(AIN1, D1);
  156.   digitalWrite(LED_3, D4);
  157. }

▼回路図

画像をクリックすると拡大します

▼Arduino IDE ボードの設定