職案人

求職・歴史・仏教などについて掲載するつもりだが、自分の思いつきが多いブログだよ。適当に付き合って下さい。

Rubyのダウンロード

2021年05月30日 | Ruby3.0.1
Rubyのダウンロード

【開発環境】
OS:Win10(64ビット)
Ruby 3.0.1

【Ruby 3.0.1をダウンロードする】
RubyのHPにアクセスする
画面上部のメニューにある「ダウンロード」をクリック

ダウンロードのためのページが表示されたら、下にスクロールして「RubyInstaller」を探し、そこを押す


RubyInstallerのサイトが表示されます。画面上部に表示されている「Download」をクリックして下さい。


RubyInstallerをダウンロードするためのページが表示される


「ルビー+デヴキット 3.0.1-1 (x64) 」をクリックすると、ダウンロードが開始される。
コメント
  • X
  • Facebookでシェアする
  • はてなブックマークに追加する
  • LINEでシェアする

ヒストグラムをPythonで書くには

2021年05月28日 | Python
ヒストグラム

【開発環境】
OS:Win10(64ビット)
言語:Python3.8.5(64bit)
Python の統合開発環境:IDLE
IDLEの操作は別サイト参照のこと
NumPy、pandas、Matplotlibライブラリのインストール

【ヒストグラムを作る】
ヒストグラムを作るには
データ全体を一定の間隔に区切って、それぞれの区間にいくつデータがあるかを数える必要がある。今回は0~1.0未満の少数の集まり全体を、10分割して、それぞれの区間にいくつのデータが有るか?計算する。

collectionsモジュールについて
Python 3.8.9 (tags/v3.8.9:a743f81, Apr 2 2021, 11:10:41) [MSC v.1928 64 bit (AMD64)] on win32
Type "help", "copyright", "credits" or "license()" for more information.
>>> import collections
>>> counter = collections.Counter([1,1,2,2,2,3])
>>> counter
Counter({2: 3, 1: 2, 3: 1})
>>> counter[2]
3
>>>
◆ヒストグラムのサンプルプログラム1
「ヒストグラム.py」ファイルにコードを書く
import sqlite3
import itertools
import random
import collections
import kame

conn = sqlite3.connect('my_database.db')

iter_cnt = itertools.count(1)
data = []


for i in range(500):
num = random.random()
conn.execute('insert into data_table values({},{})'.format(next(iter_cnt),num))


cur = conn.execute('select random_val from data_table')

for row in cur:
data.append((int(row[0]*10)))

print(data[:10] )

hist_data = collections.Counter(data)
print(hist_data)

hist_kame = kame.kame()
hist_kame.histogram(hist_data)
実行
======================= RESTART: D:\pg\Python38\ヒストグラム.py ======================
[9, 3, 2, 1, 4, 9, 6, 8, 6, 5]
Counter({6: 60, 5: 60, 4: 57, 1: 54, 8: 53, 9: 52, 0: 47, 3: 44, 7: 38, 2: 35}


ただし、kameモジュールを下記のように書き換える。
kame.pyのコード
import turtle

class kame(turtle.Turtle):
def __init__(self):
super().__init__()
self.shape('turtle')
self.shapesize(2,2)
#追加 1
def draw_bar(self,height,width=40):
self.left(90)
self.forward(height)
self.right(90)
self.forward(width)
self.right(90)
self.forward(height)
self.left(90)
 #追加2
def histogram(self,data,mag=2,x0=-200,y0=-150):
self.penup()
self.goto(x0,y0)
self.pendown()
self.begin_fill()
for i in range(10):
self.draw_bar(data[i]*mag)
self.goto(x0,y0)


◆ヒストグラムのサンプルプログラム2
【ライブラリのインストール】
C:\Users\shyok>pip install numpy
Collecting numpy
Downloading numpy-1.20.3-cp38-cp38-win_amd64.whl (13.7 MB)
|████████████████████████████████| 13.7 MB ...
Installing collected packages: numpy
Successfully installed numpy-1.20.3
WARNING: You are using pip version 20.2.3; however, version 21.1.2 is available.
You should consider upgrading via the 'd:\pg\python38\python.exe -m pip install --upgrade pip' command.

C:\Users\shyok>pip install matplotlib
Collecting matplotlib
Downloading matplotlib-3.4.2-cp38-cp38-win_amd64.whl (7.1 MB)
|████████████████████████████████| 7.1 MB 6.8 MB/s
Collecting cycler>=0.10
Downloading cycler-0.10.0-py2.py3-none-any.whl (6.5 kB)
Collecting pyparsing>=2.2.1
Downloading pyparsing-2.4.7-py2.py3-none-any.whl (67 kB)
|████████████████████████████████| 67 kB ...
Collecting python-dateutil>=2.7
Downloading python_dateutil-2.8.1-py2.py3-none-any.whl (227 kB)
|████████████████████████████████| 227 kB ...
Collecting kiwisolver>=1.0.1
Downloading kiwisolver-1.3.1-cp38-cp38-win_amd64.whl (51 kB)
|████████████████████████████████| 51 kB 4.1 MB/s
Requirement already satisfied: numpy>=1.16 in d:\pg\python38\lib\site-packages (from matplotlib) (1.20.3)
Collecting pillow>=6.2.0
Downloading Pillow-8.2.0-cp38-cp38-win_amd64.whl (2.2 MB)
|████████████████████████████████| 2.2 MB ...
Requirement already satisfied: six in c:\users\shyok\appdata\roaming\python\python38\site-packages (from cycler>=0.10->matplotlib) (1.15.0)
Installing collected packages: cycler, pyparsing, python-dateutil, kiwisolver, pillow, matplotlib
Successfully installed cycler-0.10.0 kiwisolver-1.3.1 matplotlib-3.4.2 pillow-8.2.0 pyparsing-2.4.7 python-dateutil-2.8.1
WARNING: You are using pip version 20.2.3; however, version 21.1.2 is available.
You should consider upgrading via the 'd:\pg\python38\python.exe -m pip install --upgrade pip' command.

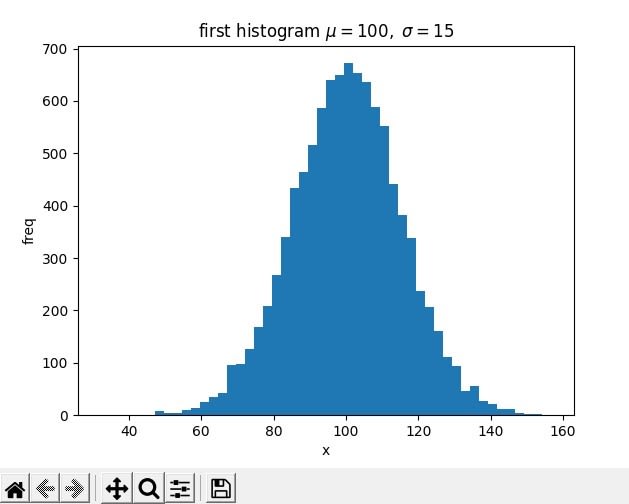
matplotlibでヒストグラムを書く場合、
「ヒストグラム.py」にコード書いて、保存する


import numpy as np
import matplotlib.pyplot as plt

mu, sigma = 100, 15
x = mu + sigma * np.random.randn(10000)

fig = plt.figure()
ax = fig.add_subplot(1,1,1)

ax.hist(x, bins=50)→hist(データ、bins=ビン数)のように指定する。
ax.set_title('first histogram $\mu=100,\ \sigma=15$')
ax.set_xlabel('x')
ax.set_ylabel('freq')
fig.show()

実行する
====================== RESTART: D:/pg/Python38/ヒストグラム2.py ======================
>>>
コメント
  • X
  • Facebookでシェアする
  • はてなブックマークに追加する
  • LINEでシェアする

データベースのその他の機能

2021年05月22日 | Python
データベースのその他の機能

【開発環境】
OS:Win10(64ビット)
言語:Python3.8.5(64bit)
Python の統合開発環境:IDLE
IDLEの操作は別サイト参照のこと

【データベースの機能】
追加
デーブルに一気に500個のデータを追加するには
>>> for i in range(500):
num = random.random()

>>> conn.execute('insert into data_table values({},{})'.format(next(iter_cnt),num))

表示
>>> cur = conn.execute('select count(*) from data_table')
>>> for row in cur:
print(row)

(500,)

抽出
>>> cur = conn.execute('select * from data_table where id = 500')
>>> for row in cur:
print(row)


(500, 0.23133482751141363)

更新
>>> cur = conn.execute('update data_table set id=-99 where id = 500 ')
>>> cur = conn.execute('select * from data_table where id = -99')
>>> for row in cur:
print(row)


(-99, 0.23133482751141363)
>>>
削除
>>> cur = conn.execute('delete from data_table where id = -99')
>>> cur = conn.execute('select * from data_table where id = -99')
>>> for row in cur:
print(row)


>>>
データベースを閉じる
>>> conn.close()
>>>
コメント
  • X
  • Facebookでシェアする
  • はてなブックマークに追加する
  • LINEでシェアする

Pythonのテーブル表示--SQLite

2021年05月18日 | Python
Pythonのデータベース表示

【開発環境】
OS:Win10(64ビット)
言語:Python3.8.5(64bit)
Python の統合開発環境:IDLE
IDLEの操作は別サイト参照のこと

【テーブル表示:SELECT文】
データを入力したデーブル「articles」を表示するためのプログラム作成する
・サンプルコード
import sqlite3

# DBに接続する。なければDBを作成する。
conn = sqlite3.connect('example.db')

# カーソルを取得する
c = conn.cursor()

print('カーソルをイテレータ (iterator) として扱う')
c.execute('select * from articles')
for row in c:
# rowオブジェクトでデータが取得できる。タプル型の結果が取得
print(row)

print('fetchallで結果リストを取得する')
c.execute('select * from articles')
for row in c.fetchall():
print(row)

print('fetchoneで1件ずつ取得する')
c.execute('select * from articles')
print(c.fetchone()) # 1レコード目が取得
print(c.fetchone()) # 2レコード目が取得


# コネクションをクローズする
conn.close()

実行結果
========================= RESTART: D:/Data/selectdb.py =========================
カーソルをイテレータ (iterator) として扱う
(1, '今朝のおかず', '魚を食べました', '2020-02-01 00:00:00')
(2, '今日のお昼ごはん', 'カレーを食べました', '2020-02-02 00:00:00')
(3, '今夜の夕食', '夕食はハンバーグでした', '2020-02-03 00:00:00')
fetchallで結果リストを取得する
(1, '今朝のおかず', '魚を食べました', '2020-02-01 00:00:00')
(2, '今日のお昼ごはん', 'カレーを食べました', '2020-02-02 00:00:00')
(3, '今夜の夕食', '夕食はハンバーグでした', '2020-02-03 00:00:00')
fetchoneで1件ずつ取得する
(1, '今朝のおかず', '魚を食べました', '2020-02-01 00:00:00')
(2, '今日のお昼ごはん', 'カレーを食べました', '2020-02-02 00:00:00')
>>>
コメント
  • X
  • Facebookでシェアする
  • はてなブックマークに追加する
  • LINEでシェアする

Python内蔵データベース・SQLiteについて

2021年05月16日 | Python
Python内蔵データベース・SQLite

【開発環境】
OS:Win10(64ビット)
言語:Python3.8.5(64bit)
Python の統合開発環境:IDLE
IDLEの操作は別サイト参照のこと

【SQLiteの使い方】
【対話コード】
1)データベースの作成
Python 3.8.9 (tags/v3.8.9:a743f81, Apr 2 2021, 11:10:41) [MSC v.1928 64 bit (AMD64)] on win32
Type "help", "copyright", "credits" or "license()" for more information.
>>> import sqlite3
>>> db = sqlite3.connect('my_database.db')

2) テーブルを作る
>>> db.execute('create table data_table(id integer,random_val real)')

>>>


3)データの入力
>>> import itertools #イテレータ
>>> import random #乱数
>>> iter_cnt = itertools.count(1)

>>> num = random.random()
>>> conn.execute('insert into data_table values({},{})'.format(next(iter_cnt),num))

4)データの表示
>>> cur = conn.execute('select * from data_table')
>>> for row in cur:
print(row)


(2, 0.22486294989131103)
>>>
【サンプルプログラム編】
「dbsample1.py」ファイルに下記のコードを書き、好きな所に保存する
import sqlite3

# 接続。なければDBを作成する。
conn = sqlite3.connect('example.db')

# カーソルを取得
c = conn.cursor()

# テーブルを作成
c.execute('CREATE TABLE articles (id int, title varchar(1024), body text, created datetime)')

# Insert実行
c.execute("INSERT INTO articles VALUES (1,'今朝のおかず','魚を食べました','2020-02-01 00:00:00')")
c.execute("INSERT INTO articles VALUES (2,'今日のお昼ごはん','カレーを食べました','2020-02-02 00:00:00')")
c.execute("INSERT INTO articles VALUES (3,'今夜の夕食','夕食はハンバーグでした','2020-02-03 00:00:00')")

# コミット
conn.commit()

# コネクションをクローズ
conn.close()

実行する
Python 3.8.9 (tags/v3.8.9:a743f81, Apr 2 2021, 11:10:41) [MSC v.1928 64 bit (AMD64)] on win32
Type "help", "copyright", "credits" or "license()" for more information.
>>>
========================= RESTART: D:\Data\dbsample1.py ========================
>>>
D:\Dataフォルダにexample.dbが作成される。
表示

コメント
  • X
  • Facebookでシェアする
  • はてなブックマークに追加する
  • LINEでシェアする