前の記事はこちら 再度・・・New Rescue Simulation を動かしてみる・・・続き
タイトルを考えるのが面倒なので・・・連番にしました。(笑)
とりあえず前回は Tutorial 1: Introduction to the platform and first steps のところで、サンプルプログラムを動かすところまで行きました。
あと書かれているのは・・・
Manually move the robot where you want it to go
When you click on a robot in the simulation window, red, blue, and green arrows will appear. You can move the robot to any position by grabbing this arrow with the mouse. You can also hold shift and move the robot around freely. Note that the robot will not be displayed until the program is started.
ロボットを手動で動かす方法・・・CoSpace みたいにラジコンっぽく動かすのではなく、X軸,Y軸,Z軸に沿って移動することができます。
やり方は・・・
①とりあえず、プログラムを指定して一旦実行します。(そうしないと、ロボットが表示されない)
②ロボットを停止する。(停止しなくてもよいけど・・・動いたままだとロボットをつかみにくい)
③ロボットをクリックする。(そうすると、赤、青、緑の軸と矢印が表示される)
④表示された3つの矢印を(マウスでつかんで)動かすと、ロボットをその方向に動かせる
⑤矢印の根本付近に回転軸(丸まった矢印)が表示されているので、これを動かすと軸に沿ってロボットを回転することができる。

で・・・基本的にZ軸の矢印(緑の矢印)、X軸,Y軸の回転軸(赤の丸まった矢印、青の丸まった矢印)は使うことは無いと思いますが・・・Webotsの仕様で消せないのだそうです。
さらに・・・③のロボットをクリックした状態でShiftキーを押しながらロボットをドラッグすると、マウス操作でロボットを移動することができます。(こちらの操作のほうが直感的でわかりやすい)
ただ、うまくロボットをドラッグできていないと、フィールド自体が動いてしまうので注意です。(笑)
さて、下のほうにロボットの機能が列挙されています。
Introducing Your Robot
In this challenge, the robot is fixed and as Epuc (this is actually a real world robot!) Your robot has a number of components:
Left and Right wheels : Can be controlled independently to set the speed
Distance Sensors : A number of distance sensors around the robot to detect walls/objects
Three Cameras : Three RGB camera on the front of the robot (left, right, centre cameras) to provide visual information
Temperature sensors : To detect the heated victims on the left and right
Bottom Camera : An RGB camera on the bottom of the robot to sense the ground colour
ロボットの紹介
この課題では、ロボットは固定されており、Epuc(これは実際には現実のロボットです!)として、ロボットにはいくつかのコンポーネントがあります。
左と右のホイール:速度を設定するために個別に制御できます
距離センサー:壁や物体を検出するためのロボット周辺のいくつかの距離センサー
3つのカメラ:視覚情報を提供するためにロボットの前面にある3つのRGBカメラ(左、右、中央のカメラ)
温度センサー:左右の熱くなった被災者を検出する
下部カメラ:地面の色を感知するロボットの下部にあるRGBカメラ
Google先生の助けを借りると、こんな感じです。

・左右独立したのホイール(当たり前ですね)
・ロボットの周りのいくつかの距離センサー(上の図のように8個だった)
・Visual Victim を識別するためのカメラだと思うのですが・・・3つも搭載してます。(なんという贅沢!)
・Heated victim を識別するための温度センサー(左右に1個ずつ)
・床の色を検知するカメラ(ここもカメラってことは、ロボットに全部で4台もカメラを搭載しているの!? なんという贅沢!)
で・・・もと Rescue Maze チームのメンターとしては・・・方位またはジャイロセンサーが欲しいです。ロボットがどの方向を向いているのかわからないとマッピングができません。同様に、ロボットが進んだ距離を知りたいです。左右のホイールの回転角(せめて回転数)が欲しいのですが・・・現状ではそれは無いようです。
これでは、いったいどうやれば、スタート地点に戻ることができるのでしょうか!?
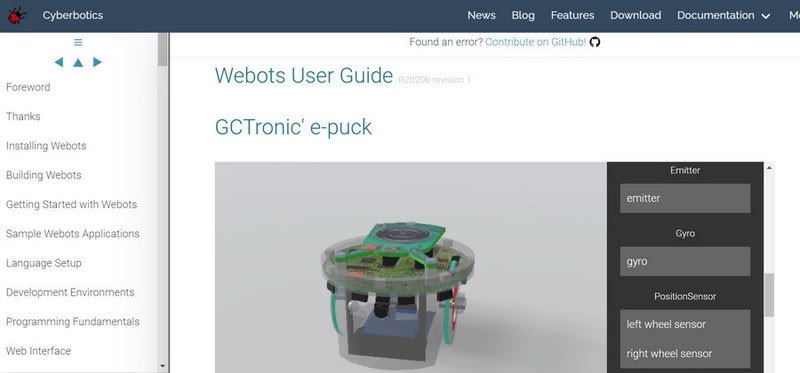
このロボットは以下のページのロボットを利用(流用)していると思うのですが・・・
https://cyberbotics.com/doc/guide/epuck

元のロボットには、ジャイロセンサーと Position Sensor として、ホイールの回転数のセンサーが付いているのですが・・・わざわざ削除をしてしまったのでしょうか?
もとに戻って・・・その後に、簡単なタスク(壁をよけて進む)が示されて、ごく簡単なサンプルプログラムが掲載されています。
Exemplar Code
Below we step through the example code developed step by step, explaining what is going on. Try and build this up by yourself first, referring back to this if you need. The full uninterrupted program can be found here. This code was used for the seminar video, and also runs on the latest release.
で、このサンプルプログラムですが・・・動きません。(いや、動くのですが、きちんと動きません)
どうも release 3 の時代と、現在(release 6)では、何かが違うらしい・・・(センサーからの値の取り方なのかなぁ)
スタートすると、真っすぐ進んで、壁にぶつかって止まります。それからピクリとも動きません・・・
で・・・
https://github.com/Shadow149/RescueMaze/blob/master/docs/tutorials/code1.py
ここにあるPythonのプログラムと、前回のサンプルプログラムを見比べてみて・・・違うところを直してみました。
① if leftSensors[i].getValue() > 80:
→ if leftSensors[i].getValue() < 0.05:
② elif rightSensors[i].getValue() > 80:
→ elif rightSensors[i].getValue() < 0.05:
③ if frontSensors[0].getValue() > 80 and frontSensors[1].getValue() > 80:
→ if frontSensors[0].getValue() < 0.05 and frontSensors[1].getValue() < 0.05:
なぜ、不等号が逆なのかは謎ですが・・・この修正で、ロボットは(まがりなりにも)動くようになりました。
その下のほうに、プログラムの説明が(ある程度)書かれています。
それを読んでいって・・・なんとなく、>80 と <0.05 の謎が分かりました。
このシミュレーションのロボットは実在する「e-puck education robot」を模しているようです。

で、このロボットに搭載されている距離センサーは、(超音波センサーではなく)infra-red sensors(つまり赤外線距離センサー、いわゆるシャープセンサー)なので、計測した距離とセンサーの値が反比例のような関係になっています。
それがこのグラフ

おそらく、これが分かりにくいということで、 release 3 から release 6 の変革の中で、単純にセンサーの値は距離を返すように改良された、のだと思います。
すると・・・0.05 というのは 0.05m = 5cm ということなのではないかと・・・
なるほど・・・勝手に自分として納得!(笑)
で・・・自分として、もっと単純にしたのが以下のプログラムです。
from controller import Robot
timeStep = 32
max_velocity = 6.28
robot = Robot()
wheel_left = robot.getMotor("left wheel motor")
wheel_right = robot.getMotor("right wheel motor")
leftSensors = []
rightSensors = []
frontSensors = []
frontSensors.append(robot.getDistanceSensor("ps7"))
frontSensors[0].enable(timeStep)
frontSensors.append(robot.getDistanceSensor("ps0"))
frontSensors[1].enable(timeStep)
rightSensors.append(robot.getDistanceSensor("ps1"))
rightSensors[0].enable(timeStep)
leftSensors.append(robot.getDistanceSensor("ps6"))
leftSensors[0].enable(timeStep)
# [left wheel speed, right wheel speed]
speeds = [max_velocity,max_velocity]
wheel_left.setPosition(float("inf"))
wheel_right.setPosition(float("inf"))
while robot.step(timeStep) != -1:
#for both front sensors
if frontSensors[0].getValue() < 0.07 and frontSensors[1].getValue() < 0.07:
#spin
speeds[0] = 0.6 * max_velocity
speeds[1] = -0.6 * max_velocity
#for sensors on the left
elif leftSensors[0].getValue() < 0.05:
#turn right
speeds[0] = 0.6 * max_velocity
speeds[1] = -0.2 * max_velocity
#for sensors on the right
elif rightSensors[0].getValue() < 0.05:
#turn left
speeds[0] = -0.2 * max_velocity
speeds[1] = 0.6 * max_velocity
else:
#go stright
speeds[0] = max_velocity
speeds[1] = max_velocity
wheel_left.setVelocity(speeds[0])
wheel_right.setVelocity(speeds[1])
まだ、迷路探索ではなく、単純なランダム走行ですけど・・・(もちろん、被災者を発見できないし、黒タイルの穴に落ちます!)


