前の記事はこちら RoboCup Junior 2001 RESCUE rules
先日(2024/5/19)の記事の RoboCupJunior Rescue の 2001年ルールの中でリンクしている
RoboCup Junior 2001 RESCUE Building Plans です。
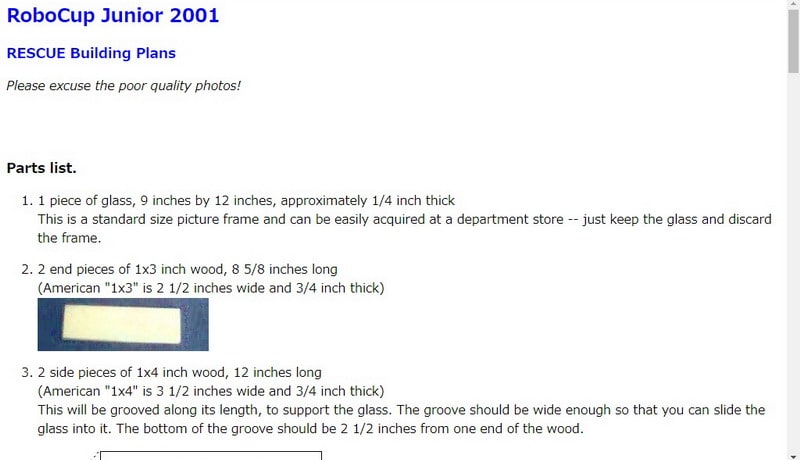
RoboCup Junior 2001
RESCUE Building Plans
Please excuse the poor quality photos!
画質が悪い写真はご容赦ください!
確かに写真の画質は悪いですが・・・写真があるだけマシですよねぇ。
Parts list.
1 piece of glass, 9 inches by 12 inches, approximately 1/4 inch thick
This is a standard size picture frame and can be easily acquired at a department store -- just keep the glass and discard the frame.
1 piece of glass, 9 inches by 12 inches, approximately 1/4 inch thick
This is a standard size picture frame and can be easily acquired at a department store -- just keep the glass and discard the frame.
1.ガラス1枚、9インチ×12インチ、厚さは約1/4インチです。これは標準サイズの額縁で、デパートで簡単に入手できます。額縁は捨てて、ガラスを使います。
2 end pieces of 1x3 inch wood, 8 5/8 inches long
(American "1x3" is 2 1/2 inches wide and 3/4 inch thick)
(American "1x3" is 2 1/2 inches wide and 3/4 inch thick)
2.木材の端材を2つ、1インチ×3インチ、長さは8 5/8インチです。 (アメリカの"1x3"は2 1/2インチ幅で3/4インチ厚です。)
「アメリカのインチは3/4インチ厚」なんとも訳の分からない表記ですね。1×3 inch は、どこのインチなのでしょうか? WiKiを調べてもイギリスインチとアメリカインチで3/4も違うとはかかれていないのですが・・・普通に cm で書いてくださいよぉ
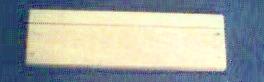
3 2 side pieces of 1x4 inch wood, 12 inches long
(American "1x4" is 3 1/2 inches wide and 3/4 inch thick)
This will be grooved along its length, to support the glass. The groove should be wide enough so that you can slide the glass into it. The bottom of the groove should be 2 1/2 inches from one end of the wood.
(American "1x4" is 3 1/2 inches wide and 3/4 inch thick)
This will be grooved along its length, to support the glass. The groove should be wide enough so that you can slide the glass into it. The bottom of the groove should be 2 1/2 inches from one end of the wood.
3.幅1インチ×厚さ4インチの木材の側面材を2枚、長さは12インチです。 (アメリカの"1x4"は幅3 1/2インチで厚さ3/4インチです。) この木材は、長さに沿って溝が付けられ、ガラスを支えるようになります。溝はガラスをスライドさせることができるほど十分に広くする必要があります。溝の底部は、木材の一方の端から2 1/2インチ離れたところになければなりません。

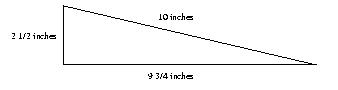
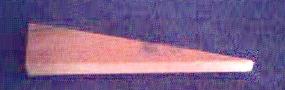
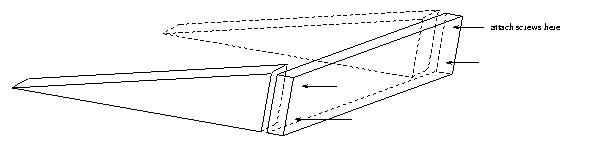
4 2 triangular ramp supports, cut from 1x3 inch wood, as below:
4.1x3インチの木材から切り出された2つの三角形の傾斜支柱、以下の通りに。
4.1x3インチの木材から切り出された2つの三角形の傾斜支柱、以下の通りに。
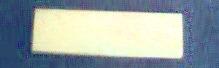
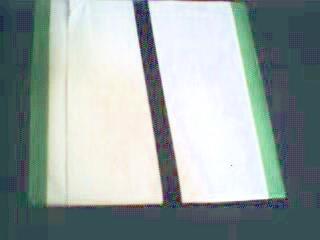
5 1 ramp of hardwood (1/4 inch thick), 10 1/4 inches by 10 inches
Cover the ramp with white paper. Put green electrical tape along on the two 10 1/4 inch edges.
Put a straight line of black electrical tape running up the middle of the ramp, parallel to the green edges.
Cover the ramp with white paper. Put green electrical tape along on the two 10 1/4 inch edges.
Put a straight line of black electrical tape running up the middle of the ramp, parallel to the green edges.
厚さ1/4インチのハードウッド製の傾斜路(10 1/4インチ×10インチ)。 傾斜路を白い紙で覆います。2つの10 1/4インチの辺に緑の電気テープを貼ります。 傾斜路の中央に、緑の辺と平行に黒い電気テープの直線を引きます。
ここまでが、部品の説明
ここからが、組み立ての説明です。
Assembly Step 1.
Attach the ramp supports to one of the end pieces, using 4 screws as shown.
4本のネジを使用して、傾斜路の支柱を片側の端材に取り付けます。
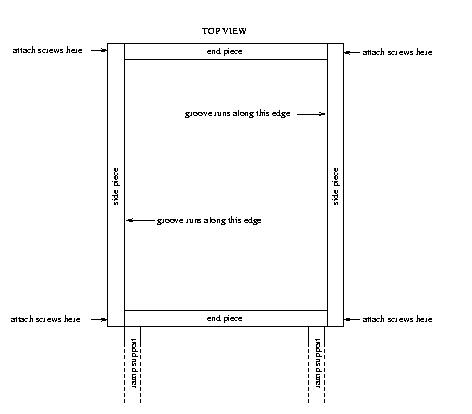
Assembly Step 2.
Create a box by attaching the two end pices to the two side pieces, using 8 screws as shown (top and bottom in 4 places indicated). Make sure that the grooves are on the inside of the rectangle and are lined up with the top edge of the end pieces.
8本のネジを使用して、2つの端材を2つの側面材に取り付けて、箱を作ります(4か所(上下)に示された場所に)。溝が四角形の内側にあり、端材の上端と整列していることを確認してください。
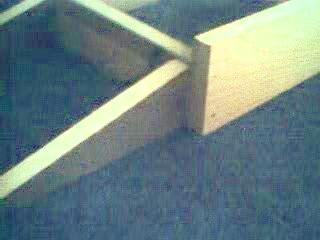
Here's a photo of the assembly so far.
これまでの組み立ての写真です。
Assembly Step 3.
Now you can slide the glass into the box, fitting it into the grooves in the side pieces, resting on top of the end pieces. The photo, belows, shows the glass being slid from the back of the box (where the ramp supports are at the other end).
ガラスを箱にスライドさせて、側面材の溝に収め、端材の上に載せます。下の写真は、ガラスが箱の後ろからスライドされている様子を示しています(そこには傾斜路の支柱が反対側にあります)。
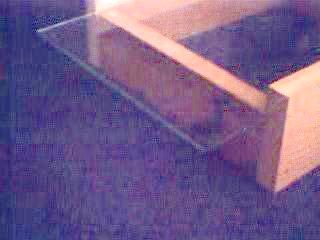
台には、低いながら壁があるのが分かります。
ルールを読んだだけではわからなかったことです。
写真があると分かりやすいですね。
Assembly Step 4.
Finally, place the ramp on top of its supports.
最後に、傾斜路をその支柱の上に置きます。
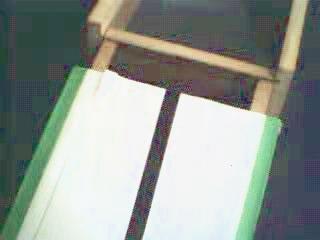
傾斜屋に壁はないのですが・・・端に緑のテープが貼られているので、(黒線から外れたとしても)端から落ちないようにすることはできるかも、です。
The lower end of the ramp will touch the floor -- aligning the black line with the end of maze.
傾斜路の下端は床に触れるでしょう — 黒い線を迷路の端に合わせます。
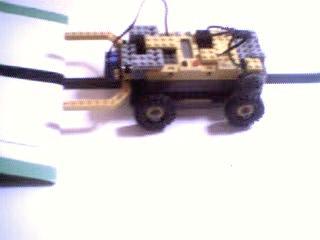
サンプルの写真が、クワガタムシみたいに角を持つロボット。 LEGO の RCX ですね。
Finished product.
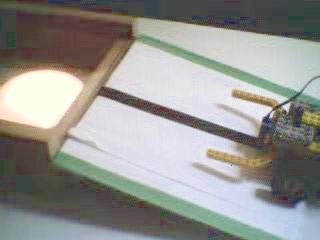
Here's the robot in action. We've placed a light source under the glass. The robot has a light sensor pointing down at the floor. When the robot reaches the top of the ramp, the sudden brightness of the light source will be detected by the robot.
ロボットを稼働させました。ガラスの下に光源を置いています。ロボットには、床を向いた光センサーがあります。ロボットが傾斜路の頂上に到達すると、光源の急激な明るさがロボットによって検出されます。
ルールに付属して、フィールドの作り方のガイドがあるのはレスキュー競技の伝統なんですね。