


いつも使ってるXperia XZ1 Compactの電池の持ちが悪くなってきたので、電池交換をしてみる事にした。
The battery of the Xperia XZ1 Compact that I always use is getting worse, so I decided to replace the battery.
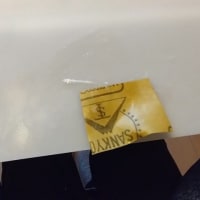
↓電池は1年程前に買って有ったが、やっと交換する事に。
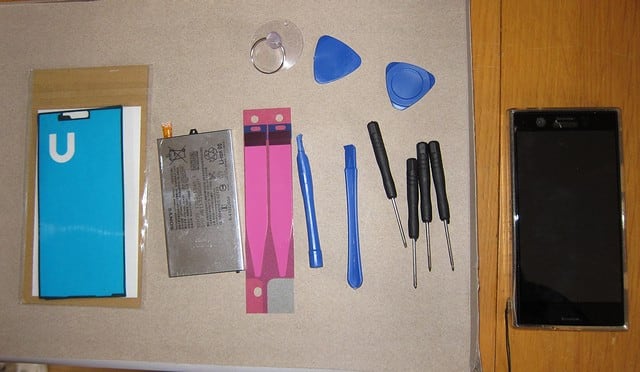
↑I bought the battery about a year ago, but finally decided to replace it.
↓両面テープを剥がす為に、ドライヤーであぶってピック等でLCDを持ち上げる。

↑To remove the double-sided tape, heat it with a hair dryer and lift the LCD with a pick.
最初にあぶってピックを差し込もうとしたが、全く入らなかった。
At first, I tried to insert the pick in the heat, but it didn't go in at all.
2分以上、しつこく温めないとピックが入らない様だ。焦らずじっくり温める事。
It seems that the pick cannot be inserted unless it is persistently warmed for more than 2 minutes.
↓何とかLCDを剥がした所。中のフレキがつながってるので要注意。

↑Somehow I peeled off the LCD. Be careful because the flexible cable inside is connected.
↓ここで、LCDが壊れてないか電源を入れて確かめる。ガーン!左下が暗い!!
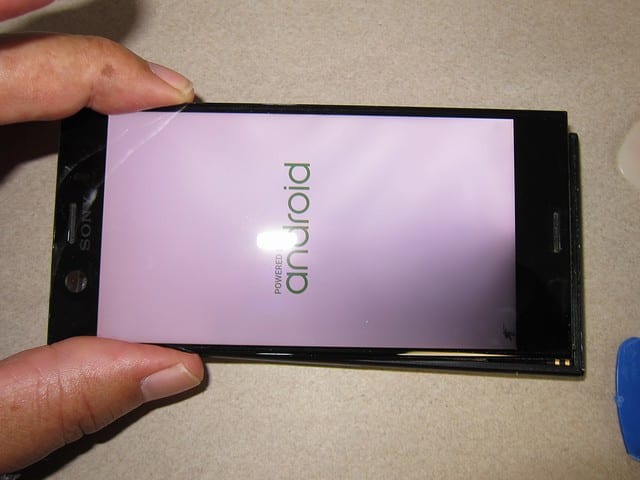
↑Now turn on the power and check if the LCD is broken. Ghan! The lower left corner is dark! !
どうやら剥がす時に少し失敗してしまったようだ。仕方ないのでこのまま進める。
It looks like I made a little mistake when removing it. For now, let's proceed as is.
↓コネクタの黒いカバーの右側を矢印の方に力を掛けながら上へ持ち上げて外す。
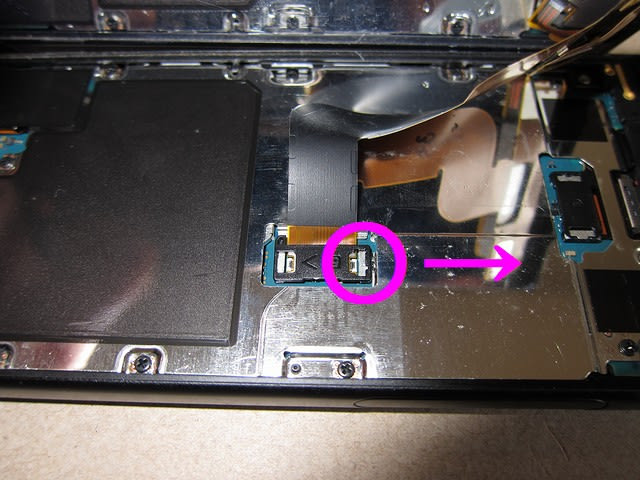
↑Lift the right side of the black cover in the direction of the arrow and remove it.
逆側は外れにくい様だ。
The reverse side seems to be difficult to remove.
↓フレキコネクターをピンセットで外す。

↑Remove the flexible connector with tweezers.
↓丸印のねじを一通り外す。

↑Remove the circled screw.
↓外れたシールド板とLCDと本体

↑The detached shield plate, LCD and main unit.
↓ねじと小さいシールド板、インカメラを外す。

↑Remove the screw, the small shield plate, and the in-camera.
↓インカメラのフレキの下のねじも外す。
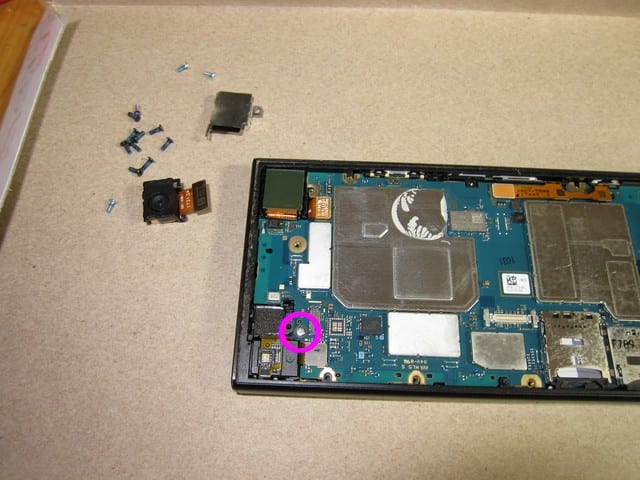
↑Remove the screw under the flexible cable of the in-camera.
↓丸印のコネクタを外す。右端のコネクタは黒いカバーを先程と同様に先に外す事。
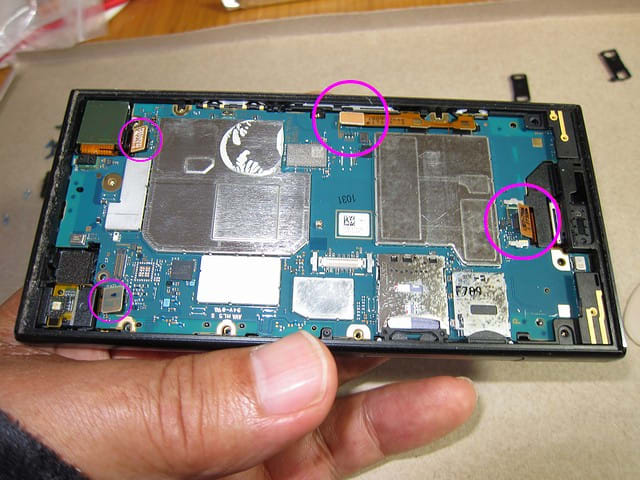
↑Remove the circled connector. For the connector on the right end, remove the black cover first in the same way as before.
↓SDカードとsimをトレイごと外す。

↑ Remove the SD card and sim together with the tray.
↓下の方から基盤を持ち上げて外す。
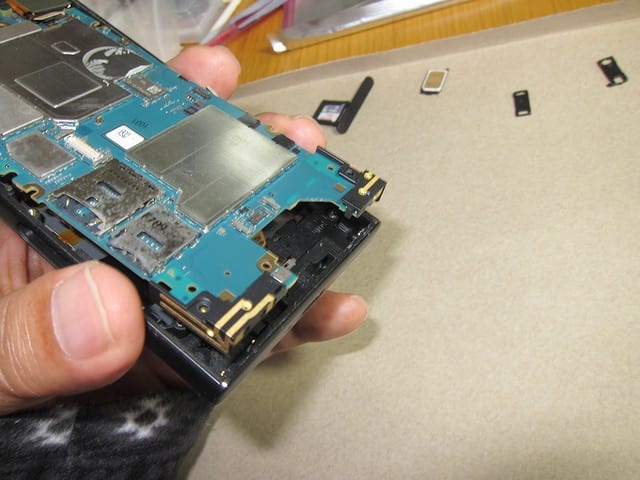
↑Lift the base from the bottom and remove it.
↓電池は基盤の裏に両面テープで張り付いている。

↑The battery is attached to the back of the board with double-sided tape.
テープの端の黒い所からピンセットで巻き取る。
Take up the black part of the tape with tweezers.
慎重にやらないと途中で切れて取れない。(私もそうなった)
If you don't do it carefully, you won't be able to cut it in the middle. (So did I)
途中で切れたので、電池の下にドライバを差し込み、ゆっくり持ち上げて取った。
It broke in the middle, so I inserted a screwdriver under the battery and slowly lifted it out.
かなり基盤がたわむので壊れないか心配になる。
Since the base bends considerably, I am worried that it will break.
↓なんとか外れた電池と基盤

↑Somehow the battery and board came off
↓新旧電池比較 上が新、下が旧。印の数字は2017年35週/2018年35週だろうか?

↑Comparison of old and new batteries New on top, old on bottom. Is the marked number 35 weeks 2017 and 35 weeks 2018?
↓基盤に新しい両面テープを張るが、長いのでカットして使用。随分伸びてしまった。
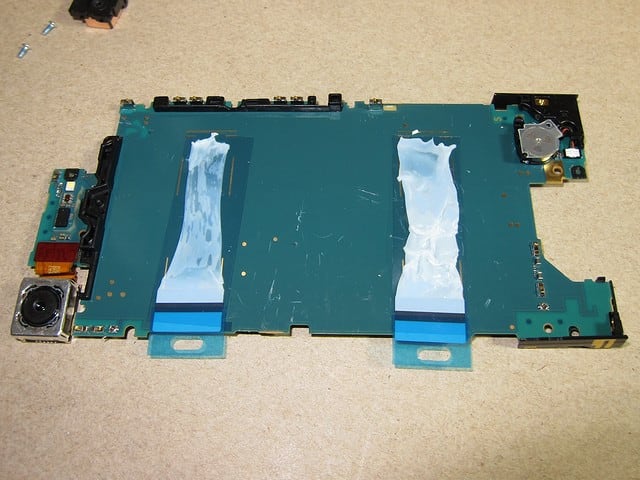
↑A new double-sided tape is put on the PCB, but it is too long, so cut it and use it. It has grown quite a bit.
↓黒い部分が電池に巻き付く長さでカットして貼り付けた。

↑ I cut and pasted the black part to the length that wraps around the battery.
後はばらした順番に組み立てていく。
After that, assemble them in the order in which they were disassembled.
↓基盤の下のコネクタとLCDのコネクタには忘れずに黒いカバーをつける。

↑Don't forget to put a black cover on the connector under the board and the LCD connector.
↓LCD画面を取り付ける前に、フレームに両面テープを貼る。

↑Before installing the LCD screen, apply double-sided tape to the frame.
↓LCD画面を取り付けて完成。今回は残念ながらバックライトを破損してしまった。

↑Install the LCD screen. Unfortunately, the backlight was broken this time.
と言う事でこのままだと太陽の下では暗くて見難いので後日LCD交換が必要だ。
It's dark and hard to see in the sun. I need to replace the LCD at a later date.
とりあえず新しいLCDを注文したが、機種変更した方がよかったかも、、、、
I ordered a new LCD, but it might have been better to change the model...
2023.5.7 (5/25 UP)
①Xperia XZ1 Compact Battery交換
②Xperia XZ1 Compact LCD交換
③Xperia XZ1 Compact LCD交換その2
The battery of the Xperia XZ1 Compact that I always use is getting worse, so I decided to replace the battery.
↓電池は1年程前に買って有ったが、やっと交換する事に。
↑I bought the battery about a year ago, but finally decided to replace it.
↓両面テープを剥がす為に、ドライヤーであぶってピック等でLCDを持ち上げる。
↑To remove the double-sided tape, heat it with a hair dryer and lift the LCD with a pick.
最初にあぶってピックを差し込もうとしたが、全く入らなかった。
At first, I tried to insert the pick in the heat, but it didn't go in at all.
2分以上、しつこく温めないとピックが入らない様だ。焦らずじっくり温める事。
It seems that the pick cannot be inserted unless it is persistently warmed for more than 2 minutes.
↓何とかLCDを剥がした所。中のフレキがつながってるので要注意。
↑Somehow I peeled off the LCD. Be careful because the flexible cable inside is connected.
↓ここで、LCDが壊れてないか電源を入れて確かめる。ガーン!左下が暗い!!
↑Now turn on the power and check if the LCD is broken. Ghan! The lower left corner is dark! !
どうやら剥がす時に少し失敗してしまったようだ。仕方ないのでこのまま進める。
It looks like I made a little mistake when removing it. For now, let's proceed as is.
↓コネクタの黒いカバーの右側を矢印の方に力を掛けながら上へ持ち上げて外す。
↑Lift the right side of the black cover in the direction of the arrow and remove it.
逆側は外れにくい様だ。
The reverse side seems to be difficult to remove.
↓フレキコネクターをピンセットで外す。
↑Remove the flexible connector with tweezers.
↓丸印のねじを一通り外す。
↑Remove the circled screw.
↓外れたシールド板とLCDと本体
↑The detached shield plate, LCD and main unit.
↓ねじと小さいシールド板、インカメラを外す。
↑Remove the screw, the small shield plate, and the in-camera.
↓インカメラのフレキの下のねじも外す。
↑Remove the screw under the flexible cable of the in-camera.
↓丸印のコネクタを外す。右端のコネクタは黒いカバーを先程と同様に先に外す事。
↑Remove the circled connector. For the connector on the right end, remove the black cover first in the same way as before.
↓SDカードとsimをトレイごと外す。
↑ Remove the SD card and sim together with the tray.
↓下の方から基盤を持ち上げて外す。
↑Lift the base from the bottom and remove it.
↓電池は基盤の裏に両面テープで張り付いている。
↑The battery is attached to the back of the board with double-sided tape.
テープの端の黒い所からピンセットで巻き取る。
Take up the black part of the tape with tweezers.
慎重にやらないと途中で切れて取れない。(私もそうなった)
If you don't do it carefully, you won't be able to cut it in the middle. (So did I)
途中で切れたので、電池の下にドライバを差し込み、ゆっくり持ち上げて取った。
It broke in the middle, so I inserted a screwdriver under the battery and slowly lifted it out.
かなり基盤がたわむので壊れないか心配になる。
Since the base bends considerably, I am worried that it will break.
↓なんとか外れた電池と基盤
↑Somehow the battery and board came off
↓新旧電池比較 上が新、下が旧。印の数字は2017年35週/2018年35週だろうか?
↑Comparison of old and new batteries New on top, old on bottom. Is the marked number 35 weeks 2017 and 35 weeks 2018?
↓基盤に新しい両面テープを張るが、長いのでカットして使用。随分伸びてしまった。
↑A new double-sided tape is put on the PCB, but it is too long, so cut it and use it. It has grown quite a bit.
↓黒い部分が電池に巻き付く長さでカットして貼り付けた。
↑ I cut and pasted the black part to the length that wraps around the battery.
後はばらした順番に組み立てていく。
After that, assemble them in the order in which they were disassembled.
↓基盤の下のコネクタとLCDのコネクタには忘れずに黒いカバーをつける。
↑Don't forget to put a black cover on the connector under the board and the LCD connector.
↓LCD画面を取り付ける前に、フレームに両面テープを貼る。
↑Before installing the LCD screen, apply double-sided tape to the frame.
↓LCD画面を取り付けて完成。今回は残念ながらバックライトを破損してしまった。
↑Install the LCD screen. Unfortunately, the backlight was broken this time.
と言う事でこのままだと太陽の下では暗くて見難いので後日LCD交換が必要だ。
It's dark and hard to see in the sun. I need to replace the LCD at a later date.
とりあえず新しいLCDを注文したが、機種変更した方がよかったかも、、、、
I ordered a new LCD, but it might have been better to change the model...
2023.5.7 (5/25 UP)
①Xperia XZ1 Compact Battery交換
②Xperia XZ1 Compact LCD交換
③Xperia XZ1 Compact LCD交換その2


※コメント投稿者のブログIDはブログ作成者のみに通知されます