goo blog サービス終了のお知らせ 

くっしーの徒然日記

無線、天文、修理、剣道、体調他について書いてます。修理や改造記事のマネに関してはあくまでも自己責任にてお願いします。

LG 32型TV 2台目修理 32LB57YM

2024-11-03 | その他修理
散光板を使用するために頂いたLGの32LB57YMであるが、これもバックライト交換で簡単に治りそうなので、接着剤の付いた散光板の修正と含めて修理して動く様にした。


前回のあり合わせのバックライトとレンズを使って修理してみたが、光点が現れて、このままでは使えそうにないので、再びバックライトストリップをアリエクスプレスで手配して交換してみた。

手順は前回同様なので省略。

↓新しく入手したLEDストリップと交換


↓TVをつけると概ね良好に見えるがまだ少し光点が気に成る。


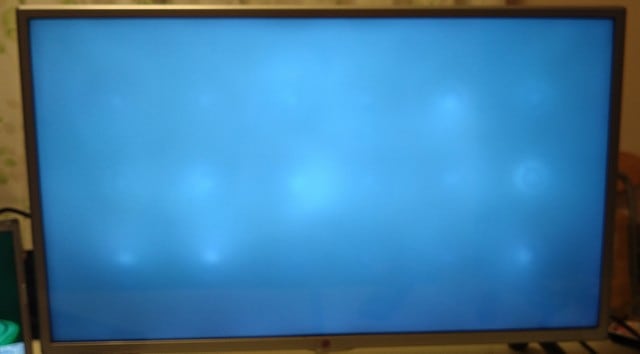
↓TV画像では判別しにくいのでPCからフラット画面を映す。
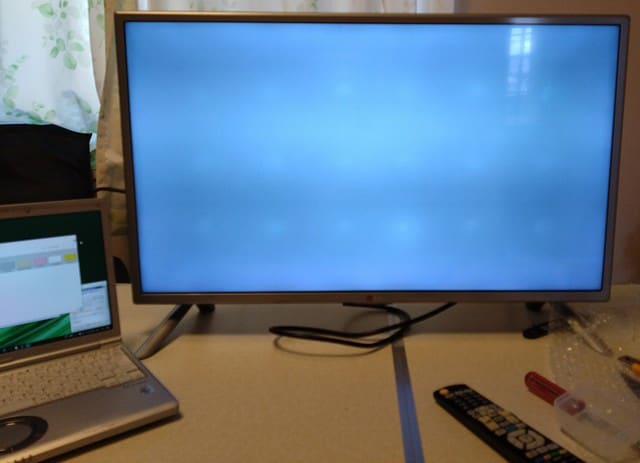

思った以上に光点が出ている。
アリエクで一番安いの買ったから出来が悪いんだろうか?

しょうがないので、もう少しだけ高いのを再度購入する。
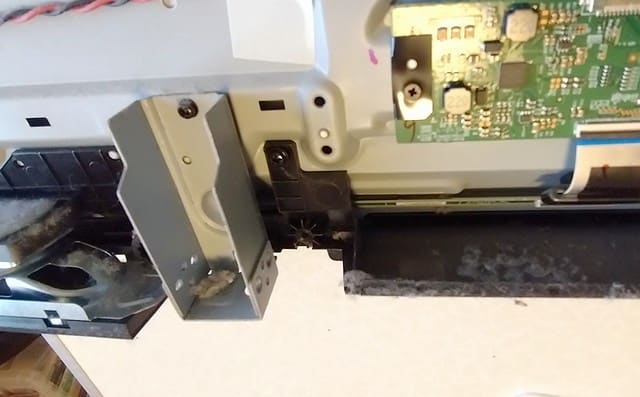
↓2回目のバックライト交換。


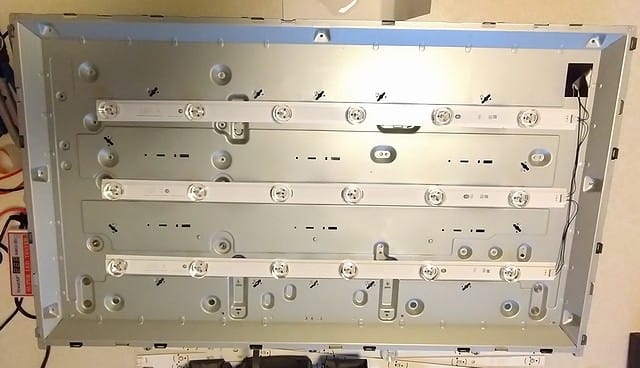
今度は下の両面テープもきれいにはがしてから取付。

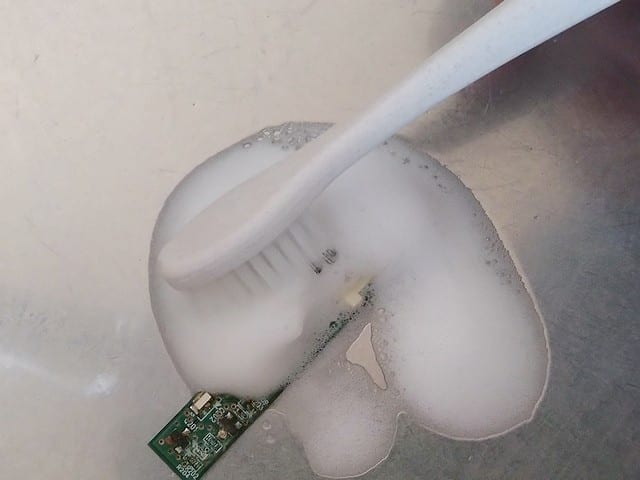
↓散光板も接着剤を1000番の耐水ペーパーで削る。


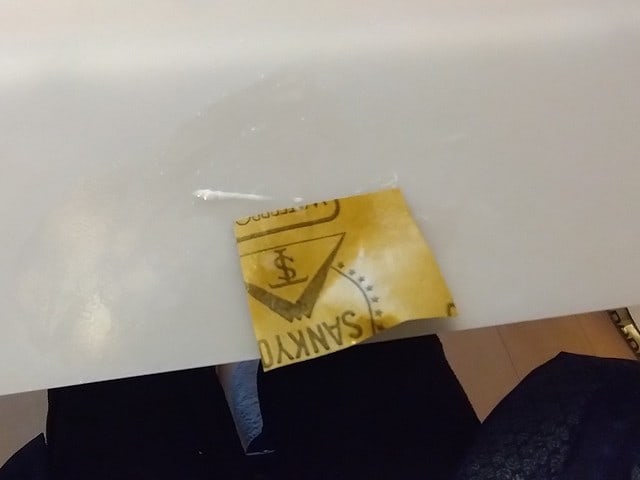
見た目はまだ接着剤の付着が判るが、適当な所でやめて試してみる。

↓再購入のバックライトと修正した散光板を取り付けフラットテスト。
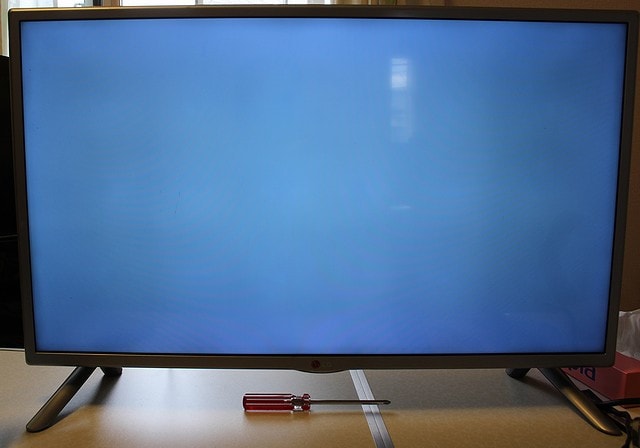

ほぼ問題ないレベルになった様だ。
このテレビはLEDレンズの位置の許容度が低いのだろうか、、、

↓このTV用のリモコンもヤフオクで購入。


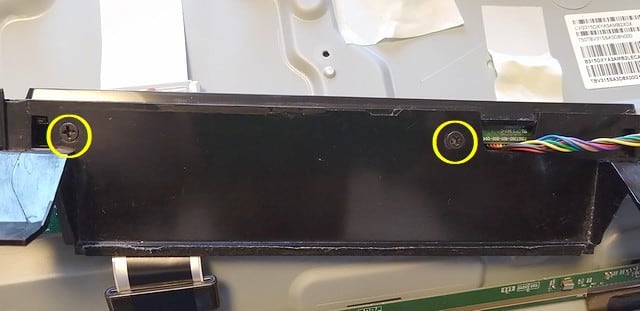
↓電源スイッチの効きが悪いのでばらして補修する。


↓電源ボタンのゴム接点の上に銅テープを丸く切って張り付ける。


これでリモコンも正常に動く様になり、2台目のLG32インチTVが復活した。
PCの拡張モニターとして使おうかな。

2024.5.2-5.7 (11/3 UP)


① LG 32型TV 修理 32LB5810 バックライトレンズ取付失敗編
② LG 32型TV 修理 32LB5810 失敗原因確認編
③ LG 32型TV 修理 32LB5810 バックライト交換編
④ LG 32型TV 修理 32LB5810 リモコン修理編
⑤ LG 32型TV 修理 32LB5810 散光板修正編
⑥LG 32型TV 2台目修理 32LB57YM

① LG 32inch TV repair 32LB5810 Backlight lens installation failure
② LG 32inch TV repair 32LB5810 Confirm of cause of failure
③ LG 32inch TV repair 32LB5810 Backlight replacement
④ LG 32inch TV repair 32LB5810 Remote control repair
⑤ LG 32inch TV repair 32LB5810 Diffuser plate repair
⑥LG 32inch TV repair 32LB57YM

LG 32型TV 修理 32LB5810 散光板修正編

2024-08-12 | その他修理
前回の作業で課題として残っていた散光板の汚れの件だが、「ジモティ」の掲示板を見るとうちのテレビとほぼ同型の32LB57YMのジャンクが0円で出ていたので、散光板が使えそうだと貰って来た。
All that remains is to remove the adhesive from the light diffuser. I found a 32LB57YM junk TV, almost the same model, for 0 yen on the Jimoty bulletin board.I thought I could use the light diffuser, so I got it.

↓我が家のとはフレームの色が異なる。

↑The frame is a different color than ours.

↓電源を入れると一部表示が見えるのでバックライト切れの様だ。

↑When turned on, some letters were visible, so seems the backlight is NG.

↓取り敢えずお目当ての散光板の所迄ばらす。

↑I took it apart down to the light diffuser.

↓取り出した散光板。

↑The light diffuser I removed.

↓接着剤の付いた散光板と入れ替えて表示試験。

↑I replaced the light diffuser and tested the display.

写真では濃淡が現れているが、実際にはフラットに写っている。
In the photo, there are shadings, but in reality it is flat.

取り敢えずこれで我が家のLG32インチテレビの修理は完了。
For now, the repair of my LG 32-inch TV is complete.

↓残ったテレビの方であるが、こちらもレンズが全て取れている。

↑The remaining TV also has all of its lenses removed.

↓ちなみに2台の主な違いは、リモコン受光部の右にwifiユニットの有/無だ。

↑The difference of two model is a wifi unit on the right side of the photo.

↓貰って来たテレビのバックライトの切れ具合。3個ほど点かない。

↑The backlight of the TV I got. About three of them don't work.

↓うちのテレビから外したLEDストリップを使い、奥と真ん中列を入れ替える。

↑I changed the two line strips with the old LEDs I removed from my TV.

取り敢えず一通りLEDは点く様になった。
For now, all the LEDs seem to work.

↓エポキシ接着剤で落ちてるレンズをくっつける。

↑Attach the fallen lenses with epoxy glue.

↓こんな感じで黒い部分に接着剤を塗って一通り取り付ける。

↑Apply glue to the black parts like this and attach everything.

↓なんとなく見た目ではちゃんと付いた様に見える。

↑At first glance, it looks like it's attached properly.

↓組み立てて点灯させてみると、かなり光点が出ている。なんで??

↑When I assembled and turned on, there were a few light spots. Why??

レンズをくっつける時に、接着剤が硬化してしまいそうなので、慌てて付けたので、レンズのでっぱりを黒い穴に合わせたが、ちゃんと中に入らず少し浮いたり、位置がずれたりしたかもしれない。
When I attached the lenses, I was worried the glue would harden, so I attached them in a hurry, so I aligned the protrusions on the lenses with the black holes, but they didn't go in properly and may have floated a little or been out of position.

一旦くっつけちゃったから、また外して付け直しても黒い穴は埋まってるだろうから、ダメだな。これだとLEDを買ってストリップで交換するしかないかもしれない。
Since I'd already stuck them in, even if I removed them and put them back on, the black holes would probably be filled, so it wouldn't work. I might have to buy new LEDs and replace them with strips.

なんだかジャンクループに陥っている様な、、、、
It seems like I'm stuck in a junk loop...

2024.04.23 (8/12 UP)

① LG 32型TV 修理 32LB5810 バックライトレンズ取付失敗編
② LG 32型TV 修理 32LB5810 失敗原因確認編
③ LG 32型TV 修理 32LB5810 バックライト交換編
④ LG 32型TV 修理 32LB5810 リモコン修理編
⑤ LG 32型TV 修理 32LB5810 散光板修正編
⑥LG 32型TV 2台目修理 32LB57YM

① LG 32inch TV repair 32LB5810 Backlight lens installation failure
② LG 32inch TV repair 32LB5810 Confirm of cause of failure
③ LG 32inch TV repair 32LB5810 Backlight replacement
④ LG 32inch TV repair 32LB5810 Remote control repair
⑤ LG 32inch TV repair 32LB5810 Diffuser plate repair
⑥LG 32inch TV repair 32LB57YM

なんと冠水ジャンク! SONY KJ-32W500C リモコン受光部修理

2024-05-28 | その他修理
前回リモコンも無事に手に入り、暫らくしてから、せっかくなので居間で使ってみようと設置してみたが、リモコンが効かない!おかしいなぁ、前回はちゃんと動いたんだけど、、、、リモコンをカメラで見るとちゃんと発光しているので、本体側がおかしい様だ。
I got the remote controller successfully last time, and after a while, I tried to use it in my living room, but the remote controller does not work! It seems strange, last time it worked fine 、、、、I saw remote controller through the camera, it is firing properly, so it seems something is wrong with the TV unit.

↓リモコンは正常に発光している

↑Remote controller is emitting light normally.

↓取説によると、リモコン受光部はこの辺に有るらしい。

↑According to the instruction manual, the remote control receiver is located here.

↓さっそくばらしてみる。

↑Let's take it apart.

↓ヘラで勘合を外して裏蓋を外す。

↑Remove the back cover by removing the joint with a spatula.

↓下部の方はほこりが結構溜まっている。

↑There is a lot of dust in the lower part.

↓スピーカ、台座のホルダー、その下のプラスチックカバーのネジを外す。

↑Unscrew the pedestal holder, and the plastic cover. And took off the speaker.

↓下のプラスチックカバーを外した所。

↑The lower plastic cover is removed.

↓リモコン受光部の基板が入ってる所のネジを外す。

↑Unscrew the screws where the board of the remote control receiver is.

↓あれ!なんか錆び(緑青(ろくしょう))が出ているぞ!

↑Oh, no! There is some rust (greenish blue) on the surface!

↓あちゃ~、こりゃ基板が冠水した跡だな、、、、修理が大変!

↑Oh no, it looks like the circuit board was flooded. 、、、、 It's hard to repair!

どうやら、リモコン受光部付近に水が掛かり、中に侵入したのに、外だけしか拭いてなくて、内部に残った水が電蝕を起こした様だ。これは修理が厄介だな、、、、
It looks like water got on the remote control receiver and got inside, but I only wiped the outside, and the water left inside caused electrical corrosion. This is a messy repair. 、、、、

↓先ずは洗剤で綺麗に緑青を落とす。

↑First, I'm going to clean off the greenish-blue with detergent.

↓新たに酸化する前に急いで乾かす。

↑Hurry up and dry it before it oxidizes anew.

↓酸化しているパターンや部品の端子をカッターで磨き半田付け。

↑Polish the oxidized patterns and terminals of the components with a cutter and solder them.

↓仮組して試験すると無事にリモコンが効く様になった。

↑I assembled it temporarily and tested it. It is OK.

↓本体を組みなおし動作確認。リモコンから制御できている。

↑I reassembled the TV and checked. The remote control is working.

↓取説によるとオフで赤、オンで緑のLED点灯の様だが、緑が点かない。

↑According to the instruction manual, the red LED lights up when off and the green LED lights up when on, but the green LED does not light up.

↓再び分解して、不良個所を探す。R202からQ201のBへの導通がない。

↑Disassembled the unit again and looked for the defective part: no continuity from R202 to B of Q201.

R202は電極剥離しているので手持ちの1608の2.2kΩをQ201のBに直接はんだ付けし、そこからリードで基板のパターンに接続する。
R202 is stripped of its electrode, so I soldered 2.2kΩ of 1608 I had directly to Q201's B, and connected it to the board pattern with a lead from there.

↓無事に緑も点灯するようになった。

↑The green light is now safely lit as well.

↓再び本体に組み込み、動作確認。今度は問題無い様だ。

↑I assembled it into the TV again and checked. Its OK this time.

ジャンク詐欺だと思ってた110円テレビ。なんとも厄介な冠水ジャンクだった。
冠水ジャンクは程度にもよるが修復が困難な場合が多く、基本的に手を出さないのだが、今回は見えない所で冠水したジャンクをつかまされた。運よく冠水被害が少なく、簡単な回路基板上だけの被害で何とかなって良かった。
A ¥110 TV that I thought was a junk scam. It was a very troublesome flooded junk.
Flooded junks are often difficult to repair, and I generally avoid dealing with them, but this time I got a flooded junk that I couldn't see. Luckily, there was not much damage from the flooding, and I was lucky that the damage was only on a small circuit board.

2024.04.14 (5/28 UP)


ジャンク詐欺?110円テレビ SONY KJ-32W500C
リモコン ゲット SONY KJ-32W500C
なんと冠水ジャンク! SONY KJ-32W500C リモコン受光部修理

Junk fraud? 110yen TV SONY KJ-32W500C
Get remote controller for SONY KJ-32W500C
What a water damaged junk! SONY KJ-32W500C Remote control receiver repair

LG 32型TV 修理 32LB5810 リモコン修理編

2024-05-22 | その他修理
バックライト交換で、光点が見えなくなったLGの32インチTVだが、ここ2年近く使ってなかったので、リモコンが動作しなくなっていた。と言う事で、リモコンをばらして整備してみた。
After replacing the backlight, the light spot was no longer visible on my LG 32” TV, but since I had not used it for almost two years, the remote controller had stopped working. So, I took the remote controller apart for maintenance.

↓32インチLGTVのリモコンAKB73756566

↑Remote controller for 32” LG TV AKB73756566

↓ボディの隙間にヘラを突っ込んで、開く。

↑Stick a spatula into the gap in the body and open it.

↓こんな感じで、全周嵌め合いで止まっている。

↑It is stopped by a full circumference fit like this.

↓ばらした所。

↑The place where it is disassembled.

↓スイッチのゴムラバーの裏側には何やらネバっとした物が付いている。

↑There is something sticky on the back side of the rubber rubber of the switch.

飲み物でもこぼしたっけ?と思ったが、表側は液漏れの跡が無いので、何だろう?
Did I spill a drink on it? I thought, but there is no sign of leakage on the front side, so what is it?

そういえば以前37インチのテレビを分解した時にスイッチ部に同じ様なのが出てたな。
I once disassembled a 37” TV and found something similar in the switch section.

↓とりあえずアルコールできれいにふき取る。

↑Anyway, I wiped it off with alcohol.

↓ゴムラバー側と基板側もきれいに拭いた所。

↑The rubber carbon side and the board side were also wiped clean.

↓元通り組付けて、カメラで動作確認。無事に点灯するようになった。

↑I assembled it back together and checked the operation with a camera. The light came on safely.

これでリモコンも復活。後は拡散版の接着剤汚れ除去のみかな?
Now the remote controller is back. I guess the only thing left to do now is to remove the adhesive stains on the diffuser plate.

2024.04.04  (5/22 UP)

① LG 32型TV 修理 32LB5810 バックライトレンズ取付失敗編
② LG 32型TV 修理 32LB5810 失敗原因確認編
③ LG 32型TV 修理 32LB5810 バックライト交換編
④ LG 32型TV 修理 32LB5810 リモコン修理編
⑤ LG 32型TV 修理 32LB5810 散光板修正編
⑥LG 32型TV 2台目修理 32LB57YM

① LG 32inch TV repair 32LB5810 Backlight lens installation failure
② LG 32inch TV repair 32LB5810 Confirm of cause of failure
③ LG 32inch TV repair 32LB5810 Backlight replacement
④ LG 32inch TV repair 32LB5810 Remote control repair
⑤ LG 32inch TV repair 32LB5810 Diffuser plate repair
⑥LG 32inch TV repair 32LB57YM

LG 32型TV 修理 32LB5810 バックライト交換編

2024-05-15 | その他修理
前回のバックライト確認で、白濁したバックライトレンズを交換するべく手配していたバックライトストリップが届いた。早速、バックライトの交換をして行こう。
The backlight strip that we had arranged to replace the cloudy backlight lens at the last backlight check has arrived. Let's replace the backlight.

↓届いたバックライトストリップ。

↑Backlight strip received.

AとBが有るが、どちらも同じもので穴はA/B両対応で空いてる。
There are two types, A and B, but both are the same and have holes for both A and B.

早速バックライト迄ばらす。ばらし方は、下にある過去のブログリンク参照。
We will immediately disassemble it to the backlight. For how to disassemble the backlight, please refer to the past blog links below.

↓バックライトが外せるところまで分解。

↑Disassemble to the point where the backlight can be removed.

↓コネクタは矢印の方向から摘まんで、上側(写真手前側)に持ち上げて外す。

↑Remove the connector by picking it up from the direction of the arrow and lifting it upward (toward the front in the photo).

実は、他の人の動画等を見ても、コネクタの外し方が判らず、摘まんで、リード線側(写真左側)へ引っ張ったが外れず。
Actually, I couldn't figure out how to remove the connector even after watching other people's videos, etc. I picked it up and pulled it toward the lead wire side (left side in the photo), but it didn't come off.

結局、ストリップを剥がしてから、コネクタの下側の隙間にカッターの刃を入れて持ち上げて外す事が出来た。
After peeling off the strips, I was able to remove the connector by inserting the cutter blade into the gap on the underside of the connector and lifting it up.

↓ストリップをヘラで外す。

↑Remove the strips with a spatula.

↓裏から見たコネクタの構造。摘まむと下の爪がロックから外れる構造だった。

↑Structure of the connector seen from the back. The bottom pawl is released from the lock when it is picked up.

↓LEDバックライトストリップを交換した所。

↑The LED backlight strip has been replaced.

ここで一旦点灯試験をしてみるが、なんと点灯しない!初期不良か?!
I tried a lighting test once here, but to my surprise, it does not light up! Is it an early failure?

古いストリップで点くかと1番下のストリップのコネクタを差替えると無事に点灯。
I replaced the connector on the bottom strip to see if the old strip would light up, and it did.

↓新しいのに戻して、色々と触ってみると、コネクタ部分に触ると点灯した。

↑I put it back in the new one and touched it in various ways, and it lit up when I touched the connector part.

↓コネクタ部分を良く見ると新旧で、中のピンの長さが違う。(上が旧、下が新)

↑When I looked closely at the connector part, I found that the length of the pins inside the old one and the new one are different (the top is the old one, the bottom is the new one).

どうやら外す時にリード方向に引っ張ったりしたので少しコンタクトもずれていた様で、リードをコネクタ側に押し込んでやると、問題なさそうだ。
It seems that the contacts were also slightly misaligned because of pulling in the direction of the leads when removing the connector, and after pushing the leads toward the connector, it looks fine.

↓散光板は接着剤の汚れが付いたままだが、取り敢えず組み上げる事にする。

↑The diffuser plate is still covered with glue stains, but I decided to assemble it anyway.

↓一通り組み上げて動作試験。無事に光の点は無くなった。

↑I assembled it and tested the operation. No more light spots.

ただ、散光板の接着剤の汚れによるムラは、テレビを見てる分にはあまり気に成らないが、ここにあると認識した後だと、その箇所がやっぱり気に成る感じだ。
However, the unevenness caused by the stain of the glue on the diffuser plate does not bother me so much when I am watching TV, but after I recognized that it was here, I was still bothered by the spot.

何とか散光板の接着剤汚れも対処しなければ、、、、
I have to deal with the glue stains on the diffuser somehow. 、、、、

2024.04.11 (5/15 UP)

① LG 32型TV 修理 ① LG 32型TV 修理 32LB5810 バックライトレンズ取付失敗編
② LG 32型TV 修理 32LB5810 失敗原因確認編
③ LG 32型TV 修理 32LB5810 バックライト交換編
④ LG 32型TV 修理 32LB5810 リモコン修理編
⑤ LG 32型TV 修理 32LB5810 散光板修正編
⑥LG 32型TV 2台目修理 32LB57YM

① LG 32inch TV repair 32LB5810 Backlight lens installation failure
② LG 32inch TV repair 32LB5810 Confirm of cause of failure
③ LG 32inch TV repair 32LB5810 Backlight replacement
④ LG 32inch TV repair 32LB5810 Remote control repair
⑤ LG 32inch TV repair 32LB5810 Diffuser plate repair
⑥LG 32inch TV repair 32LB57YM