IC-7300をメインとして使用していますが、最近MULTIを回してRITやRF POWER設定がスムーズに変化しないので、調べてみました。このMULTIにはロータリーエンコーダ(RE)が使用されていますが、いわゆる(メカニカル接点の)「すべり」現象がおき、スムーズにアップダウンカウントが出来ない状況になっていました(と、思われる)
ネットで検索しましたが、それらしき記事は見つからなかったので、まれ?なケースかもしれません。このMULTIを使うのは主にRITや送信電力を調整するときくらいですが、変化がスムーズでないのはストレスになります。
調べると、このREはREと基盤でユニットになっており(RITボードと呼ぶようです)、簡単に取り換え出来そうだったのでアイコムにネットから補修部品の問い合わせをしたところ、すぐに返事があり、予備を含めて2個注文しました。
交換作業:
① ケースを外す。ビスが多いので結構手間です。
② MULTIの「つまみ=ノブ」を外す。引き抜くだけですが、きっちり刺さっており手では引き抜けません。そこで、ゴムシートを適当な大きさに切り、ノブにかぶせペンチで軸方向手前に引きぬきました。余り力を入れるとノブが壊れるので注意が必要です。
③ REを外す、パネル面から見えるネジを外すだけです。ラジオペンチを使えばうまくゆくます。
④ REを交換、コネクタの差し込みを忘れない様に。
と、書けば簡単ですが、RITボード(下の写真)ではなくREだけが送られてきたので、既存の不良REを外し、新しいREをボードに載せ替える作業が待っていました。 REには5端子あり、ボードにガッチリと半田でついています。 はんだ吸い取り器があれば簡単に行くと思いますが、あいにく手持にはまともに使えるものはなく、半田ごてとはんだ吸い取り線で作業となりました。5つの端子に半田ごてを当てて半田を吸い取ってもなかなかきれいに取れてくれません。そこで、不良REをばらして5つの端子を独立して外せるようにし、何とか交換できました。
送られてきたRE 2個、一個は予備 (Rotary encoder, one for spare)

MULTIのRITボード(上側の四角いのがRE) RIT board, upper one is RE.

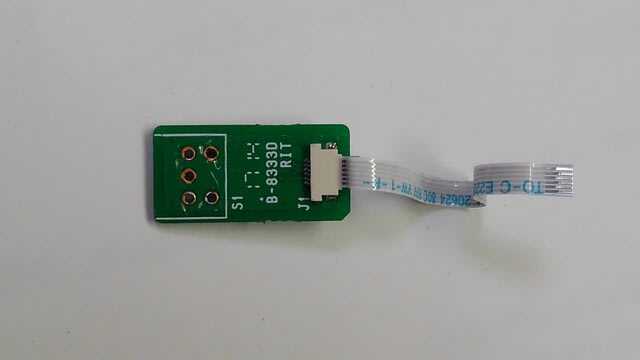
パネルより外したMULTIのRITボード (Removed RIT Board)

不良REを外したボード(ここまでの作業は結構大変)(Board after removed faulty RE, it was hard work)
新しいREとボード (New RE and existing board)

取り換え完了 (Now lets go!)

以上で完成です。 REの部品代は妥当な金額でしたが、送料と代引手数料の方が高いくらいでした。 また、ケースの開腹やパネル面各部品の実装図を送ってもらったので参考になりました。
もし、これからMULTIのRITボードを交換しようと考えている方にコメントしたいと思います。注文はREとボードがセットになったものを聞いてみてください。REだけを注文すると半田ごてと格闘することになり結構時間と場合によってはボードを破損させる危険性があります。RITボードで交換する場合でもパネルと本体間にフラットケーブルが3本とワイヤのケーブルが一本あり外す必要があり、抜き差しに注意が必要です。
以上あくまで当局が実施した内容なので、自己責任で楽しんみてください。
English version
IC-7300 is my current main radio and it works well past few years without any problem. Recently I found a malfuntion of MULTI which is composed of rotary encoder (RE) and it's mounting board. Phenomenon was that smooth up and down can not be done, which made stressful adjustment of the radio, looking at the circuit, I determined the RE should be degraded of inner contacts or so and need to be replaced.
I asked Icom for the quotation and got reply in the next day, it was so quick!
Step to repair
1. Open the case, upper and lower. Many screws!
2. Take off the RIT board, be careful there are small flat cable between front panel and main body.
3. Take off the faulty RE, clean the board for new RE installation.
4. Take opposite procedure.
Step 2 requre some technique that it is difficult to take off the faultiy RE from the board since it is fixed tightly, if you do the work, be careful not give damage the board. One solution is to order RIT board (RE equipped with board) which does not require soldering work. Knob of MULTI (RE) is tightly inserted in the shaft so that you need to pull the knob out with some tool(it may be only in my case). I used a plier, but put a rubber between the knob and the tool to protect the plastic knob.
There are three flat cables between front panel and main body and one cable assembly, while working this work pay attention for those cables.
After completion of the replacement, I have no problem on the function.
Hope this article may help for anyone who has a similar issue. This article is just in my case, do it by your own responsibility.