Ubuntu 64bit/LXC上にUbuntu 32bit仮想マシンをインストールする
いつもアクセスありがとうございます。匠技術研究所の谷山 亮治です。
今回は「Ubuntu 64bit/LXC上にUbuntu 32bit仮想マシンをインストールする」です。
■何やっているの?
Ubuntu 32bitで動くバイナリーでの配布ソフトウエアがあります。そのまま動作させるためにi386版Ubuntuが必要です。
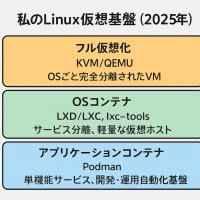
Ubuntu 64bit/x86_84 LXC仮想基盤上で仮想マシンとしてUbuntu 32bit版を立ち上げてみます。これが動くと専用ハードウエアが不要になり、かつ複数のUbuntu 32bitマシンを動かすことができます。
○RAM容量の確認
仮想基盤のRAM容量です。充分な容量があります。
$ free
total used free shared buffers cached
Mem: 3960284 1220964 2739320 64300 872 631388
-/+ buffers/cache: 588704 3371580
Swap: 1952764 0 1952764
$
○OS情報の表示
仮想基盤の基本ソフトの情報です。
$ lsb_release -a
No LSB modules are available.
Distributor ID: Ubuntu
Description: Ubuntu 15.04
Release: 15.04
Codename: vivid
$ uname -a
Linux LaVieLN 3.19.0-31-generic #36-Ubuntu SMP Wed Oct 7 15:04:02 UTC 2015 x86_64 x86_64 x86_64 GNU/Linux
○Ubuntu 32bit LXC仮想マシンのインストール
$ sudo -i
# lxc-create -n ubi386 -t ubuntu -- -a i386
.... 時間がかかります。
##
# The default user is 'ubuntu' with password 'ubuntu'!
# Use the 'sudo' command to run tasks as root in the container.
##
#
○Ubuntu 32bit LXC仮想マシンの複製
できたてほやほやを保存するために複製(クローン)します。
# lxc-ls -f
NAME STATE IPV4 IPV6 GROUPS AUTOSTART
----------------------------------------------
ubi386 STOPPED - - - NO
# lxc-clone -o ubi386 -n vm11
Created container vm11 as copy of ubi386
# lxc-ls -f
NAME STATE IPV4 IPV6 GROUPS AUTOSTART
----------------------------------------------
ubi386 STOPPED - - - NO
vm11 STOPPED - - - NO
#
○Ubuntu 32bit LXC仮想マシンを起動します
クローンした32bit仮想マシンを起動します。起動直後はIPアドレスがありませんが、すぐにIPアドレスをDHCPで取得しています。
# lxc-start -n vm11
# lxc-ls -f
NAME STATE IPV4 IPV6 GROUPS AUTOSTART
----------------------------------------------
ubi386 STOPPED - - - NO
vm11 RUNNING - - - NO
# lxc-ls -f
NAME STATE IPV4 IPV6 GROUPS AUTOSTART
----------------------------------------------------
ubi386 STOPPED - - - NO
vm11 RUNNING 10.0.3.128 - - NO
root@LaVieLN:~#
成功です。