gooブログはじめました!

写真付きで日記や趣味を書くならgooブログ

Launch X431 Airbag Module Programming for Ford Focus 2013

2020-08-29 18:03:04 | 日記


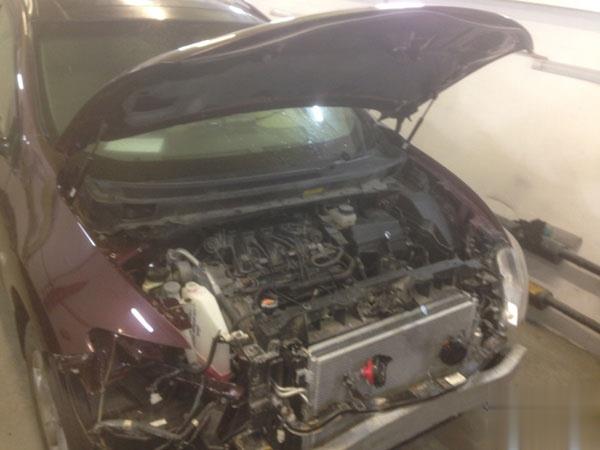
It requires you to reprogram airbag module when you finishing airbag
module replacement.So here i will show you guide on how to use Launch X431 to reprogram airbag module for Ford Focus 2013.More about Ford repair please check here:Ford Focus Trouble Repair


Launch-X431-Airbag-Module-Programming-for-Ford-Focus-2013-1


What You Need?


Launch X431 V+ pro3


Test prerequisites and warnings:


The car is equipped with the programmable module and the module is
communicating properly. The ignition switch is on. All cables and
connectors are correctly connected. Communication fault may occur on the
vehicle if the status is not good or the battery is low.


Procedure:


1.Choose Ford V46.20 or a later version.


2.Choose Automatic Search.


3.Choose System Selection.


4.Choose RCM (Airbag System).


5.Choose Special Function.


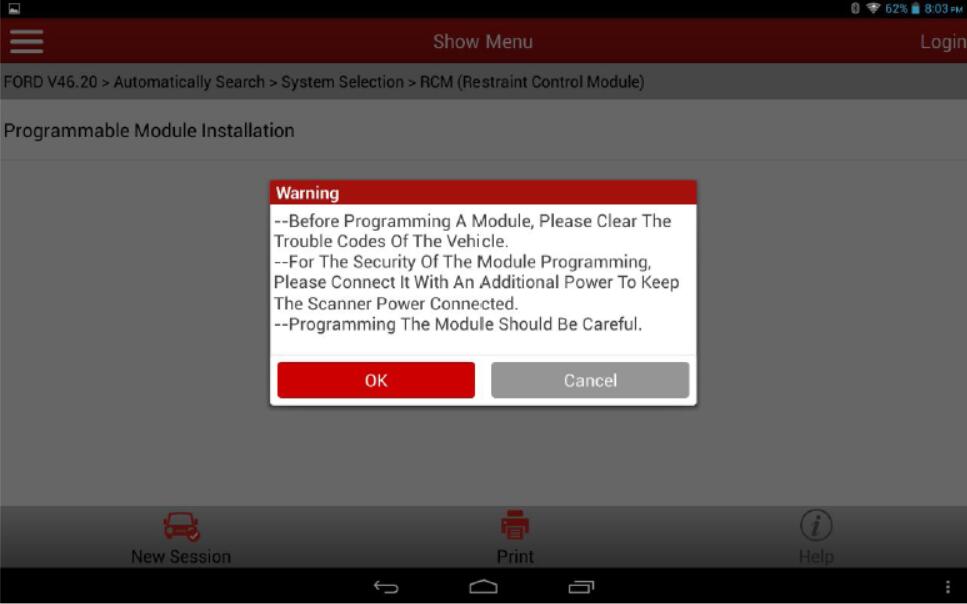
6.Choose Programming Module Installation. Read the hint carefully,
check that conditions are met, and then click OK to perform the
function.


Launch-X431-Airbag-Module-Programming-for-Ford-Focus-2013-2


7.Before installing the module, clear the DTCs first and configure an
auxiliary power supply to keep the decoder power supply connected.


Launch-X431-Airbag-Module-Programming-for-Ford-Focus-2013-3
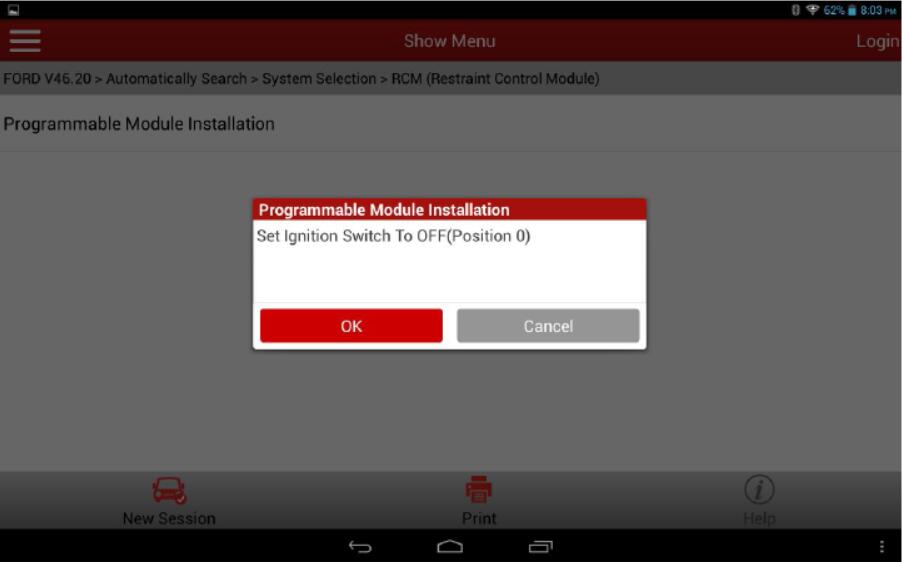
8.Turn the ignition key to ON (position II) and then click OK. The program starts reading old module information.


Launch-X431-Airbag-Module-Programming-for-Ford-Focus-2013-4


9.After reading, turn the ignition key to OFF (position I) and then click OK.


Launch-X431-Airbag-Module-Programming-for-Ford-Focus-2013-5


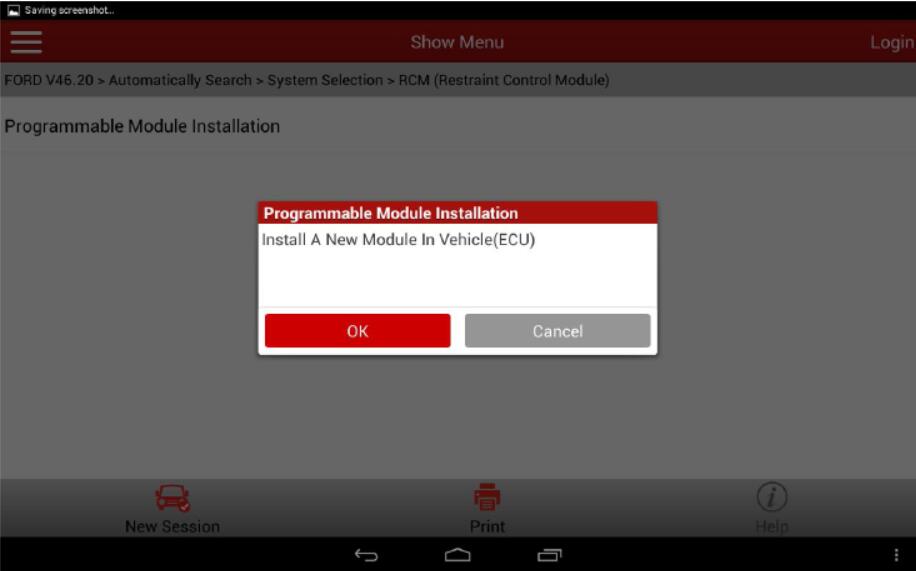
10.After the program completes reading old module information,
install a new module0.Ensure that all cables and connectors are
correctly connected and the decoder power supply is kept connected.
After installation, click OK. The program starts writing new
programmable module information.


Launch-X431-Airbag-Module-Programming-for-Ford-Focus-2013-6


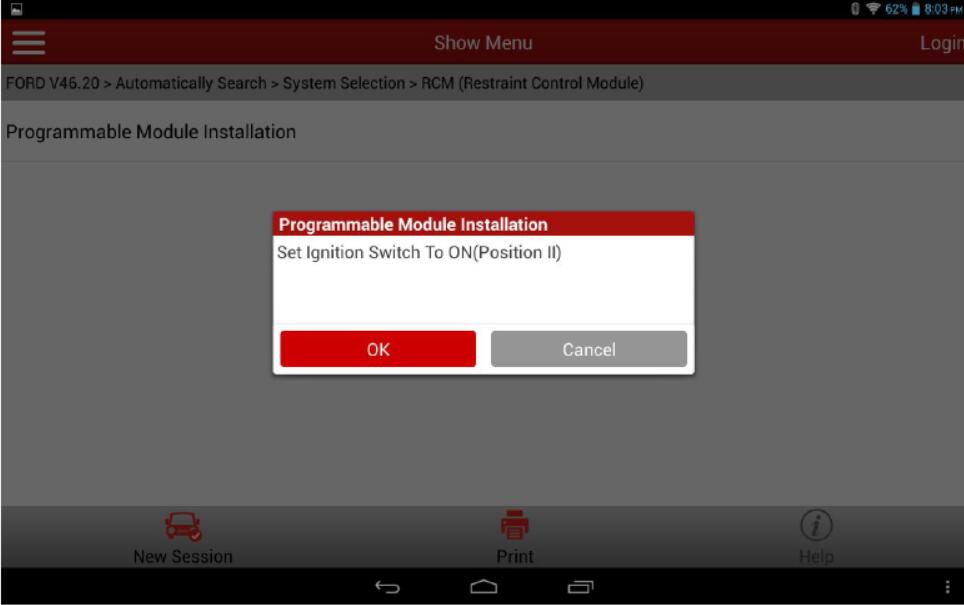
11.Turn the ignition key to ON (position II) and then click OK.


Launch-X431-Airbag-Module-Programming-for-Ford-Focus-2013-7


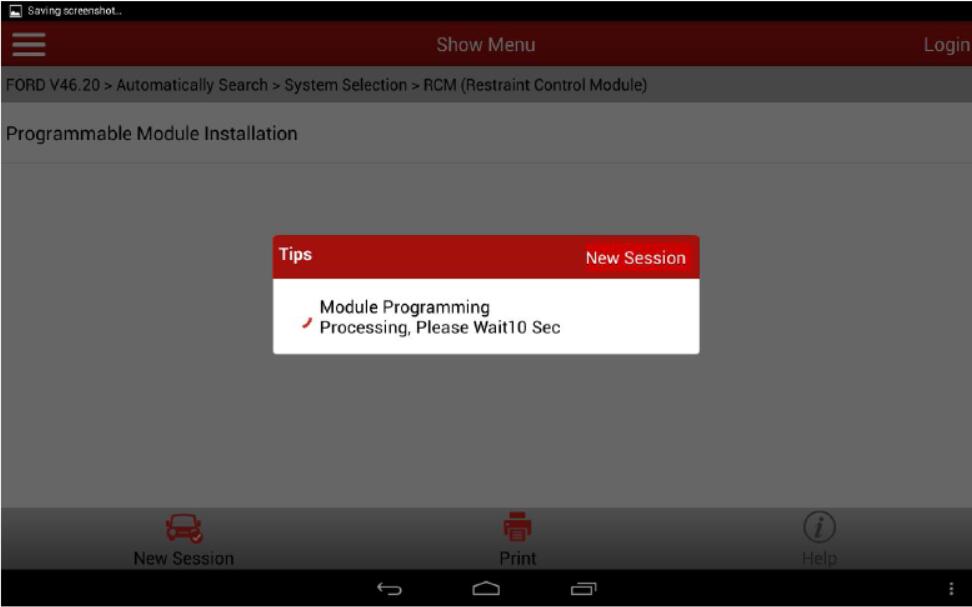
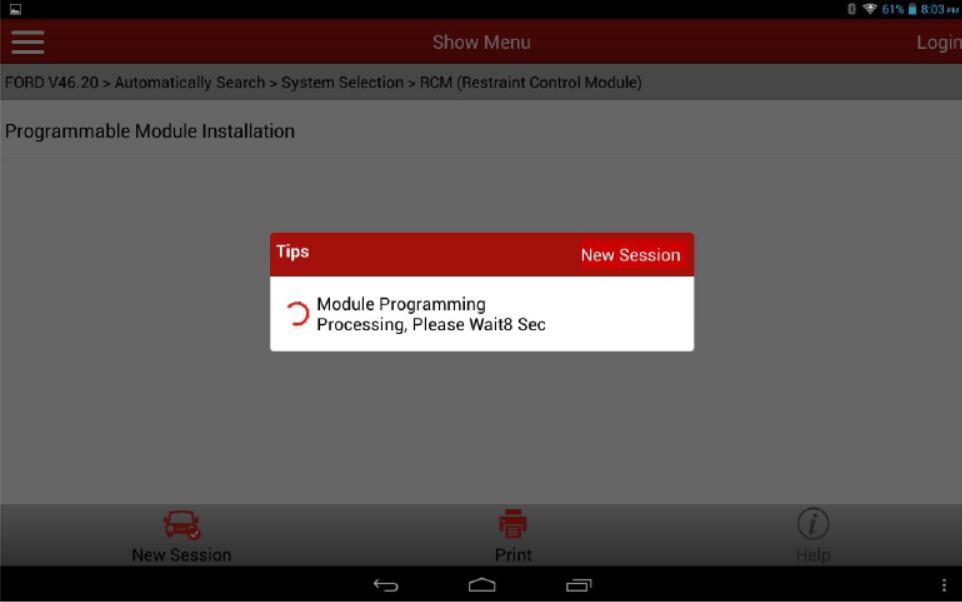
12.Wait for the program running.


Launch-X431-Airbag-Module-Programming-for-Ford-Focus-2013-8


13.After program running is complete, turn the ignition key to OFF (position I) and click OK.


Launch-X431-Airbag-Module-Programming-for-Ford-Focus-2013-9


14.Turn the ignition key to ON (position II) and then click OK.


Launch-X431-Airbag-Module-Programming-for-Ford-Focus-2013-10 (1)


15.Wait the program to run for 10s.


Launch-X431-Airbag-Module-Programming-for-Ford-Focus-2013-11 (1)


16.Turn the ignition key to OFF (position I) and then click OK.


Launch-X431-Airbag-Module-Programming-for-Ford-Focus-2013-12 (1)


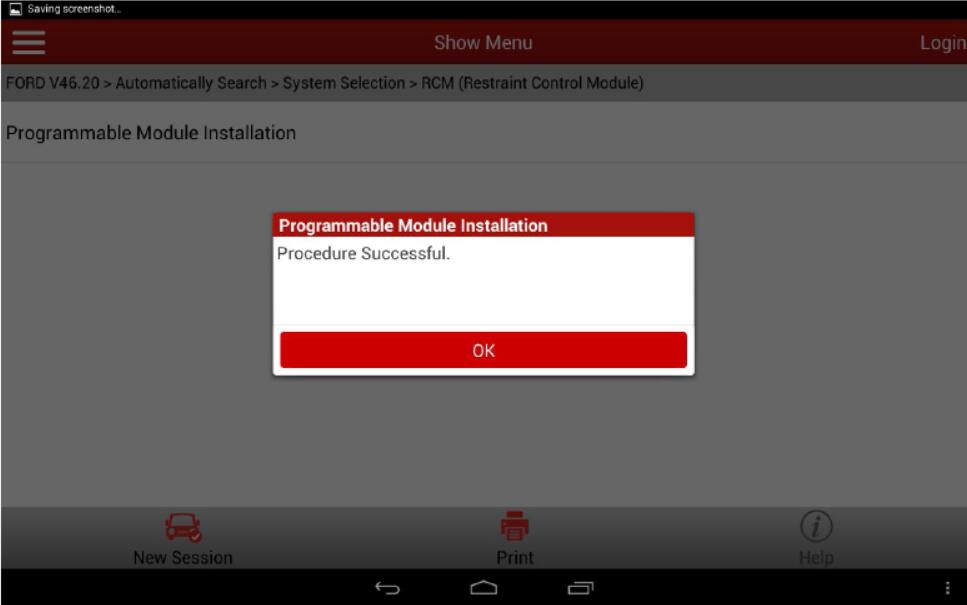
17.After the module is successfully installed, a program running
success message is displayed. The new module information has been
written. The function is complete and exits.


Launch-X431-Airbag-Module-Programming-for-Ford-Focus-2013-13


18.After program running is complete, stop and restart the engine to
check whether the instrument cluster MIL is on and whether the replaced
or initialized module can operate properly.


More test report about Launch X431 please check:Launch X431 Test report


Toyota Prado 2011 C120A Yaw Rate Sensor Calibration by Launch X431

2020-08-29 17:50:38 | 日記


After you replace ABS ECU or yaw rate/G sensor for Toyota,it will get
C1210A trouble code.It will ask you to program yaw rate sensor.So here i
want to show you instruction on how to use Launch X431 device to perform calibrate the yaw rate sensor for Toyota Prado 2011.For repair about Toyota,please check here Toyota Trouble Repair


Toyota-Prado-2011-C120A-Yaw-Rate-Sensor-Calibration-Launch-X431-1


What You Need?


Launch X431 V+ pro3


Prerequisites:


1.The vehicle is on a flat surface.


2.The steering wheel is straight forward.


3.The gear lever is in P gear.


4.Engine is not running.


5.Ignition is ON.


Procedure:


The following takes C120A present after 2011 Prado ABS pump assembly is replaced as an example.


Toyota-Prado-2011-C120A-Yaw-Rate-Sensor-Calibration-Launch-X431-2


1.Choose Toyota V48.53 or a later version.


Toyota-Prado-2011-C120A-Yaw-Rate-Sensor-Calibration-Launch-X431-3


2.Choose 16PIN DLC (Europe and other regions).


Toyota-Prado-2011-C120A-Yaw-Rate-Sensor-Calibration-Launch-X431-4


3.Choose Automatic Search.


Toyota-Prado-2011-C120A-Yaw-Rate-Sensor-Calibration-Launch-X431-5


4.Choose LC PRADO.


Toyota-Prado-2011-C120A-Yaw-Rate-Sensor-Calibration-Launch-X431-6


5.Choose China, up to 2012.06..


Toyota-Prado-2011-C120A-Yaw-Rate-Sensor-Calibration-Launch-X431-7


6.Launch X431 automatically reads vehicle information.


Toyota-Prado-2011-C120A-Yaw-Rate-Sensor-Calibration-Launch-X431-8


7.Choose System Selection.


Toyota-Prado-2011-C120A-Yaw-Rate-Sensor-Calibration-Launch-X431-9


8.Choose Chassis.


Toyota-Prado-2011-C120A-Yaw-Rate-Sensor-Calibration-Launch-X431-10


9.Choose ABS (Anti-lock Brake System)/VSC (Vehicle Stability Control)/TRC (Traction Control).


Toyota-Prado-2011-C120A-Yaw-Rate-Sensor-Calibration-Launch-X431-11


10.Read the DTC. The information “C120a, ECU initialization is not completed” is displayed.


Toyota-Prado-2011-C120A-Yaw-Rate-Sensor-Calibration-Launch-X431-12


Toyota-Prado-2011-C120A-Yaw-Rate-Sensor-Calibration-Launch-X431-13


11.Place the gear lever in P, press and turn the knob in Figure 9 to
the middle position between H4 (high speed 4WD) and L4 (low speed 4WD),
and then perform the X-431 special function “test mode”.


12.Choose Special Function.


Toyota-Prado-2011-C120A-Yaw-Rate-Sensor-Calibration-Launch-X431-14


13.Choose Automatically Scan Special Function.


Toyota-Prado-2011-C120A-Yaw-Rate-Sensor-Calibration-Launch-X431-15


14.Choose Test Mode.


Toyota-Prado-2011-C120A-Yaw-Rate-Sensor-Calibration-Launch-X431-16


15.A message is displayed, asking this function to be performed after ABS ECU or yaw rate/G sensor is replaced.


Toyota-Prado-2011-C120A-Yaw-Rate-Sensor-Calibration-Launch-X431-17


16.The prerequisites for test mode are displayed. Ensure that the
vehicle is on a flat surface, the steeringnwheel is straight forward,
the gear lever is in P, the engine is stopped, and ignition is on.


Toyota-Prado-2011-C120A-Yaw-Rate-Sensor-Calibration-Launch-X431-18


17.Keep the vehicle stationary for 2s or longer.


Toyota-Prado-2011-C120A-Yaw-Rate-Sensor-Calibration-Launch-X431-19


18.The message “When the ABS&VSC lamp blinks, calibration is
complete. If the ABS&VSC lamp does not blink, try again” is
displayed.


Toyota-Prado-2011-C120A-Yaw-Rate-Sensor-Calibration-Launch-X431-20


19.Read the DTC again. No DTC is prompted. Start the engine to check.
If the instrument panel MIL is not on, the fault is rectified.


Toyota-Prado-2011-C120A-Yaw-Rate-Sensor-Calibration-Launch-X431-21


More test report about Launch X431 please check:Launch X431 Test report


FREE download Nissan Consult 3 Plus software

2020-08-11 15:38:54 | 日記


CONSULT 3 Plus v83.11.00:


https://mega.nz/#!D9ZRnaSL!Y6rksoTqF1rbpx2-tIvliYFN5RcQSb6s-WwKqBGByZI


CONSULT-III_v83_download (2)


CONSULT III Plus v81.11.00:


https://mega.nz/#!ukhgRSYJ!DXM22QAbQDo-b4Di9e6tyxy2SE4fKVogLmKCv6QzZUA


CONSULT-III_v81_download (2)


Nissan Consult3 old patch download free:


https://mega.nz/#!xY03WKhZ!V5iQs7OiI4Xl4OhNLWehbgac56uYEpSxaOKQy6NeweU


CONSULT-III_patch-download (2)


This is used for it cannot be patched with “C3PCheckLicense” file


Remove old patch and install Consult 3 here


Test: Consult 3 plus 83.11 does not work with j2534
PassThruSupport.04.04 devices, only API 05.00…… but Consult 3+ 81.11 no
problem


Go back to version 75 if you want programming


Nissan Consult III plus v75 software download:


https://mega.nz/#!WYYmiQ6J!QDCblZBomUBfEkTUEHd9ZCHWzV0cUKM-_3fT0nW7scg


CSP Software Version : CSP V41.10


Programming Data Version : Plus_V75


Password: Not required


Installation tip:


Uninstall the firewall, antivirus software.


Install the Consult 3 plus V75.20 to the C drive in the “NTFS” format.


Security: use with relief, 100% tested with Consult 3 plus china clone!


Languages: English/ French/ German/ Spanish/ Italian/ Japanese/
Portuguese/Russian/ Finnish/ Greek/ Chinese(Simplified)/
Chinese(Traditional)


Vehicles: Nissan and Infiniti from 1996 to 2017


Programming: confirmed! ECU Programming without card


Kts570 working with Consult III plus:


Have to modified the INI.


[current_channel]
channel=0


[system_management]
access_mode=1


[device]
vi_device_name=J-box 2
[mode]
debug_mode=TRUE
debug_mode_vehicle_battery=TRUE
[vehicles]
tab_index=1


“tab_index=1” seems the key to make jbox2 especially. Another thing
is that you don’t need change the name of Jbox2 folder to nissan_VI2.
Just copy the name of device (in this case “J-Box 2″) and paste to the
vi_device_name in INI file. so it gonna be vi_device_name-J-Box 2”. That
is it. At the first time, I changed the name of the folder in regedit,
and errors showed. Now, automatically consult3 recognized jbox2 and vin
number now. Only DTC and clear codes were detected though so far. I did
not dig deeper yet.


For KTS570, it is pretty much same as jbox2. The difference is that I
wrote “tab_index=4” instead of ‘1’. You also need update the firmware
through esi. Otherwise, consult3 did not recognize.


How to Reset Nissan Murano 2012 CVT Fluid Count with Consult3

2020-08-11 15:26:02 | 日記


Vehicle model: Nissan Murano Z51 3.5L CVT 2012Y
Purpose: reset CVT fluid “life” monitor
Device used:  
You need a professional scan tool to reset the CVT transmission fluid count.  The normal code readers will not work.
Nissan Consult III, Nissan Consult III Plus, Launch x431 V and an Autel ms908p scanner, all of these will do the reset.


Procedure using Nissan Consult III diagnostic tool:


If you are using a clone, Consult 3 plus is better choice.


This procedure is preferably carried out after changing the oil in the CVT .


Launch Starter in which we select Consult-III :


How-to-Reset-Nissan-Murano-2012-CVT-Fluid-Count-with-Consult3-1 (2)


Press the Connect button :


How-to-Reset-Nissan-Murano-2012-CVT-Fluid-Count-with-Consult3-2 (2)


Choose vehicle model Murano Z51 after 2010.v. and press the Select button :


How-to-Reset-Nissan-Murano-2012-CVT-Fluid-Count-with-Consult3-3 (2)
Confirm the selection with the Confirm button :


How-to-Reset-Nissan-Murano-2012-CVT-Fluid-Count-with-Consult3-4 (2)
Choose Diagnosis :
How-to-Reset-Nissan-Murano-2012-CVT-Fluid-Count-with-Consult3-5 (2)
Select the type of Can- bus according to the configuration, in this case, the very first, and click the Next button :


How-to-Reset-Nissan-Murano-2012-CVT-Fluid-Count-with-Consult3-6 (2)
Click on the tablet (top left):
How-to-Reset-Nissan-Murano-2012-CVT-Fluid-Count-with-Consult3-7 (2)
Choose System Diagnosis :
How-to-Reset-Nissan-Murano-2012-CVT-Fluid-Count-with-Consult3-8 (2)
Click on Transmission and OK :


How-to-Reset-Nissan-Murano-2012-CVT-Fluid-Count-with-Consult3-9 (2)
Moving towards Work Support :


How-to-Reset-Nissan-Murano-2012-CVT-Fluid-Count-with-Consult3-10 (2)
Click on Conform CVTF Deteriortn and Next :


How-to-Reset-Nissan-Murano-2012-CVT-Fluid-Count-with-Consult3-11 (2)
At the moment, the fluid counter shows 7897


How-to-Reset-Nissan-Murano-2012-CVT-Fluid-Count-with-Consult3-12 (2)
Click the Clear button and once again agree:


How-to-Reset-Nissan-Murano-2012-CVT-Fluid-Count-with-Consult3-13 (2)
Counter reset:


How-to-Reset-Nissan-Murano-2012-CVT-Fluid-Count-with-Consult3-14 (2)
Reset fluid count success with Nissan Consult 3 scanner.
How-to-Reset-Nissan-Murano-2012-CVT-Fluid-Count-with-Consult3-15 (2)
Done.