gooブログはじめました!

写真付きで日記や趣味を書くならgooブログ

Toyota Vellfire 2015 readjust oil pressure calibration Launch X431 Pad V

2021-05-27 12:02:36 | 日記
Car model and year: Toyota Vellfire 2015

Purpose: To readjust oil pressure calibration of CVT after replacing the CVT Fluid.

Launch-X431-Pad-V-readjust-oil-pressure-calibration-of-CVT-1 (2)

Toyota diagnostic tool that is able to do:

X431 Pro3

X431 PAD

Launch X431 PAD V

Launch-X431-Pad-V-readjust-oil-pressure-calibration-of-CVT-2 (2)

Today, I use Launch X431 PAD V to test . I connect the device to the car first, wait for the device to start, and click on “Local Diagnose”, select “Asian ” and then “Toyota”.

Launch-X431-Pad-V-readjust-oil-pressure-calibration-of-CVT-3 (2)

Ensure it is the newest Toyota version, click on “Ok”.

Launch-X431-Pad-V-readjust-oil-pressure-calibration-of-CVT-4 (2)

Tap “16PIN DLC (Europe and Other).”.

Launch-X431-Pad-V-readjust-oil-pressure-calibration-of-CVT-5 (2)

Tap “-2018.01” and will have vehicle information including VIN, vehicle name, model, engine type, year, cylinder number.

Launch-X431-Pad-V-readjust-oil-pressure-calibration-of-CVT-6 (2)

Tap “System Selection” -> “Powertrain”.

Launch-X431-Pad-V-readjust-oil-pressure-calibration-of-CVT-7 (2)
Launch-X431-Pad-V-readjust-oil-pressure-calibration-of-CVT-8 (2)

Tap “Engine and ECT”.

Launch-X431-Pad-V-readjust-oil-pressure-calibration-of-CVT-9 (2)
Tap “Special Function“.

Launch-X431-Pad-V-readjust-oil-pressure-calibration-of-CVT-10 (2)

Tap “Reset Memory” and have the notice reading “This function is used to delete the learned memory in the ECT ECU. A memory reset is required after automatic transmission or valve body replacement. ”

Launch-X431-Pad-V-readjust-oil-pressure-calibration-of-CVT-11 (2)

Complete, please perform the following operations:

1. Turn the ignition switch OFF and back ON.
2. Drive the vehicle in a “stop and go” pattern for approximately 15 minutes.

Launch-X431-Pad-V-readjust-oil-pressure-calibration-of-CVT-12 (2)

Tap “ CVT Oil Pressure Calibration “

Usage: To readjust oil pressure calibration of CVT after replacing the related parts.

Launch-X431-Pad-V-readjust-oil-pressure-calibration-of-CVT-13 (2)
Launch-X431-Pad-V-readjust-oil-pressure-calibration-of-CVT-14 (2)

Procedure:

1. Keep IG OFF for 30 seconds.
2. Cycle IG ON (Ready OFF / Engine OFF) and wait at least 2 seconds.
3. Start vehicle (Ready ON/Engine ON) and wait at least 5 seconds.

Launch-X431-Pad-V-readjust-oil-pressure-calibration-of-CVT-15 (2)

Wait 10 seconds and it prompts “ CVT Oil Pressure Calibration is complete”.

Launch-X431-Pad-V-readjust-oil-pressure-calibration-of-CVT-16 (2)

Finally, check and delete all DTC.

Launch-X431-Pad-V-readjust-oil-pressure-calibration-of-CVT-17 (2)

Alright, job is done.

If you want to know more about Launch X431 Scan Tools, please visit our website www.obd2tool.com

How to deal with Ford Mustang 2017 TPMS sensor malfunction

2021-05-27 12:02:36 | 日記
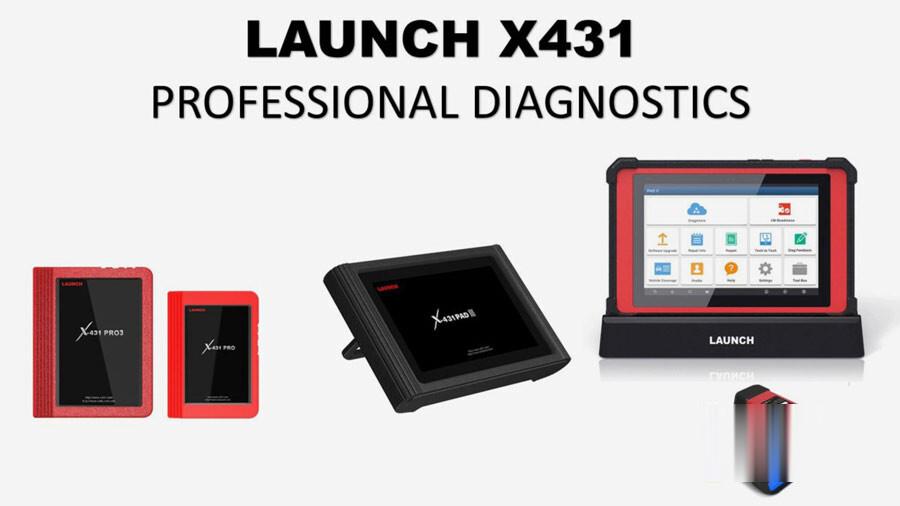
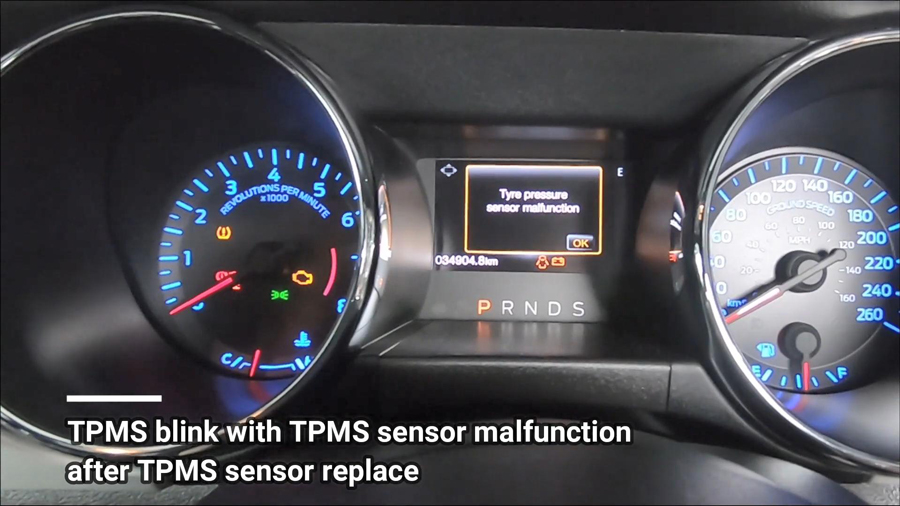
Have one Ford Mustang 2017, the TPMS blink with TPMS sensor malfunction after TPMS sensor replace. And we prepared these tools: a Launch X431 TSGUN TPSM Wand, a Launch X431 Diagnostic Tool (X431 V, X431 V+, X431 PAD V 5, X431 PAD II etc), 4pcs 315MHz + 433MHz TPMS sensors (Shown as below). And X431 TSGUN will communicate with X431 Tool via Bluetooth.

Launch-X431-TSGUN-Ford-Mustang-2017--TPMS-Sensor-Learning-Procedure-1
Launch-X431-TSGUN-Ford-Mustang-2017--TPMS-Sensor-Learning-Procedure-2

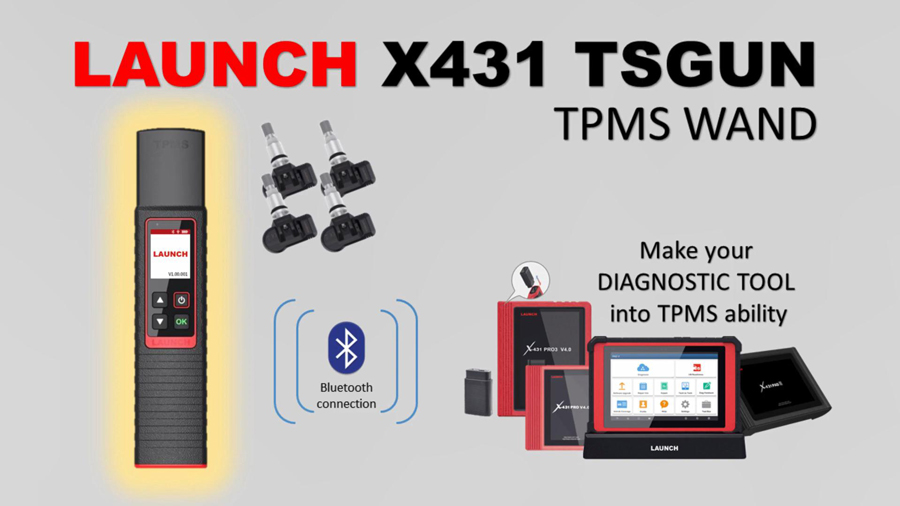
Note: X431 TSGUN can only program the sensors from Launch, for the activation, it can apply to the original tire pressure sensor.

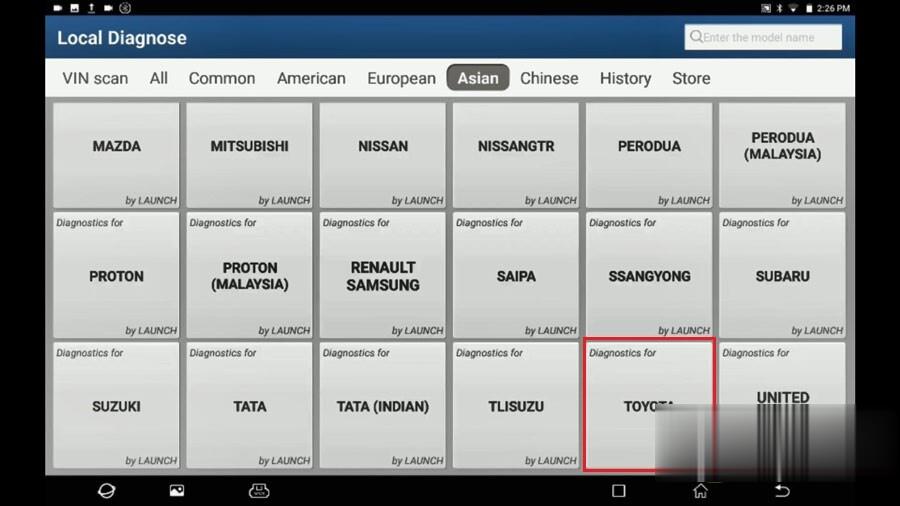
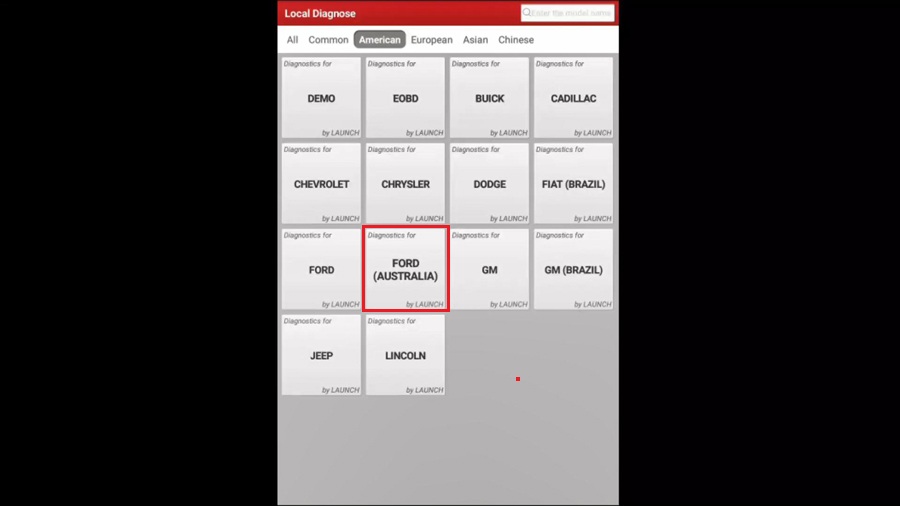
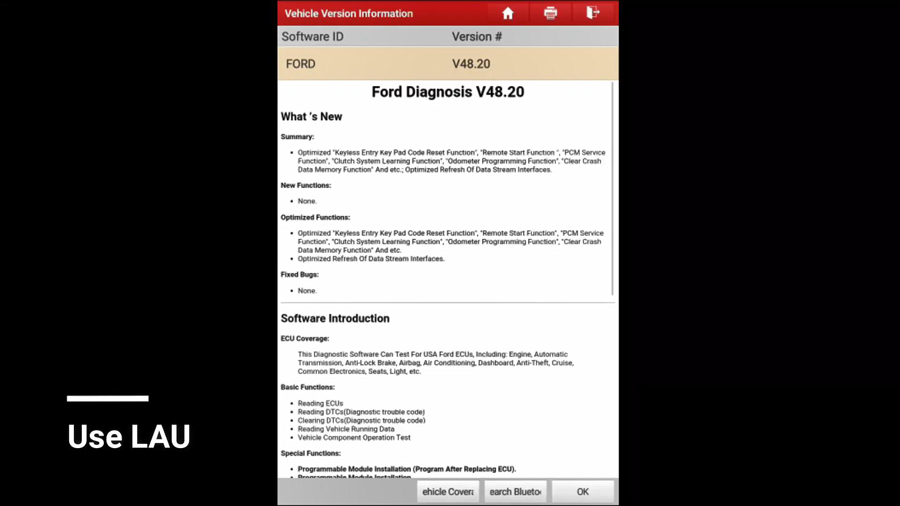
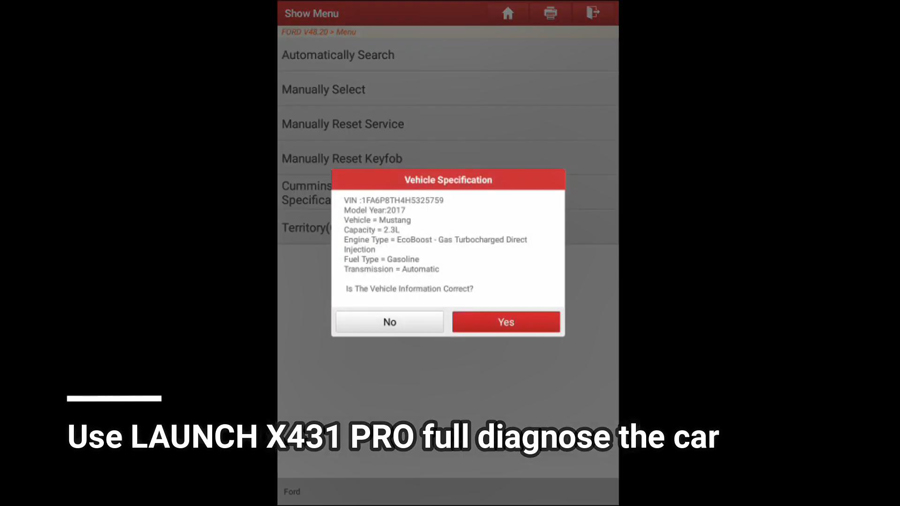
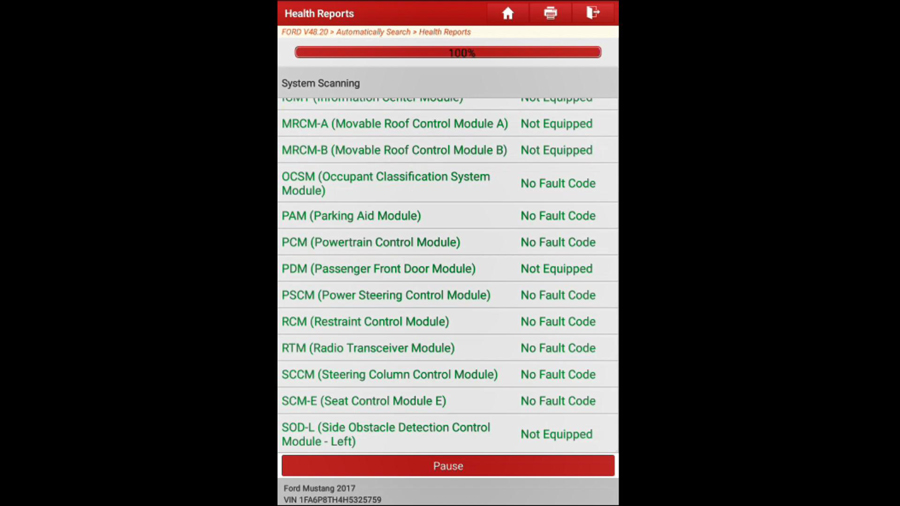
Next we will use Launch X431 Pro full diagnose the car.

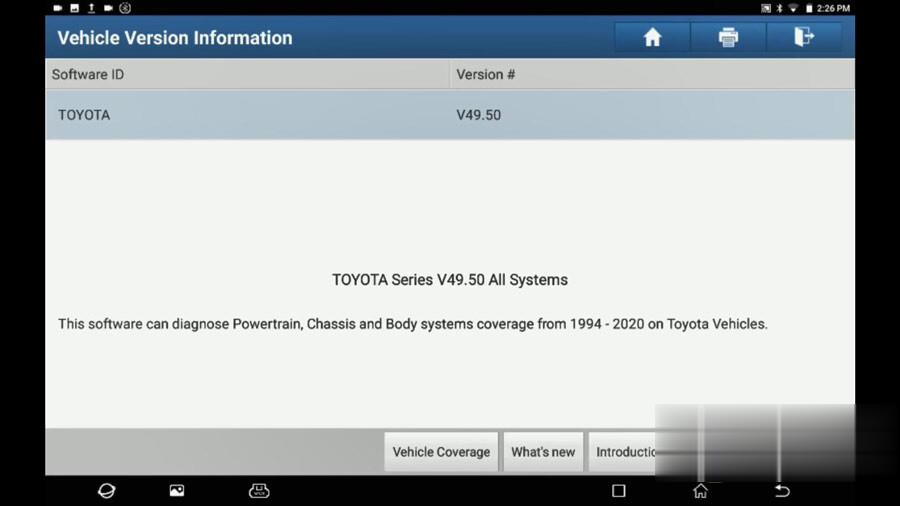
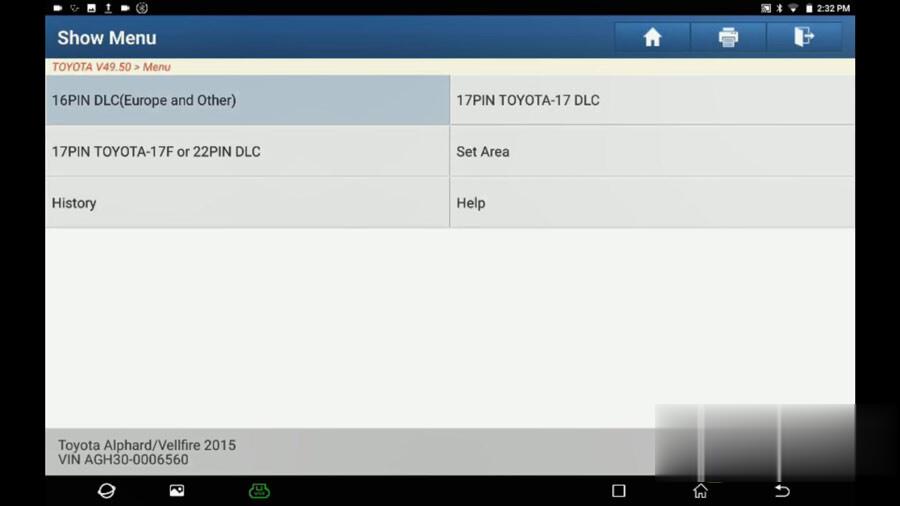
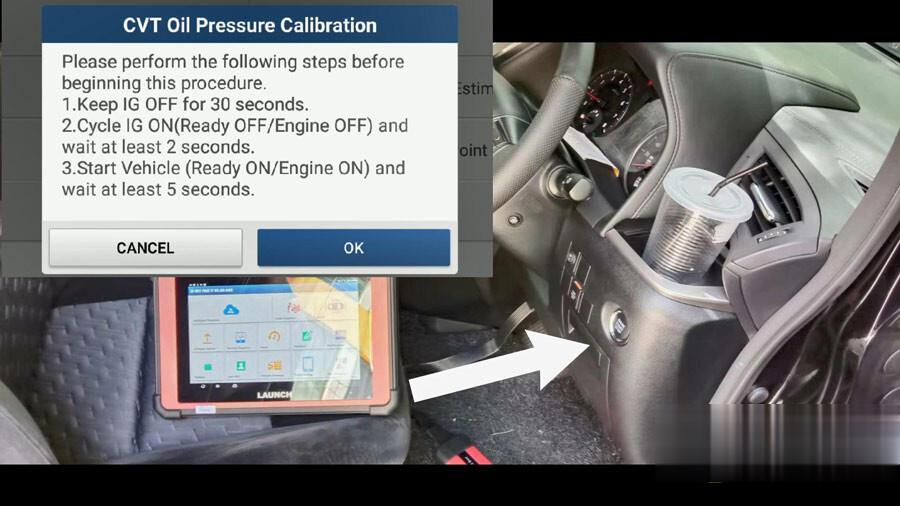
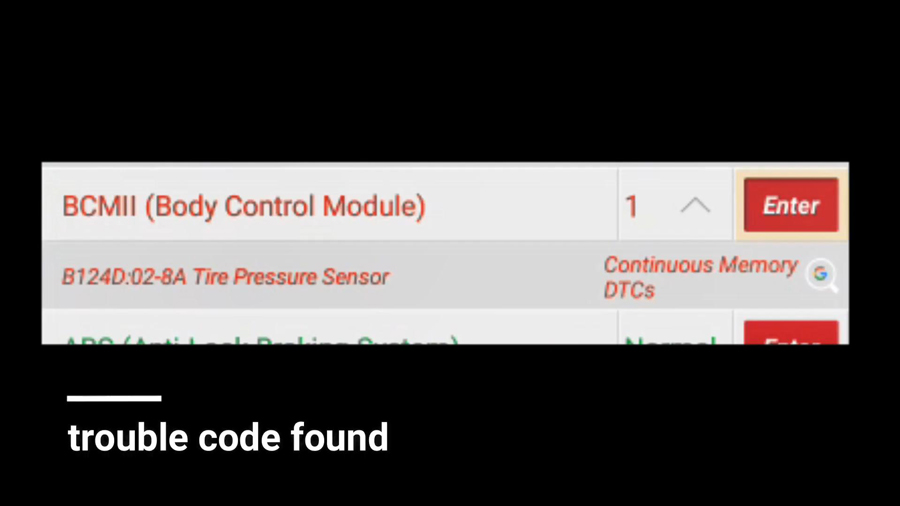
Operation path: Local diagnose -> American -> Ford -> Vehicle version information (i.e Ford V48.20) -> Loading -> Automatically Search -> Set ignition Switch to ON (Position II) -> Vehicle specification -> Health Reports-> Trouble code found.

Launch-X431-TSGUN-Ford-Mustang-2017--TPMS-Sensor-Learning-Procedure-3
Launch-X431-TSGUN-Ford-Mustang-2017--TPMS-Sensor-Learning-Procedure-4
Launch-X431-TSGUN-Ford-Mustang-2017--TPMS-Sensor-Learning-Procedure-5
Launch-X431-TSGUN-Ford-Mustang-2017--TPMS-Sensor-Learning-Procedure-6
Launch-X431-TSGUN-Ford-Mustang-2017--TPMS-Sensor-Learning-Procedure-7
Launch-X431-TSGUN-Ford-Mustang-2017--TPMS-Sensor-Learning-Procedure-8

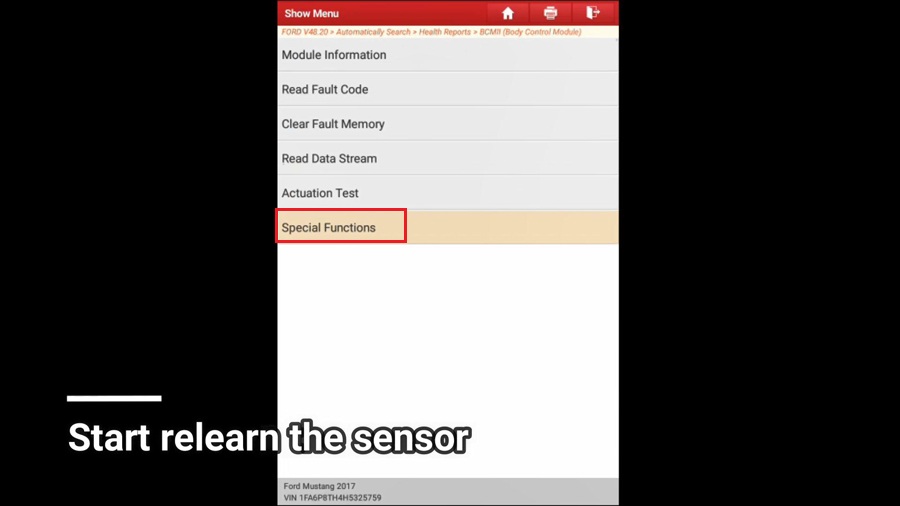
Next, start relearn the sensor.

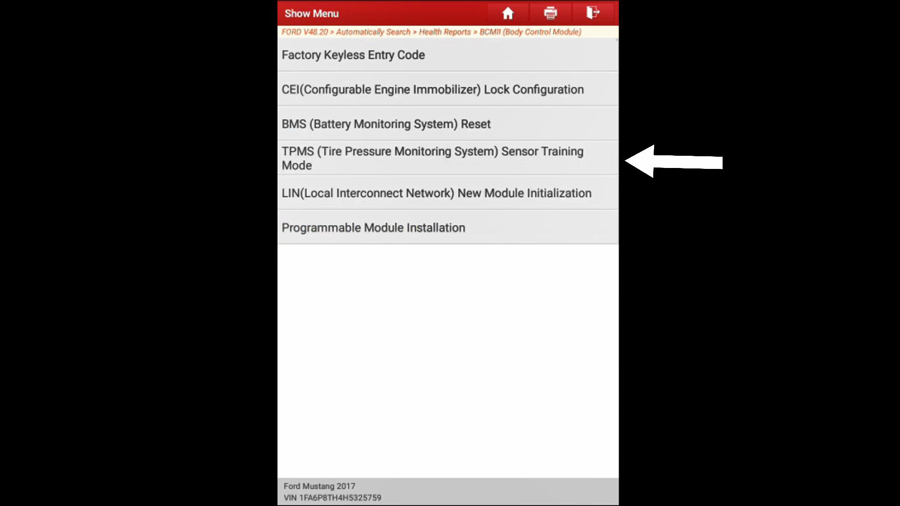
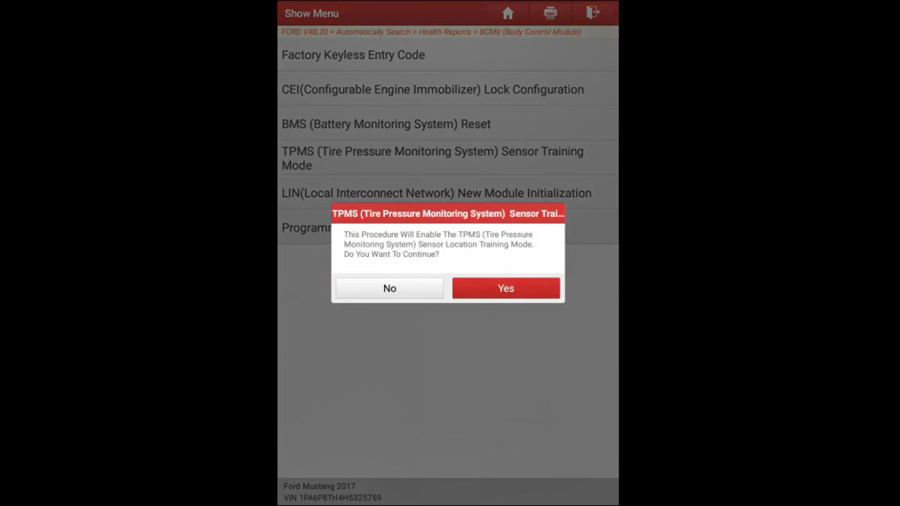
Operation path: Special Functions -> TPMS (Tire Pressure Monitoring System ) sensor training mode.

Launch-X431-TSGUN-Ford-Mustang-2017--TPMS-Sensor-Learning-Procedure-9
Launch-X431-TSGUN-Ford-Mustang-2017--TPMS-Sensor-Learning-Procedure-10

Next is to follow the pop-up prompts to operate.

1. This procedure will enable the TPMS (Tire Pressure Monitoring System ) Sensor location training mode. Do you want to continue? Select “Yes”.

Launch-X431-TSGUN-Ford-Mustang-2017--TPMS-Sensor-Learning-Procedure-11

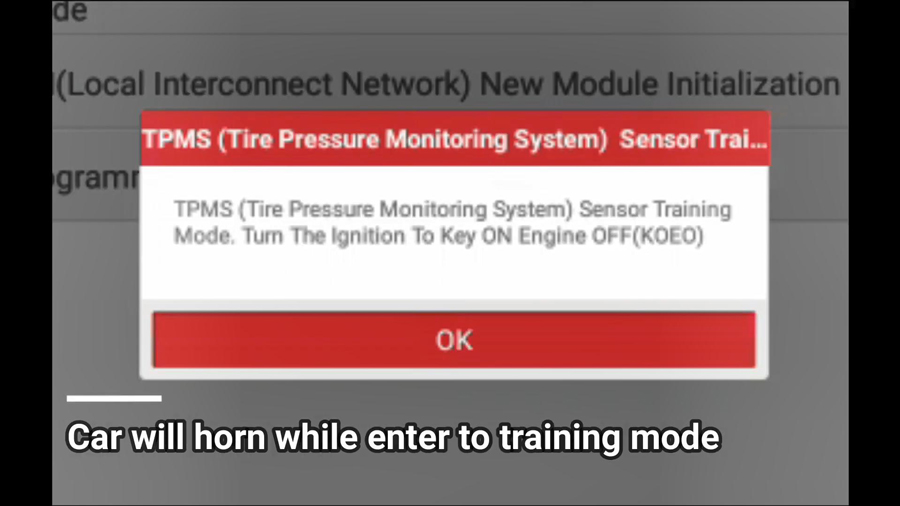
2. TPMS (Tire Pressure Monitoring System ) Sensor Training Mode. Turn the ignition to Key ON Engine OFF (KOEO).

And the car will horn while enter to training mode.

Launch-X431-TSGUN-Ford-Mustang-2017--TPMS-Sensor-Learning-Procedure-12

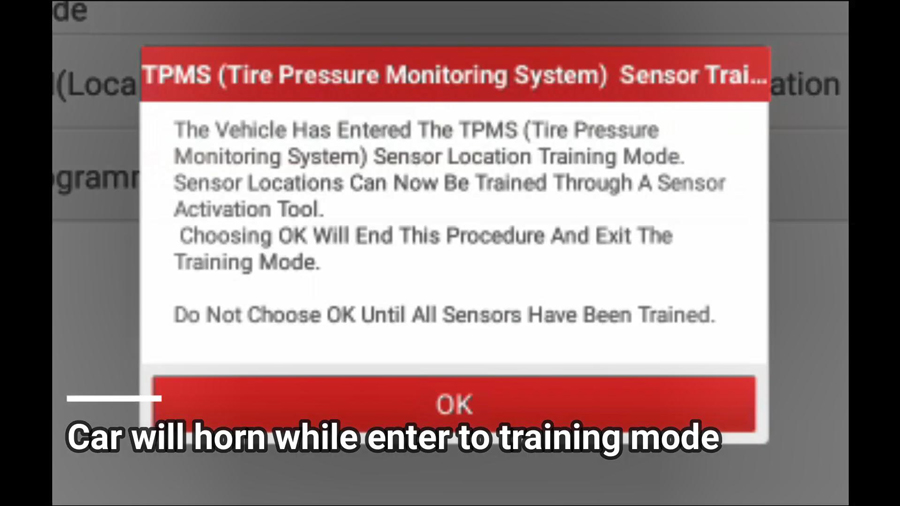
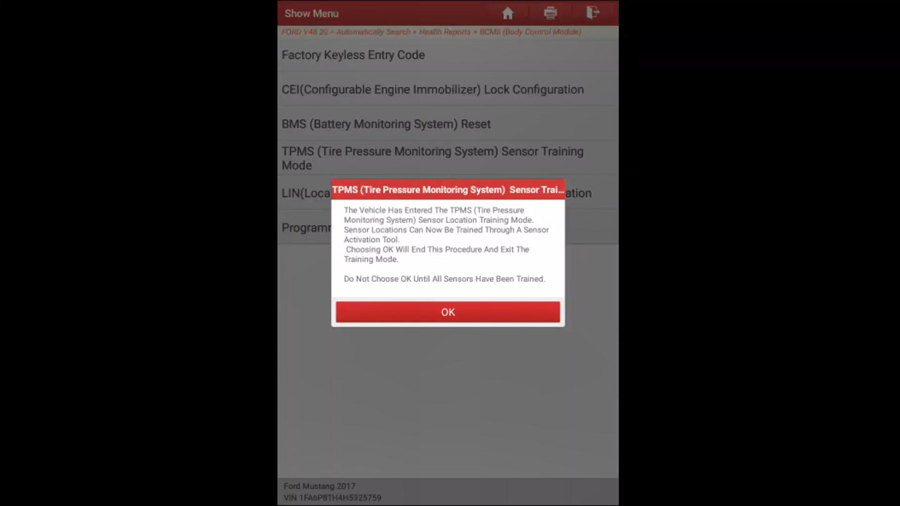
Sensor Locations can now be trained trough a sensor activation tool. Do not choose OK until all sensors have been trained.

Launch-X431-TSGUN-Ford-Mustang-2017--TPMS-Sensor-Learning-Procedure-13

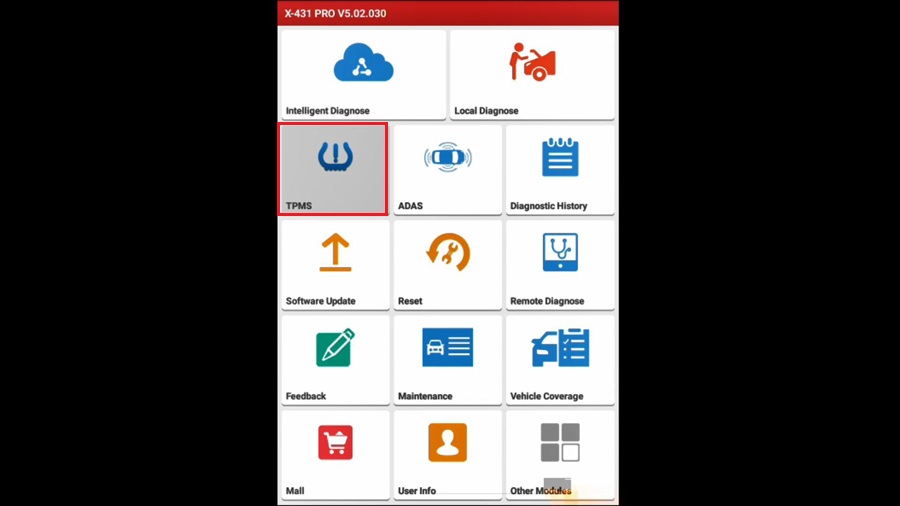
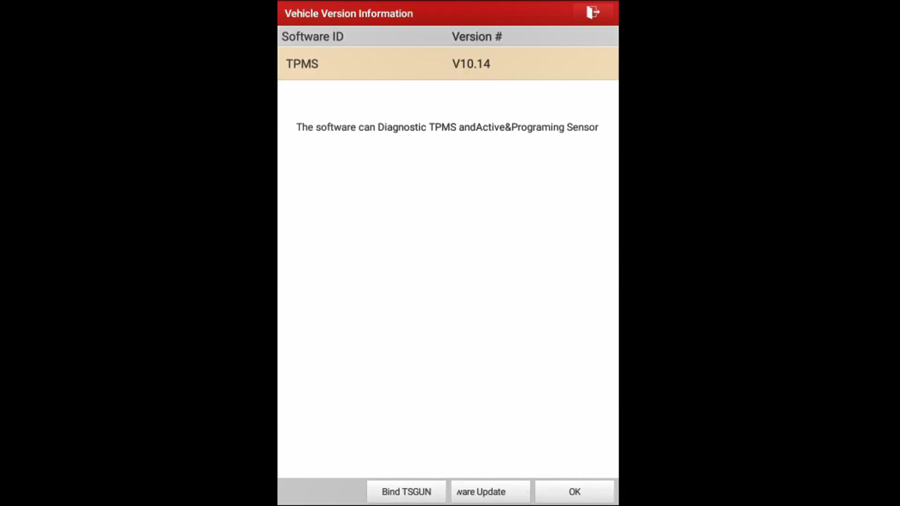
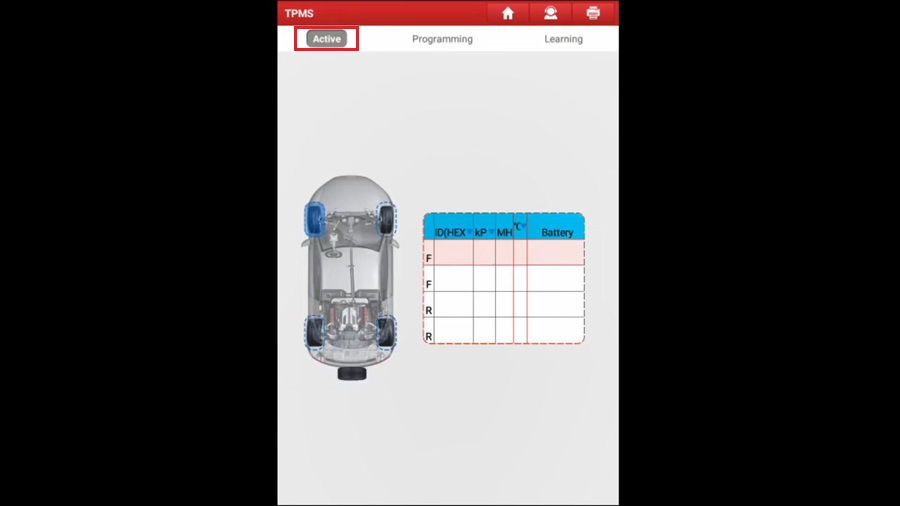
Next, back to X431 Pro home menu and choose “TPMS” to diagnose TPMS, activate and program sensor.

Launch-X431-TSGUN-Ford-Mustang-2017--TPMS-Sensor-Learning-Procedure-14
Launch-X431-TSGUN-Ford-Mustang-2017--TPMS-Sensor-Learning-Procedure-15

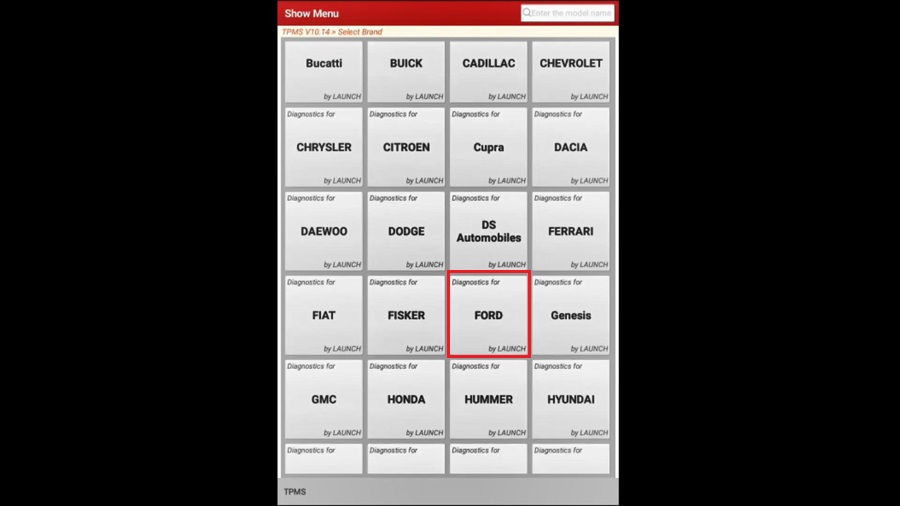
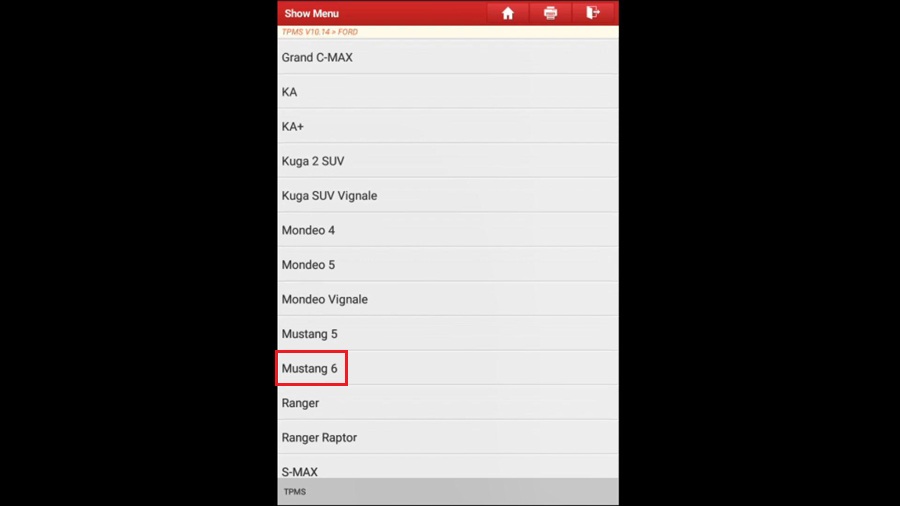
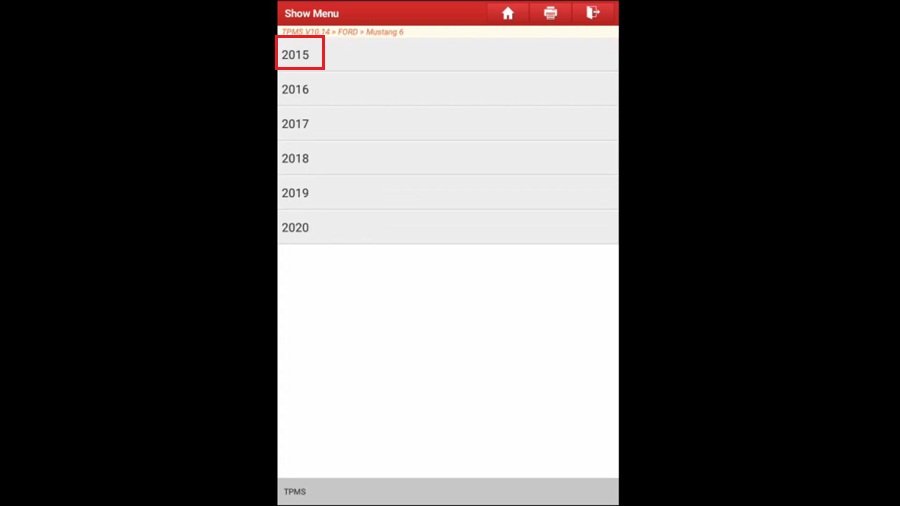
Europe -> select brand “Ford” -> Mustang 6 -> 2015 (up to 2020)
Launch-X431-TSGUN-Ford-Mustang-2017--TPMS-Sensor-Learning-Procedure-16
Launch-X431-TSGUN-Ford-Mustang-2017--TPMS-Sensor-Learning-Procedure-17
Launch-X431-TSGUN-Ford-Mustang-2017--TPMS-Sensor-Learning-Procedure-18

Active first.

Launch-X431-TSGUN-Ford-Mustang-2017--TPMS-Sensor-Learning-Procedure-19

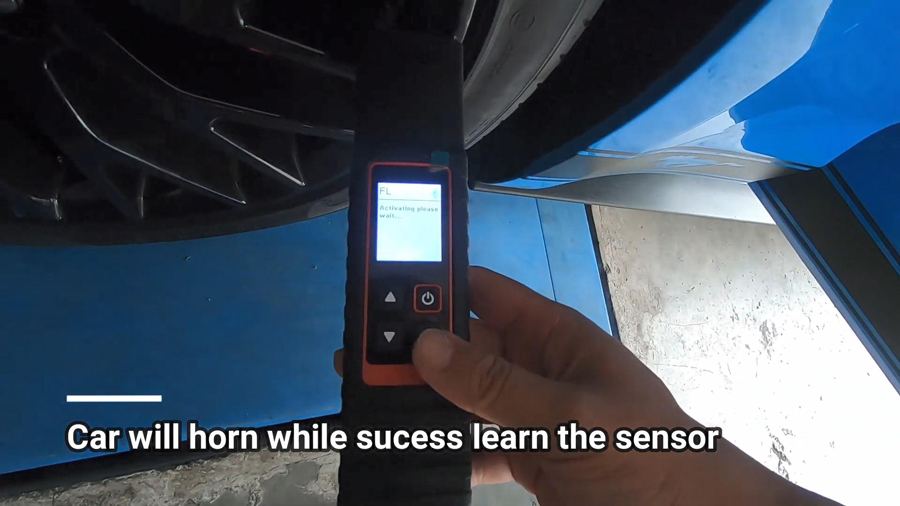
The first tire to be activated is the front left. And the car will horn while succeed learning the sensor.
Launch-X431-TSGUN-Ford-Mustang-2017--TPMS-Sensor-Learning-Procedure-20

Then to learn the front right sensor.

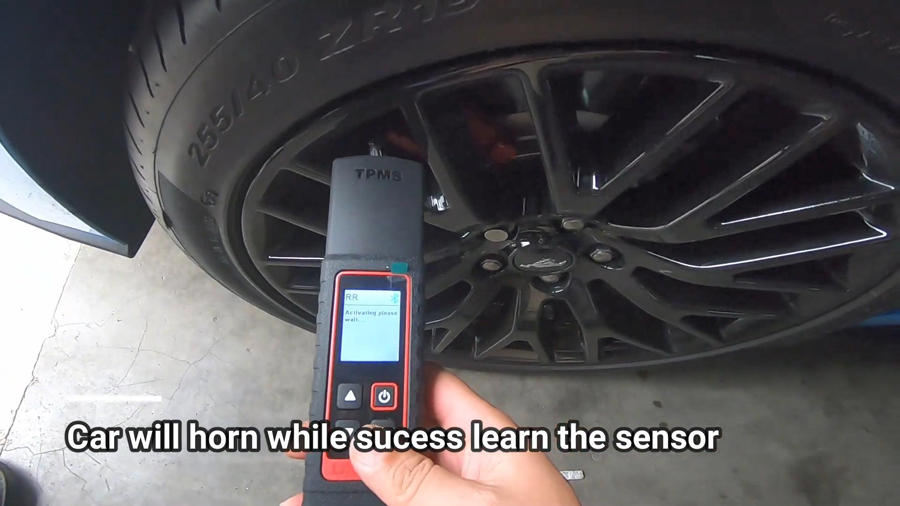
Then to learn the rear right sensor.
Launch-X431-TSGUN-Ford-Mustang-2017--TPMS-Sensor-Learning-Procedure-21

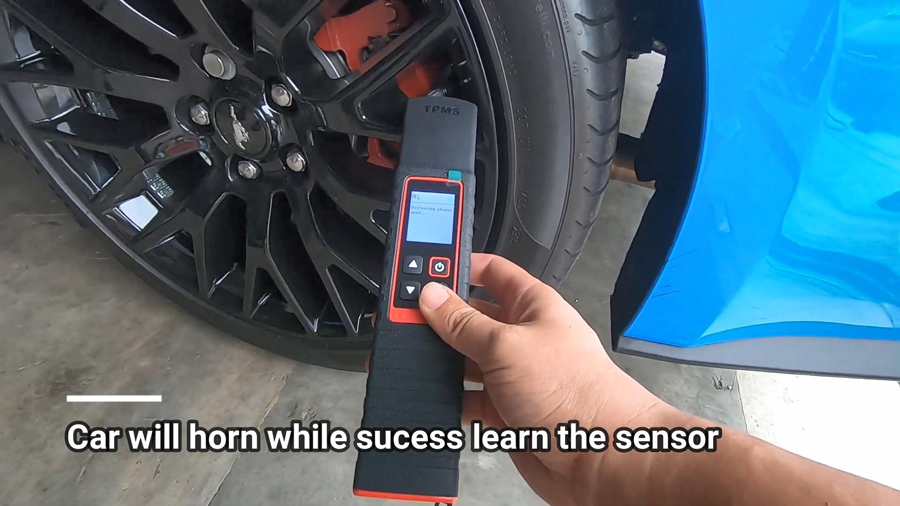
The last one is the Rear left sensor.

Launch-X431-TSGUN-Ford-Mustang-2017--TPMS-Sensor-Learning-Procedure-22

Back to X431 Pro Ford V48.20 ->Automatically search -> Health Reports -> BCM (Body Control Module), tap “Yes” to ensure all sensors have been trained.

And car will horn while exit from training mode.

Launch-X431-TSGUN-Ford-Mustang-2017--TPMS-Sensor-Learning-Procedure-23

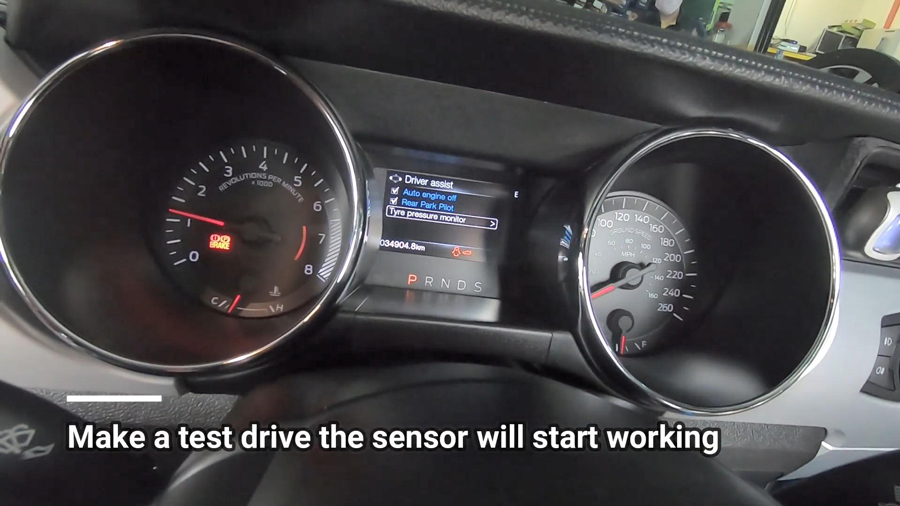
Finally, make a test drive the sensor will start working.

Launch-X431-TSGUN-Ford-Mustang-2017--TPMS-Sensor-Learning-Procedure-24

Job is done.

Let us drink a cup of coffee to celebrate it. Thanks to Launch X431 Pro, TSGUN TPSM Wand, TPMS sensors etc. Which make my life wonderful.

Autel Scanners Registration, Update, Language and Error FAQs

2021-05-13 18:32:19 | 日記


Here are the Autel all series diagnostic scanners registration,
update, language change, common problems frequently asked questions and
answers provided by Autel engineers.


Registration:


Q1: How to register Autel ID?
A1: Go to Autel website to register your Autel ID with email address:
https://pro.autel.com/regCustomerInfo.html?operationType=1&m=1


Q2:. How can i found device S/N and register password?
A2: Go to Product Registration to register your scanner, input the S/N
and register password (both can be found on the About page of the tool)
If cannot turn on scanner, send S/N (on the back of the machine) to
Autel support, they will send you the register password in their server.


Q3: How to register Autel MaxiCOM MK808, MP808TS, Maxisys series?


A3:  Autel tablets registration is done within the tablet.  Press register and follow system instructions.


Q4: How to register Autel autolink scan tools?


A4: These autel hand-held scanners don’t require registration,
including AL319,AL419,AL439, AL439B, AL539, AL539B, AL519, TS401 and
MS609.


Update:


Q1: How to Update Autel Maxisys, DS708, MK808, MP808TS etc tablets?


A1:  Connect Autel tablet with network via WiFi or WLAN cable
connection, Go to Update function, select the software you desire to
update. Press Update and wait until it completed.


Check:  How to Register and Update Autel MaxiSys tablets?


Q2: How to Update Autel scanners MD802, AL619, MD808MaxiCheck Pro etc?


A2:


1).Download maxi pc suite to laptop: http://support.autel.com/support/solutions/folders/8000079030


2.) Remove SD card (recommend update by SD card rather than USB). Insert a SD card reader with laptop via USB port.


3). Run Maxi PC Suite, login, then you will get software list, pls install all programs you need.


4).  Insert SD card back to the scanner and check the result.


5). If you have any problems with the update, pls kindly send us the S/N and pictures with error message for troubleshooting.


Maxi Pc Suite
Check detail guide here: How to Update Autel MaxiDiag, MaxiCheck etc Software?


Q3: How to Update Autel autolink AL319 AL419 AL519 scanners that without S/N?


A3:


1). Download MaxiilinkII on official website: http://support.autel.com/support/solutions/folders/8000079030


2). Connect scanner with laptop via USB cable, run MaxilinkII


3). Select scanner model in MaxilinkII. Check the green icon appears on the right top corner and displays device connected.


4). In official website, select Products- Download, download and
unzip update tool.  Select corresponding update file in maxilinkII to
update.


Note* update contains 2 parts.  Make sure complete all 2 parts.


5). Update finished. Remove USB connection.


Maxilink Ii


Language:


Q1: How to change language for Autel MK808, MX808, DS808, Maxisys series?


A1:   Send S/N to us.  Autel support team will change language on their server.


After change language on server, go to official website and download software on Update page.


If there is no upgradeable software on Update page, run a factory
reset first (System settings—Reset—Factory reset) , then download
software under Update page.


Device language is changed when download software finished.


Q2: How to change language for Autel hand-held scanners MD802 AL619 etc?


A2:  Send S/N to us.  Autel support team will change language on their server.


After change language on server, format the SD card, run Maxi pc suite and update all software again (same procedure as update).


Q3: How to update Autel autolink scanners AL319, AL419, AL439, AL439B, AL539, AL539B, AL519 that without S/N?


A3:   Download corresponding language pack on official website. Then run MaxilinkII to update software.


Common Problems & Errors


Q1: I failed to register Autel scanner. Why?


A1:  The most common reason is the wrong register password (many people entered the register ID by mistake ).


Register password: 6-digit number can be found on device About interface.


Better provide us whole registration interface to tell what information you entered is wrong.


Q2: Autel can read fault code but cannot clear fault code?


A2: Autel reads the fault code., You need to get problem solved, otherwise the fault code still exists.


Q3: Autel does not work on my car?


A3: If cannot work on specific model or function, it can be software
or operation issue. Please upload datalog to server with vehicle model,
year, VIN code and problem.


If all car software fail to work, check physical connection, check main test cable and VCI connection.


If a specific software fail to work, check the related OBD connector or download and install this software again.


Q4: Communication failure. How do i know if it is caused by VCI or hardware connection?


A4:


1). Connection MaxiSys host with VCI via USB to check if it communicates.


2). Test more vehicles.


3). Test EOBD software


4). Change main test cable and VCI to make a comparison.


Q5: Hand-held Autel scanner ask to obtain authorization or give error SD Card dismatch?


A5:  Language incorrect or SD card (Serial number does not match, take SD card from other machine).


1). Make sure language setting is correct.


2). Format SD card and use correct Autel ID (provide us S/N to get correct ID)


3). Usually download software, format SD card can solve the problem.


Q6: Maxisys has stopped, how to reflash maxisys system?


A6: Provide us your scanner S/N, we’ll send you reflash file.


Please uncompress/unzip the files first, copy the folder
“autel_factory” or “autel_factory_dev” to an empty TF card. Insert the
TF card to the left side slot of Maxisys, restart the tool to flash the
system.


Q7: How to get system log when strange system error occurs ?


A7: Restart the scanner to re-produce the problem, once the problem occurred, pls go to the home screen, click on Autel Scanner MaxiTools button, click on the Start button, wait for it to finish,
then click on Upload to send the log to Autel server. You can try this
procedure several times to ensure we receive the complete logs.


Keep updating…