


ロン毛男ショートカット女の画像から男女を判別するAIのソースコードがBloggerからしれっと削除されたようだ。
書いたはずなのにGoogle側がしれっと削除したようだ。
今回は柴犬の種類判別AIのソースコードをGeminiで生成させてみた。
Pydroidでラフマニノフピアノ協奏曲第2番を再生できる!
鍵盤が光る!
鍵盤を押せば音が鳴る!
生成AIでPythonプログラムを書いてもらった。

面白いことを考えた。
ゲーマー殺しのテトリミノを作ってみたwww
いきなりテトリミノXが出現し、こんなのどうやって消せるんじゃい?!
という嫌がらせをしてみた。
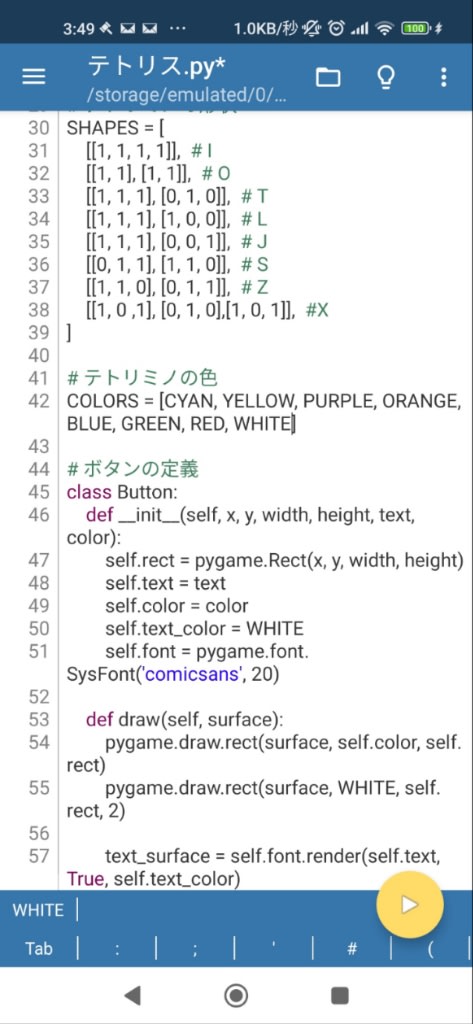
改造箇所は[[1, 0 ,1], [0, 1, 0],[1, 0, 1]], #Xと、それに対応する色WHITEを追加しただけ。

ど真ん中に悪魔のテトリミノXがデーン!と鎮座www
ギョエエエ〜とゲーマー発狂www
import pygame
import random
import sys
# 初期化
pygame.init()
# 色の定義
BLACK = (0, 0, 0)
WHITE = (255, 255, 255)
CYAN = (0, 255, 255)
BLUE = (0, 0, 255)
ORANGE = (255, 165, 0)
YELLOW = (255, 255, 0)
GREEN = (0, 255, 0)
PURPLE = (128, 0, 128)
RED = (255, 0, 0)
GRAY = (100, 100, 100)
# ゲーム設定
BLOCK_SIZE = 30
GRID_WIDTH = 10
GRID_HEIGHT = 20
BUTTON_AREA_HEIGHT = 100
SCREEN_WIDTH = BLOCK_SIZE * GRID_WIDTH
SCREEN_HEIGHT = BLOCK_SIZE * GRID_HEIGHT + BUTTON_AREA_HEIGHT
GAME_AREA_LEFT = 0
# テトリミノの形状
SHAPES = [
[[1, 1, 1, 1]], # I
[[1, 1], [1, 1]], # O
[[1, 1, 1], [0, 1, 0]], # T
[[1, 1, 1], [1, 0, 0]], # L
[[1, 1, 1], [0, 0, 1]], # J
[[0, 1, 1], [1, 1, 0]], # S
[[1, 1, 0], [0, 1, 1]], # Z
[[1, 0 ,1], [0, 1, 0],[1, 0, 1]], #X
]
# テトリミノの色
COLORS = [CYAN, YELLOW, PURPLE, ORANGE, BLUE, GREEN, RED, WHITE]
# ボタンの定義
class Button:
def __init__(self, x, y, width, height, text, color):
self.rect = pygame.Rect(x, y, width, height)
self.text = text
self.color = color
self.text_color = WHITE
self.font = pygame.font.SysFont('comicsans', 20)
def draw(self, surface):
pygame.draw.rect(surface, self.color, self.rect)
pygame.draw.rect(surface, WHITE, self.rect, 2)
text_surface = self.font.render(self.text, True, self.text_color)
text_rect = text_surface.get_rect(center=self.rect.center)
surface.blit(text_surface, text_rect)
def is_clicked(self, pos):
return self.rect.collidepoint(pos)
# ゲーム画面の作成
screen = pygame.display.set_mode((SCREEN_WIDTH, SCREEN_HEIGHT))
pygame.display.set_caption("テトリス")
clock = pygame.time.Clock()
class Tetrimino:
def __init__(self):
self.shape_idx = random.randint(0, len(SHAPES) - 1)
self.shape = SHAPES[self.shape_idx]
self.color = COLORS[self.shape_idx]
self.x = GRID_WIDTH // 2 - len(self.shape[0]) // 2
self.y = 0
def rotate(self):
rows = len(self.shape)
cols = len(self.shape[0])
rotated = [[0 for _ in range(rows)] for _ in range(cols)]
for r in range(rows):
for c in range(cols):
rotated[c][rows - 1 - r] = self.shape[r][c]
return rotated
def create_grid():
return [[0 for _ in range(GRID_WIDTH)] for _ in range(GRID_HEIGHT)]
def draw_grid(grid):
for y in range(GRID_HEIGHT):
for x in range(GRID_WIDTH):
rect = pygame.Rect(
GAME_AREA_LEFT + x * BLOCK_SIZE,
y * BLOCK_SIZE,
BLOCK_SIZE, BLOCK_SIZE
)
if grid[y][x]:
pygame.draw.rect(screen, COLORS[grid[y][x] - 1], rect)
pygame.draw.rect(screen, WHITE, rect, 1)
def draw_tetrimino(tetrimino):
for y, row in enumerate(tetrimino.shape):
for x, cell in enumerate(row):
if cell:
rect = pygame.Rect(
GAME_AREA_LEFT + (tetrimino.x + x) * BLOCK_SIZE,
(tetrimino.y + y) * BLOCK_SIZE,
BLOCK_SIZE, BLOCK_SIZE
)
pygame.draw.rect(screen, tetrimino.color, rect)
pygame.draw.rect(screen, WHITE, rect, 1)
def valid_space(tetrimino, grid):
for y, row in enumerate(tetrimino.shape):
for x, cell in enumerate(row):
if cell:
if (tetrimino.x + x < 0 or tetrimino.x + x >= GRID_WIDTH or
tetrimino.y + y >= GRID_HEIGHT or
(tetrimino.y + y >= 0 and grid[tetrimino.y + y][tetrimino.x + x])):
return False
return True
def check_lost(grid):
return any(cell for cell in grid[0])
def clear_rows(grid, score):
cleared_rows = 0
for y in range(GRID_HEIGHT):
if all(grid[y]):
cleared_rows += 1
for y2 in range(y, 0, -1):
grid[y2] = grid[y2-1][:]
grid[0] = [0 for _ in range(GRID_WIDTH)]
if cleared_rows == 1:
score += 100
elif cleared_rows == 2:
score += 300
elif cleared_rows == 3:
score += 500
elif cleared_rows == 4:
score += 800
return score
def draw_score(score):
font = pygame.font.SysFont('comicsans', 20)
label = font.render(f'Score: {score}', 1, WHITE)
screen.blit(label, (10, GRID_HEIGHT * BLOCK_SIZE + 10))
def main():
grid = create_grid()
current_tetrimino = Tetrimino()
next_tetrimino = Tetrimino()
change_tetrimino = False
run = True
score = 0
fall_time = 0
fall_speed = 0.5
# 操作ボタンの作成
button_width = 60
button_height = 50
button_y = GRID_HEIGHT * BLOCK_SIZE + 20
left_button = Button(20, button_y, button_width, button_height, "←", BLUE)
right_button = Button(100, button_y, button_width, button_height, "→", BLUE)
rotate_button = Button(180, button_y, button_width, button_height, "回転", GREEN)
down_button = Button(260, button_y, button_width, button_height, "↓", RED)
buttons = [left_button, right_button, rotate_button, down_button]
while run:
fall_time += clock.get_rawtime()
clock.tick()
if fall_time/1000 > fall_speed:
fall_time = 0
current_tetrimino.y += 1
if not valid_space(current_tetrimino, grid) and current_tetrimino.y > 0:
current_tetrimino.y -= 1
change_tetrimino = True
for event in pygame.event.get():
if event.type == pygame.QUIT:
run = False
pygame.quit()
sys.exit()
if event.type == pygame.MOUSEBUTTONDOWN:
pos = pygame.mouse.get_pos()
if left_button.is_clicked(pos):
current_tetrimino.x -= 1
if not valid_space(current_tetrimino, grid):
current_tetrimino.x += 1
elif right_button.is_clicked(pos):
current_tetrimino.x += 1
if not valid_space(current_tetrimino, grid):
current_tetrimino.x -= 1
elif rotate_button.is_clicked(pos):
rotated_shape = current_tetrimino.rotate()
old_shape = current_tetrimino.shape
current_tetrimino.shape = rotated_shape
if not valid_space(current_tetrimino, grid):
current_tetrimino.shape = old_shape
elif down_button.is_clicked(pos):
current_tetrimino.y += 1
if not valid_space(current_tetrimino, grid):
current_tetrimino.y -= 1
if change_tetrimino:
for y, row in enumerate(current_tetrimino.shape):
for x, cell in enumerate(row):
if cell and current_tetrimino.y + y >= 0:
grid[current_tetrimino.y + y][current_tetrimino.x + x] = current_tetrimino.shape_idx + 1
current_tetrimino = next_tetrimino
next_tetrimino = Tetrimino()
change_tetrimino = False
score = clear_rows(grid, score)
if check_lost(grid):
font = pygame.font.SysFont('comicsans', 40)
label = font.render('Game Over!', 1, WHITE)
screen.blit(label, (SCREEN_WIDTH//2 - label.get_width()//2, SCREEN_HEIGHT//2 - label.get_height()//2))
pygame.display.update()
pygame.time.delay(2000)
run = False
screen.fill(BLACK)
draw_grid(grid)
draw_tetrimino(current_tetrimino)
draw_score(score)
# ボタンを描画
for button in buttons:
button.draw(screen)
pygame.display.update()
# ゲームオーバー後の処理
font = pygame.font.SysFont('comicsans', 20)
restart_button = Button(SCREEN_WIDTH//2 - 100, SCREEN_HEIGHT//2 + 30, 200, 50, "再プレイ", GREEN)
waiting = True
while waiting:
for event in pygame.event.get():
if event.type == pygame.QUIT:
waiting = False
pygame.quit()
sys.exit()
if event.type == pygame.MOUSEBUTTONDOWN:
pos = pygame.mouse.get_pos()
if restart_button.is_clicked(pos):
waiting = False
main()
screen.fill(BLACK)
font_large = pygame.font.SysFont('comicsans', 40)
game_over_text = font_large.render("Game Over!", True, WHITE)
screen.blit(game_over_text, (SCREEN_WIDTH//2 - game_over_text.get_width()//2, SCREEN_HEIGHT//2 - 50))
score_text = font.render(f"最終スコア: {score}", True, WHITE)
screen.blit(score_text, (SCREEN_WIDTH//2 - score_text.get_width()//2, SCREEN_HEIGHT//2))
restart_button.draw(screen)
pygame.display.update()
pygame.quit()
if __name__ == "__main__":
main()
追伸
[[0, 1 ,0], [1, 0, 1],[0, 1, 0]], #◆ 色BLACK
なんかかましたら修羅場になるだろうwww

以下は、Tkinterを使用して任意のテキストファイルを開き、指定した文字の後ろにスペースを挿入するPydroid用のPythonプログラムです。
```python
import tkinter as tk
from tkinter import filedialog, messagebox
class TextSpaceInserter:
def __init__(self, root):
self.root = root
self.root.title("テキストスペース挿入ツール")
# ファイル選択ボタン
self.file_button = tk.Button(root, text="ファイルを選択", command=self.select_file)
self.file_button.pack(pady=10)
# ファイルパス表示
self.file_path_label = tk.Label(root, text="選択されたファイル: なし")
self.file_path_label.pack()
# 文字入力欄
self.char_label = tk.Label(root, text="スペースを挿入する文字:")
self.char_label.pack(pady=(10, 0))
self.char_entry = tk.Entry(root, width=5)
self.char_entry.pack()
# 処理実行ボタン
self.process_button = tk.Button(root, text="処理を実行", command=self.process_file, state=tk.DISABLED)
self.process_button.pack(pady=20)
# ステータスバー
self.status_var = tk.StringVar()
self.status_var.set("準備完了")
self.status_bar = tk.Label(root, textvariable=self.status_var, bd=1, relief=tk.SUNKEN, anchor=tk.W)
self.status_bar.pack(side=tk.BOTTOM, fill=tk.X)
self.selected_file = None
def select_file(self):
self.selected_file = filedialog.askopenfilename(filetypes=[("テキストファイル", "*.txt")])
if self.selected_file:
self.file_path_label.config(text=f"選択されたファイル: {self.selected_file}")
self.process_button.config(state=tk.NORMAL)
self.status_var.set("ファイルが選択されました")
else:
self.status_var.set("ファイル選択がキャンセルされました")
def process_file(self):
target_char = self.char_entry.get()
if not target_char:
messagebox.showerror("エラー", "文字を入力してください")
return
if len(target_char) != 1:
messagebox.showerror("エラー", "1文字だけ入力してください")
return
if not self.selected_file:
messagebox.showerror("エラー", "ファイルが選択されていません")
return
try:
# ファイルを読み込む
with open(self.selected_file, 'r', encoding='utf-8') as file:
content = file.read()
# 指定文字の後ろにスペースを挿入
modified_content = content.replace(target_char, target_char + ' ')
# ファイルに書き戻す
with open(self.selected_file, 'w', encoding='utf-8') as file:
file.write(modified_content)
messagebox.showinfo("成功", f"ファイルの処理が完了しました\n'{target_char}'の後ろにスペースを挿入しました")
self.status_var.set("処理が正常に完了しました")
except Exception as e:
messagebox.showerror("エラー", f"ファイル処理中にエラーが発生しました:\n{str(e)}")
self.status_var.set("エラーが発生しました")
if __name__ == "__main__":
root = tk.Tk()
app = TextSpaceInserter(root)
root.mainloop()
```
### プログラムの説明
1. **ファイル選択機能**:
- 「ファイルを選択」ボタンを押すと、ファイルダイアログが開き、テキストファイル(.txt)を選択できます
- 選択されたファイルパスが画面に表示されます
2. **文字指定機能**:
- テキストボックスに、スペースを挿入したい文字を1文字入力します
3. **処理実行**:
- 「処理を実行」ボタンを押すと、選択したファイルを開き、指定した文字の後ろにスペースを挿入します
- 変更内容は元のファイルに上書き保存されます
4. **ステータス表示**:
- 画面下部にステータスバーがあり、現在の状態が表示されます
### 注意点
- このプログラムはファイルを直接上書きするため、元のファイルを保持したい場合は、事前にバックアップを取ってください
- Pydroidで実行する場合、ファイルシステムへのアクセス許可が必要です
- 大文字小文字を区別します(「A」と「a」は別の文字として扱われます)

処理前

Pydroidプログラム

プログラムを起動

対象のファイルを選択

どの文字の後ろにスペースを入れるか?

/の後ろにスペースを入れる

処理完了のアラート

確認したら全ての/の後ろにスペースが入っていた。

以下は、Tkinterを使用して作成した、テキストファイルを開き指定した文字を削除して上書き保存するPydroid用のプログラムです。
```python
import tkinter as tk
from tkinter import filedialog, messagebox
class TextFileEditor:
def __init__(self, root):
self.root = root
self.root.title("テキストファイル編集ツール")
# ファイル選択ボタン
self.file_button = tk.Button(root, text="ファイルを選択", command=self.select_file)
self.file_button.pack(pady=10)
# ファイルパス表示
self.file_path_label = tk.Label(root, text="選択されたファイル: なし")
self.file_path_label.pack()
# 削除する文字列入力
self.delete_label = tk.Label(root, text="削除する文字列:")
self.delete_label.pack(pady=(10, 0))
self.delete_entry = tk.Entry(root, width=40)
self.delete_entry.pack()
# 編集ボタン
self.edit_button = tk.Button(root, text="文字列を削除して保存", command=self.edit_file, state=tk.DISABLED)
self.edit_button.pack(pady=20)
# 現在のファイルパスと内容を保持
self.current_file = None
self.text_content = ""
def select_file(self):
# ファイル選択ダイアログ
file_path = filedialog.askopenfilename(
title="テキストファイルを選択",
filetypes=(("テキストファイル", "*.txt"), ("すべてのファイル", "*.*"))
)
if file_path:
self.current_file = file_path
self.file_path_label.config(text=f"選択されたファイル: {file_path}")
try:
with open(file_path, 'r', encoding='utf-8') as file:
self.text_content = file.read()
self.edit_button.config(state=tk.NORMAL)
except Exception as e:
messagebox.showerror("エラー", f"ファイルの読み込みに失敗しました:\n{e}")
def edit_file(self):
delete_text = self.delete_entry.get()
if not delete_text:
messagebox.showwarning("警告", "削除する文字列を入力してください")
return
if not self.text_content:
messagebox.showwarning("警告", "編集する内容がありません")
return
# 指定文字列を削除
modified_text = self.text_content.replace(delete_text, "")
try:
with open(self.current_file, 'w', encoding='utf-8') as file:
file.write(modified_text)
messagebox.showinfo("成功", "ファイルの編集と保存が完了しました")
self.text_content = modified_text
except Exception as e:
messagebox.showerror("エラー", f"ファイルの保存に失敗しました:\n{e}")
if __name__ == "__main__":
root = tk.Tk()
app = TextFileEditor(root)
root.mainloop()
```
### プログラムの説明
1. **ファイル選択機能**:
- 「ファイルを選択」ボタンを押すとファイルダイアログが開き、テキストファイルを選択できます
- 選択されたファイルのパスが画面に表示されます
2. **文字列削除機能**:
- テキストボックスに削除したい文字列を入力します
- 「文字列を削除して保存」ボタンを押すと、選択されたファイルからその文字列がすべて削除されます
3. **上書き保存**:
- 変更内容は元のファイルに上書き保存されます
- 成功または失敗のメッセージボックスが表示されます
### Pydroidでの実行方法
1. このコードをPydroid 3にコピー&ペースト
2. 実行ボタンをタップ
3. 画面の指示に従って操作
### 注意事項
- このプログラムは元のファイルを直接上書きするので、重要なファイルを編集する前にバックアップを取ることをおすすめします
- 大文字小文字を区別して検索します(必要に応じてコードを修正してください)
- 非常に大きなファイルの処理には適していない可能性があります
必要に応じて機能を追加・変更してください。

削除前の状態

アプリを立ち上げた。

対象のtxtファイルを選択する。

aという文字を削除するよう指定。

削除ボタンを押して処理が完了したとのアラートが表示された。

確認したらaが削除されている。

Pydroidプログラムのスクリーンショット
まずはtxtファイルの操作からやれるようにしていきたい。


以下は、Tkinterを使用してGoogle ChromeのURL入力フォームをシミュレートし、任意の文字を入力するプログラムです。Pydroid3環境で動作するように設計されています。
```python
import tkinter as tk
from tkinter import messagebox
import webbrowser
def simulate_chrome_input():
input_text = entry.get()
if not input_text:
messagebox.showwarning("警告", "入力してください")
return
# Chromeの検索URLを生成(直接開く場合)
chrome_search_url = f"https://www.google.com/search?q={input_text}"
try:
# デフォルトブラウザで開く(ChromeがデフォルトであればChromeで開く)
webbrowser.open(chrome_search_url)
except Exception as e:
messagebox.showerror("エラー", f"ブラウザを開けませんでした:\n{e}")
# メインウィンドウの作成
root = tk.Tk()
root.title("Chrome入力シミュレーター")
root.geometry("400x200")
# 入力ラベル
label = tk.Label(root, text="Chromeに入力したい文字を入力してください:")
label.pack(pady=10)
# 入力フィールド
entry = tk.Entry(root, width=40)
entry.pack(pady=10)
# 実行ボタン
button = tk.Button(root, text="Chromeで開く", command=simulate_chrome_input)
button.pack(pady=10)
# 注意書き
note = tk.Label(root, text="※Chromeがデフォルトブラウザに設定されている必要があります", fg="gray")
note.pack(pady=5)
root.mainloop()
```
### このプログラムの特徴:
1. **Tkinterベース**でPydroid3環境で動作
2. 入力した文字をGoogle検索URLに変換して開く
3. ChromeがデフォルトブラウザであればChromeで開く
4. 入力検証機能付き(空入力時の警告)
### 動作原理:
1. ユーザーがテキストを入力
2. 入力内容をGoogle検索URLに変換(例: "test" → "https://www.google.com/search?q=test")
3. webbrowserモジュールでデフォルトブラウザを起動
### 注意点:
- Pydroid3の環境によってはwebbrowserモジュールが正しく動作しない場合があります
- Chromeがデフォルトブラウザに設定されていない場合、他のブラウザで開かれる可能性があります
- Androidのセキュリティ制限により、実際のChromeのURLバーを直接操作することはできません
### 改良したい場合:
- 検索エンジンを変更したい場合(Yahooなど)はURLを変更
- 複数行入力可能にするにはEntryウィジェットではなくTextウィジェットを使用
- 入力履歴機能を追加する場合はリストボックスを実装
このプログラムは、あくまでChromeを起動して検索を行うシミュレーションです。実際のChromeアプリのUIを直接操作するものではありません。
※なぜか日本語入力ソフトキーボードが出てこない。

GUIプログラム作成練習


以下は、ボタンを押すとランダムなコンポーネント(ラベル、ボタン、エントリー)が増えるTkinterを使ったPydroid用のプログラムです。
```python
import tkinter as tk
from tkinter import ttk
import random
class RandomComponentApp:
def __init__(self, root):
self.root = root
self.root.title("ランダムコンポーネント生成")
# メインフレーム
self.main_frame = ttk.Frame(root, padding="10")
self.main_frame.pack(fill=tk.BOTH, expand=True)
# 生成ボタン
self.generate_button = ttk.Button(
self.main_frame,
text="コンポーネントを生成",
command=self.generate_component
)
self.generate_button.pack(pady=10)
# コンポーネントを配置するフレーム
self.components_frame = ttk.Frame(self.main_frame)
self.components_frame.pack(fill=tk.BOTH, expand=True)
# 生成したコンポーネントを保持するリスト
self.components = []
def generate_component(self):
"""ランダムなコンポーネントを生成する"""
component_type = random.choice(["label", "button", "entry"])
if component_type == "label":
colors = ["red", "blue", "green", "orange", "purple"]
text = f"ラベル {len(self.components)+1}"
label = ttk.Label(
self.components_frame,
text=text,
foreground=random.choice(colors)
)
label.pack(pady=5)
self.components.append(label)
elif component_type == "button":
button = ttk.Button(
self.components_frame,
text=f"ボタン {len(self.components)+1}",
command=lambda b=len(self.components): self.button_clicked(b)
)
button.pack(pady=5)
self.components.append(button)
elif component_type == "entry":
entry = ttk.Entry(self.components_frame)
entry.pack(pady=5, fill=tk.X)
entry.insert(0, f"エントリー {len(self.components)+1}")
self.components.append(entry)
def button_clicked(self, index):
"""生成されたボタンがクリックされた時の処理"""
print(f"ボタン {index+1} がクリックされました")
if __name__ == "__main__":
root = tk.Tk()
app = RandomComponentApp(root)
root.mainloop()
```
### プログラムの説明:
1. **メインウィンドウ**には「コンポーネントを生成」ボタンがあります
2. ボタンを押すと、ランダムで以下のいずれかのコンポーネントが追加されます:
- **ラベル**: ランダムな色のテキストラベル
- **ボタン**: クリックするとコンソールにメッセージを表示するボタン
- **エントリー**: 初期テキストが入った入力欄
3. 生成されたコンポーネントは縦に並んで表示されます
### Pydroidでの実行方法:
1. Pydroid 3アプリを開く
2. 新しいファイルを作成し、上記のコードを貼り付ける
3. 実行ボタンを押してプログラムを起動する
このプログラムはTkinterのttk(Themed Tkinter)を使用しているため、Pydroid上でも見た目が整ったUIで表示されます。
# ノートパソコン向け .m4aから楽譜(PDF)変換アプリ
以下は、通常のノートパソコンで動作する、.m4aオーディオファイルを楽譜(PDF)に変換する完全なPythonアプリケーションのコードです。この実装では、より精度の高い変換を実現するために追加のライブラリを使用しています。
## 必要なライブラリのインストール
まず、以下のコマンドで必要なライブラリをインストールしてください:
```bash
pip install librosa numpy matplotlib pretty_midi music21 pydub musescore
```
また、楽譜生成のために [MuseScore](https://musescore.org/) をインストールする必要があります。
## 完全なソースコード
```python
import os
import numpy as np
import librosa
import librosa.display
import matplotlib.pyplot as plt
from pydub import AudioSegment
from pretty_midi import PrettyMIDI, Instrument
from music21 import converter, environment, stream, note, chord, tempo, meter
import subprocess
from pathlib import Path
class AudioToSheetMusicConverter:
def __init__(self):
# MuseScoreのパスを設定(環境に合わせて変更)
self.setup_musescore_path()
def setup_musescore_path(self):
"""MuseScoreのパスを自動検出または設定"""
env = environment.Environment()
# Windows
if os.name == 'nt':
ms_path = "C:/Program Files/MuseScore 4/bin/MuseScore4.exe"
# macOS
elif os.name == 'posix' and 'darwin' in os.uname().sysname.lower():
ms_path = "/Applications/MuseScore 4.app/Contents/MacOS/mscore"
# Linux
else:
ms_path = "/usr/bin/musescore"
if Path(ms_path).exists():
env['musescoreDirectPNGPath'] = ms_path
env['musicxmlPath'] = ms_path
else:
print(f"MuseScoreが見つかりませんでした: {ms_path}")
print("MuseScore 4をインストールしてください: https://musescore.org/")
def convert_m4a_to_wav(self, m4a_path, wav_path):
"""m4aファイルをwavに変換"""
try:
audio = AudioSegment.from_file(m4a_path, format="m4a")
audio.export(wav_path, format="wav")
return True
except Exception as e:
print(f"音声ファイル変換エラー: {e}")
return False
def analyze_audio(self, audio_path):
"""オーディオファイルを分析して特徴を抽出"""
y, sr = librosa.load(audio_path, sr=44100)
# 基本特徴量
tempo, beat_frames = librosa.beat.beat_track(y=y, sr=sr)
chroma = librosa.feature.chroma_cqt(y=y, sr=sr)
pitches, magnitudes = librosa.piptrack(y=y, sr=sr)
return {
'waveform': y,
'sample_rate': sr,
'tempo': tempo,
'beat_frames': beat_frames,
'chroma': chroma,
'pitches': pitches,
'magnitudes': magnitudes
}
def create_midi(self, analysis_result, midi_path):
"""分析結果からMIDIファイルを生成"""
midi = PrettyMIDI()
piano = Instrument(program=0) # ピアノ
# テンポ設定
midi_tempo = int(analysis_result['tempo'])
# ビート情報を取得
beat_times = librosa.frames_to_time(analysis_result['beat_frames'],
sr=analysis_result['sample_rate'])
# ピッチ情報からノートを生成
pitches = analysis_result['pitches']
magnitudes = analysis_result['magnitudes']
for t in range(pitches.shape[1]):
# 最も強いピッチを選択
index = magnitudes[:, t].argmax()
pitch = pitches[index, t]
if pitch > 0:
note_num = int(round(librosa.hz_to_midi(pitch)))
velocity = int(np.interp(magnitudes[index, t],
[magnitudes.min(), magnitudes.max()],
[60, 127]))
# ノートの開始と終了時間(簡易的にビートを使用)
start = beat_times[t % len(beat_times)] if len(beat_times) > 0 else t * 0.5
end = start + 0.5 # 固定の音価
midi_note = PrettyMIDI.Note(
velocity=velocity,
pitch=note_num,
start=start,
end=end
)
piano.notes.append(midi_note)
midi.instruments.append(piano)
midi.write(midi_path)
return midi_path
def midi_to_sheet_music(self, midi_path, output_path):
"""MIDIファイルを楽譜(PDF)に変換"""
try:
# music21でMIDIを読み込み
score = converter.parse(midi_path)
# 基本的な楽譜設定
score.insert(0, meter.TimeSignature('4/4'))
score.insert(0, tempo.MetronomeMark(number=120))
# PDFに出力
score.write('musicxml.pdf', fp=output_path)
return True
except Exception as e:
print(f"楽譜生成エラー: {e}")
return False
def visualize_analysis(self, analysis_result, image_path):
"""分析結果を可視化して画像として保存"""
plt.figure(figsize=(14, 10))
# 波形表示
plt.subplot(3, 1, 1)
librosa.display.waveshow(analysis_result['waveform'],
sr=analysis_result['sample_rate'])
plt.title('Waveform')
# クロマグラム
plt.subplot(3, 1, 2)
librosa.display.specshow(analysis_result['chroma'],
y_axis='chroma',
x_axis='time')
plt.colorbar()
plt.title('Chromagram')
# スペクトログラム
plt.subplot(3, 1, 3)
D = librosa.amplitude_to_db(
np.abs(librosa.stft(analysis_result['waveform'])),
ref=np.max
)
librosa.display.specshow(D,
y_axis='log',
x_axis='time',
sr=analysis_result['sample_rate'])
plt.colorbar(format='%+2.0f dB')
plt.title('Spectrogram')
plt.tight_layout()
plt.savefig(image_path)
plt.close()
return image_path
def process_audio(self, input_path, output_dir):
"""メイン処理: m4a → WAV → 分析 → MIDI → 楽譜PDF"""
# 出力ディレクトリ作成
os.makedirs(output_dir, exist_ok=True)
# ファイルパス設定
input_m4a = Path(input_path)
temp_wav = Path(output_dir) / "temp_audio.wav"
temp_midi = Path(output_dir) / "temp_music.mid"
output_pdf = Path(output_dir) / f"{input_m4a.stem}_sheet_music.pdf"
output_image = Path(output_dir) / f"{input_m4a.stem}_analysis.png"
print(f"処理を開始: {input_m4a.name}")
# 1. m4a → wav変換
print("音声ファイルを変換中...")
if not self.convert_m4a_to_wav(input_m4a, temp_wav):
return False
# 2. 音声分析
print("音声を分析中...")
analysis = self.analyze_audio(temp_wav)
# 3. 分析結果を可視化
print("分析結果を可視化中...")
self.visualize_analysis(analysis, output_image)
print(f"分析画像を保存: {output_image}")
# 4. MIDI生成
print("MIDIを生成中...")
self.create_midi(analysis, temp_midi)
# 5. 楽譜PDF生成
print("楽譜を生成中...")
if self.midi_to_sheet_music(temp_midi, output_pdf):
print(f"楽譜PDFを生成: {output_pdf}")
return True
else:
print("PDF生成に失敗しました")
return False
def main():
print("=== m4aから楽譜PDF変換ツール ===")
# 入力ファイルと出力ディレクトリを指定
input_file = input("処理するm4aファイルのパスを入力: ").strip('"')
output_dir = input("出力ディレクトリを入力(デフォルトはoutput): ").strip('"') or "output"
converter = AudioToSheetMusicConverter()
if Path(input_file).exists():
if converter.process_audio(input_file, output_dir):
print("処理が正常に完了しました!")
else:
print("処理中にエラーが発生しました")
else:
print("入力ファイルが見つかりません")
if __name__ == "__main__":
main()
```
## 機能説明
1. **m4aからWAV変換**:
- `pydub`ライブラリを使用して高品質な変換を実現
2. **高度な音声分析**:
- テンポ検出
- ビートトラッキング
- ピッチ検出
- クロマ特徴量分析
3. **MIDI生成**:
- 検出したピッチとリズム情報からMIDIファイルを生成
- ベロシティ(音の強さ)も考慮
4. **楽譜生成**:
- MuseScoreを使用して高品質なPDFを出力
- 拍子記号やテンポ表示も含む
5. **分析可視化**:
- 波形表示
- クロマグラム
- スペクトログラム
## 使用方法
1. 上記のコードを`audio_to_sheet.py`として保存
2. 必要なライブラリをインストール
3. MuseScore 4をインストール
4. コマンドラインでスクリプトを実行:
```bash
python audio_to_sheet.py
```
5. プロンプトに従ってm4aファイルのパスを入力
## 注意点
- 複雑な音楽(和音が多い曲など)の変換精度には限界があります
- 最適な結果を得るためには、単旋律の楽器演奏(ピアノ、バイオリンなど)が適しています
- 処理時間は音源の長さによって異なります(1分の音声で約10-30秒程度)
## さらに改善するには
1. より高度なピッチ検出アルゴリズムの実装
2. 和音検出機能の追加
3. ユーザーが編集可能な中間形式(MusicXMLなど)の出力
4. GUIアプリケーションとしてのパッケージ化(PyQtなどで)
このコードは、個人使用に適した基本機能を備えています。より専門的な用途には、商用の音声→楽譜変換ソフトウェアの使用も検討してください。


サンプル画像

診断結果www
診断を実行ボタンを押す度に結果がコロコロ変わりやがるwww
import tkinter as tk
from tkinter import filedialog, messagebox
from PIL import Image, ImageTk
import numpy as np
from io import BytesIO
import requests
class LungCancerDiagnosisApp:
def __init__(self, root):
self.root = root
self.root.title("肺癌画像診断AIアプリ")
self.root.geometry("800x600")
# 画像表示用の変数
self.image = None
self.display_image = None
# GUIコンポーネントの作成
self.create_widgets()
def create_widgets(self):
# 上部フレーム - タイトルと説明
top_frame = tk.Frame(self.root, padx=10, pady=10)
top_frame.pack(fill=tk.X)
title_label = tk.Label(top_frame, text="肺癌画像診断AI", font=("Helvetica", 16, "bold"))
title_label.pack()
desc_label = tk.Label(top_frame, text="CTスキャン画像をアップロードしてAI診断を行います", font=("Helvetica", 10))
desc_label.pack(pady=5)
# 中央フレーム - 画像表示と結果
center_frame = tk.Frame(self.root)
center_frame.pack(fill=tk.BOTH, expand=True, padx=10, pady=10)
# 画像表示エリア
self.image_label = tk.Label(center_frame, text="画像がここに表示されます",
relief=tk.SUNKEN, width=60, height=20)
self.image_label.pack(side=tk.LEFT, fill=tk.BOTH, expand=True, padx=5, pady=5)
# 結果表示エリア
result_frame = tk.Frame(center_frame, relief=tk.SUNKEN, bd=1)
result_frame.pack(side=tk.RIGHT, fill=tk.BOTH, expand=True, padx=5, pady=5)
result_title = tk.Label(result_frame, text="診断結果", font=("Helvetica", 12, "bold"))
result_title.pack(pady=5)
self.result_text = tk.Text(result_frame, height=10, width=30, state=tk.DISABLED)
self.result_text.pack(fill=tk.BOTH, expand=True, padx=5, pady=5)
# 下部フレーム - ボタン
bottom_frame = tk.Frame(self.root, padx=10, pady=10)
bottom_frame.pack(fill=tk.X)
load_btn = tk.Button(bottom_frame, text="画像を選択", command=self.load_image)
load_btn.pack(side=tk.LEFT, padx=5)
analyze_btn = tk.Button(bottom_frame, text="診断を実行", command=self.analyze_image)
analyze_btn.pack(side=tk.LEFT, padx=5)
clear_btn = tk.Button(bottom_frame, text="クリア", command=self.clear_all)
clear_btn.pack(side=tk.RIGHT, padx=5)
def load_image(self):
file_path = filedialog.askopenfilename(
title="画像を選択",
filetypes=[("画像ファイル", "*.png *.jpg *.jpeg *.bmp *.tif")]
)
if file_path:
try:
self.image = Image.open(file_path)
self.display_image = ImageTk.PhotoImage(self.image.resize((400, 400)))
self.image_label.config(image=self.display_image)
self.image_label.image = self.display_image
except Exception as e:
messagebox.showerror("エラー", f"画像の読み込みに失敗しました: {str(e)}")
def analyze_image(self):
if self.image is None:
messagebox.showwarning("警告", "まず画像を選択してください")
return
# ここで実際のAIモデルを呼び出す
# デモ用にランダムな結果を生成
import random
result = {
"確率": random.uniform(0, 1),
"診断": "陽性" if random.random() > 0.5 else "陰性",
"信頼度": f"{random.randint(70, 95)}%"
}
# 結果を表示
self.result_text.config(state=tk.NORMAL)
self.result_text.delete(1.0, tk.END)
self.result_text.insert(tk.END, "AI診断結果:\n\n")
self.result_text.insert(tk.END, f"肺癌の確率: {result['確率']:.2f}\n")
self.result_text.insert(tk.END, f"診断結果: {result['診断']}\n")
self.result_text.insert(tk.END, f"信頼度: {result['信頼度']}\n")
self.result_text.config(state=tk.DISABLED)
# 実際のアプリではここでAIモデルを呼び出す
# self.predict_with_model(self.image)
def predict_with_model(self, image):
"""
実際のAIモデルを使用して予測を行う関数
この部分は使用するAIモデルに合わせて実装する必要があります
"""
# 例: 画像をnumpy配列に変換
img_array = np.array(image)
# ここでモデルによる予測を実行
# prediction = model.predict(img_array)
# 結果を返す
pass
def clear_all(self):
self.image = None
self.display_image = None
self.image_label.config(image='', text="画像がここに表示されます")
self.result_text.config(state=tk.NORMAL)
self.result_text.delete(1.0, tk.END)
self.result_text.config(state=tk.DISABLED)
if __name__ == "__main__":
root = tk.Tk()
app = LungCancerDiagnosisApp(root)
root.mainloop()


1番左の青ボタンが左移動、その隣の青ボタンが右移動、緑ボタンが回転、赤ボタンが下移動。
ボタンが小さ過ぎるし、落ちてくるスピードが速すぎwww
import pygame
import random
import sys
# 初期化
pygame.init()
# 色の定義
BLACK = (0, 0, 0)
WHITE = (255, 255, 255)
CYAN = (0, 255, 255)
BLUE = (0, 0, 255)
ORANGE = (255, 165, 0)
YELLOW = (255, 255, 0)
GREEN = (0, 255, 0)
PURPLE = (128, 0, 128)
RED = (255, 0, 0)
GRAY = (100, 100, 100)
# ゲーム設定
BLOCK_SIZE = 30
GRID_WIDTH = 10
GRID_HEIGHT = 20
BUTTON_AREA_HEIGHT = 100
SCREEN_WIDTH = BLOCK_SIZE * GRID_WIDTH
SCREEN_HEIGHT = BLOCK_SIZE * GRID_HEIGHT + BUTTON_AREA_HEIGHT
GAME_AREA_LEFT = 0
# テトリミノの形状
SHAPES = [
[[1, 1, 1, 1]], # I
[[1, 1], [1, 1]], # O
[[1, 1, 1], [0, 1, 0]], # T
[[1, 1, 1], [1, 0, 0]], # L
[[1, 1, 1], [0, 0, 1]], # J
[[0, 1, 1], [1, 1, 0]], # S
[[1, 1, 0], [0, 1, 1]] # Z
]
# テトリミノの色
COLORS = [CYAN, YELLOW, PURPLE, ORANGE, BLUE, GREEN, RED]
# ボタンの定義
class Button:
def __init__(self, x, y, width, height, text, color):
self.rect = pygame.Rect(x, y, width, height)
self.text = text
self.color = color
self.text_color = WHITE
self.font = pygame.font.SysFont('comicsans', 20)
def draw(self, surface):
pygame.draw.rect(surface, self.color, self.rect)
pygame.draw.rect(surface, WHITE, self.rect, 2)
text_surface = self.font.render(self.text, True, self.text_color)
text_rect = text_surface.get_rect(center=self.rect.center)
surface.blit(text_surface, text_rect)
def is_clicked(self, pos):
return self.rect.collidepoint(pos)
# ゲーム画面の作成
screen = pygame.display.set_mode((SCREEN_WIDTH, SCREEN_HEIGHT))
pygame.display.set_caption("テトリス")
clock = pygame.time.Clock()
class Tetrimino:
def __init__(self):
self.shape_idx = random.randint(0, len(SHAPES) - 1)
self.shape = SHAPES[self.shape_idx]
self.color = COLORS[self.shape_idx]
self.x = GRID_WIDTH // 2 - len(self.shape[0]) // 2
self.y = 0
def rotate(self):
rows = len(self.shape)
cols = len(self.shape[0])
rotated = [[0 for _ in range(rows)] for _ in range(cols)]
for r in range(rows):
for c in range(cols):
rotated[c][rows - 1 - r] = self.shape[r][c]
return rotated
def create_grid():
return [[0 for _ in range(GRID_WIDTH)] for _ in range(GRID_HEIGHT)]
def draw_grid(grid):
for y in range(GRID_HEIGHT):
for x in range(GRID_WIDTH):
rect = pygame.Rect(
GAME_AREA_LEFT + x * BLOCK_SIZE,
y * BLOCK_SIZE,
BLOCK_SIZE, BLOCK_SIZE
)
if grid[y][x]:
pygame.draw.rect(screen, COLORS[grid[y][x] - 1], rect)
pygame.draw.rect(screen, WHITE, rect, 1)
def draw_tetrimino(tetrimino):
for y, row in enumerate(tetrimino.shape):
for x, cell in enumerate(row):
if cell:
rect = pygame.Rect(
GAME_AREA_LEFT + (tetrimino.x + x) * BLOCK_SIZE,
(tetrimino.y + y) * BLOCK_SIZE,
BLOCK_SIZE, BLOCK_SIZE
)
pygame.draw.rect(screen, tetrimino.color, rect)
pygame.draw.rect(screen, WHITE, rect, 1)
def valid_space(tetrimino, grid):
for y, row in enumerate(tetrimino.shape):
for x, cell in enumerate(row):
if cell:
if (tetrimino.x + x < 0 or tetrimino.x + x >= GRID_WIDTH or
tetrimino.y + y >= GRID_HEIGHT or
(tetrimino.y + y >= 0 and grid[tetrimino.y + y][tetrimino.x + x])):
return False
return True
def check_lost(grid):
return any(cell for cell in grid[0])
def clear_rows(grid, score):
cleared_rows = 0
for y in range(GRID_HEIGHT):
if all(grid[y]):
cleared_rows += 1
for y2 in range(y, 0, -1):
grid[y2] = grid[y2-1][:]
grid[0] = [0 for _ in range(GRID_WIDTH)]
if cleared_rows == 1:
score += 100
elif cleared_rows == 2:
score += 300
elif cleared_rows == 3:
score += 500
elif cleared_rows == 4:
score += 800
return score
def draw_score(score):
font = pygame.font.SysFont('comicsans', 20)
label = font.render(f'Score: {score}', 1, WHITE)
screen.blit(label, (10, GRID_HEIGHT * BLOCK_SIZE + 10))
def main():
grid = create_grid()
current_tetrimino = Tetrimino()
next_tetrimino = Tetrimino()
change_tetrimino = False
run = True
score = 0
fall_time = 0
fall_speed = 0.5
# 操作ボタンの作成
button_width = 60
button_height = 50
button_y = GRID_HEIGHT * BLOCK_SIZE + 20
left_button = Button(20, button_y, button_width, button_height, "←", BLUE)
right_button = Button(100, button_y, button_width, button_height, "→", BLUE)
rotate_button = Button(180, button_y, button_width, button_height, "回転", GREEN)
down_button = Button(260, button_y, button_width, button_height, "↓", RED)
buttons = [left_button, right_button, rotate_button, down_button]
while run:
fall_time += clock.get_rawtime()
clock.tick()
if fall_time/1000 > fall_speed:
fall_time = 0
current_tetrimino.y += 1
if not valid_space(current_tetrimino, grid) and current_tetrimino.y > 0:
current_tetrimino.y -= 1
change_tetrimino = True
for event in pygame.event.get():
if event.type == pygame.QUIT:
run = False
pygame.quit()
sys.exit()
if event.type == pygame.MOUSEBUTTONDOWN:
pos = pygame.mouse.get_pos()
if left_button.is_clicked(pos):
current_tetrimino.x -= 1
if not valid_space(current_tetrimino, grid):
current_tetrimino.x += 1
elif right_button.is_clicked(pos):
current_tetrimino.x += 1
if not valid_space(current_tetrimino, grid):
current_tetrimino.x -= 1
elif rotate_button.is_clicked(pos):
rotated_shape = current_tetrimino.rotate()
old_shape = current_tetrimino.shape
current_tetrimino.shape = rotated_shape
if not valid_space(current_tetrimino, grid):
current_tetrimino.shape = old_shape
elif down_button.is_clicked(pos):
current_tetrimino.y += 1
if not valid_space(current_tetrimino, grid):
current_tetrimino.y -= 1
if change_tetrimino:
for y, row in enumerate(current_tetrimino.shape):
for x, cell in enumerate(row):
if cell and current_tetrimino.y + y >= 0:
grid[current_tetrimino.y + y][current_tetrimino.x + x] = current_tetrimino.shape_idx + 1
current_tetrimino = next_tetrimino
next_tetrimino = Tetrimino()
change_tetrimino = False
score = clear_rows(grid, score)
if check_lost(grid):
font = pygame.font.SysFont('comicsans', 40)
label = font.render('Game Over!', 1, WHITE)
screen.blit(label, (SCREEN_WIDTH//2 - label.get_width()//2, SCREEN_HEIGHT//2 - label.get_height()//2))
pygame.display.update()
pygame.time.delay(2000)
run = False
screen.fill(BLACK)
draw_grid(grid)
draw_tetrimino(current_tetrimino)
draw_score(score)
# ボタンを描画
for button in buttons:
button.draw(screen)
pygame.display.update()
# ゲームオーバー後の処理
font = pygame.font.SysFont('comicsans', 20)
restart_button = Button(SCREEN_WIDTH//2 - 100, SCREEN_HEIGHT//2 + 30, 200, 50, "再プレイ", GREEN)
waiting = True
while waiting:
for event in pygame.event.get():
if event.type == pygame.QUIT:
waiting = False
pygame.quit()
sys.exit()
if event.type == pygame.MOUSEBUTTONDOWN:
pos = pygame.mouse.get_pos()
if restart_button.is_clicked(pos):
waiting = False
main()
screen.fill(BLACK)
font_large = pygame.font.SysFont('comicsans', 40)
game_over_text = font_large.render("Game Over!", True, WHITE)
screen.blit(game_over_text, (SCREEN_WIDTH//2 - game_over_text.get_width()//2, SCREEN_HEIGHT//2 - 50))
score_text = font.render(f"最終スコア: {score}", True, WHITE)
screen.blit(score_text, (SCREEN_WIDTH//2 - score_text.get_width()//2, SCREEN_HEIGHT//2))
restart_button.draw(screen)
pygame.display.update()
pygame.quit()
if __name__ == "__main__":
main()
Androidにインストールして使えるようにするためには、PythonスクリプトをAndroidアプリとしてパッケージ化する必要があります。これには、以下のツールや方法が利用できます:
---
### 1. **KivyとBuildozerを使う方法**
KivyはPythonでモバイルアプリを開発するためのフレームワークで、BuildozerはKivyアプリをAndroid APKにパッケージ化するツールです。
#### 手順
1. **KivyとBuildozerのインストール**:
- デスクトップ環境(Windows、macOS、Linux)で以下のコマンドを実行して、KivyとBuildozerをインストールします。
```bash
pip install kivy buildozer
```
2. **プロジェクトの作成**:
- プロジェクト用のディレクトリを作成し、`main.py`というファイルに以下のコードを保存します。
```python
from kivy.app import App
from kivy.uix.button import Button
from kivy.uix.boxlayout import BoxLayout
from kivy.uix.label import Label
from kivy.uix.filechooser import FileChooserListView
import pandas as pd
from android.permissions import request_permissions, Permission
from android.storage import app_storage_path
class ODS2XLSXApp(App):
def build(self):
# Androidのストレージ権限をリクエスト
request_permissions([Permission.WRITE_EXTERNAL_STORAGE, Permission.READ_EXTERNAL_STORAGE])
# レイアウト
layout = BoxLayout(orientation='vertical')
self.label = Label(text="ODSをXLSXに変換")
self.file_chooser = FileChooserListView()
self.convert_button = Button(text="変換", size_hint=(1, 0.1))
self.convert_button.bind(on_press=self.convert_file)
layout.add_widget(self.label)
layout.add_widget(self.file_chooser)
layout.add_widget(self.convert_button)
return layout
def convert_file(self, instance):
try:
# 選択されたファイルを取得
ods_file = self.file_chooser.selection and self.file_chooser.selection[0]
if not ods_file:
self.label.text = "ファイルを選択してください"
return
# 変換先のファイル名を指定
xlsx_file = ods_file.replace(".ods", ".xlsx")
# .odsファイルを読み込む
df = pd.read_excel(ods_file, engine="odf")
# DataFrameをExcelファイルに保存
df.to_excel(xlsx_file, index=False)
self.label.text = f"変換完了: {xlsx_file}"
except Exception as e:
self.label.text = f"エラー: {str(e)}"
if __name__ == '__main__':
ODS2XLSXApp().run()
```
3. **Buildozerの設定**:
- プロジェクトディレクトリで以下のコマンドを実行し、`buildozer.init`ファイルを生成します。
```bash
buildozer init
```
- `buildozer.spec`ファイルを編集し、以下の設定を追加します。
```ini
[app]
title = ODS2XLSX
package.name = ods2xlsx
package.domain = org.example
source.include_exts = py,png,jpg,kv,atlas
requirements = python3,kivy,pandas,openpyxl,odfpy,android
```
4. **APKのビルド**:
- 以下のコマンドを実行してAPKをビルドします。
```bash
buildozer -v android debug
```
- ビルドが成功すると、`bin`ディレクトリにAPKファイルが生成されます。
5. **APKのインストール**:
- 生成されたAPKファイルをAndroidデバイスに転送し、インストールします。
---
### 2. **BeeWareを使う方法**
BeeWareは、Pythonでネイティブモバイルアプリを開発するためのもう一つのフレームワークです。
#### 手順
1. **BeeWareのインストール**:
- デスクトップ環境で以下のコマンドを実行します。
```bash
pip install beeware
```
2. **プロジェクトの作成**:
- 以下のコマンドで新しいプロジェクトを作成します。
```bash
briefcase create
```
3. **コードの追加**:
- `src/ods2xlsx/app.py`に以下のコードを追加します。
```python
import toga
from toga.style import Pack
from toga.style.pack import COLUMN, ROW
import pandas as pd
class ODS2XLSXApp(toga.App):
def startup(self):
# メインウィンドウ
main_box = toga.Box(style=Pack(direction=COLUMN))
# ファイル選択ボタン
self.file_label = toga.Label("ファイルを選択してください", style=Pack(padding=5))
self.select_file_button = toga.Button("ファイルを選択", on_press=self.select_file, style=Pack(padding=5))
self.convert_button = toga.Button("変換", on_press=self.convert_file, style=Pack(padding=5))
main_box.add(self.file_label)
main_box.add(self.select_file_button)
main_box.add(self.convert_button)
self.main_window = toga.MainWindow(title=self.formal_name)
self.main_window.content = main_box
self.main_window.show()
def select_file(self, widget):
try:
self.ods_file = self.main_window.open_file_dialog(title="ODSファイルを選択", file_types=[".ods"])
self.file_label.text = f"選択されたファイル: {self.ods_file}"
except Exception as e:
self.file_label.text = f"エラー: {str(e)}"
def convert_file(self, widget):
try:
if not self.ods_file:
self.file_label.text = "ファイルを選択してください"
return
xlsx_file = self.ods_file.replace(".ods", ".xlsx")
# .odsファイルを読み込む
df = pd.read_excel(self.ods_file, engine="odf")
# DataFrameをExcelファイルに保存
df.to_excel(xlsx_file, index=False)
self.file_label.text = f"変換完了: {xlsx_file}"
except Exception as e:
self.file_label.text = f"エラー: {str(e)}"
def main():
return ODS2XLSXApp()
```
4. **APKのビルド**:
- 以下のコマンドを実行してAPKをビルドします。
```bash
briefcase build android
briefcase run android
```
5. **APKのインストール**:
- 生成されたAPKファイルをAndroidデバイスに転送し、インストールします。
---
### 3. **その他のツール**
- **Chaquopy**: Android StudioでPythonコードを実行するためのプラグインです。
- **Pyqtdeploy**: PyQtアプリをAndroidにデプロイするためのツールです。
---
### まとめ
KivyとBuildozerを使う方法が最も簡単で、PythonコードをAndroidアプリに変換するのに適しています。BeeWareも同様に便利ですが、Kivyよりも新しいフレームワークです。どちらの方法でも、Androidデバイスにインストール可能なAPKファイルを生成できます。


import tkinter as tk
from tkinter import filedialog, messagebox
import pandas as pd
def convert_ods_to_xlsx():
# ファイル選択ダイアログを開く
ods_file = filedialog.askopenfilename(filetypes=[("OpenDocument Spreadsheet", "*.ods")])
if not ods_file:
return
# 変換先のファイル名を指定
xlsx_file = filedialog.asksaveasfilename(defaultextension=".xlsx", filetypes=[("Excel files", "*.xlsx")])
if not xlsx_file:
return
try:
# .odsファイルを読み込む
df = pd.read_excel(ods_file, engine="odf")
# DataFrameをExcelファイルに保存
df.to_excel(xlsx_file, index=False)
messagebox.showinfo("成功", f"ファイルが正常に変換されました: {xlsx_file}")
except Exception as e:
messagebox.showerror("エラー", f"ファイルの変換中にエラーが発生しました: {str(e)}")
# GUIアプリの作成
app = tk.Tk()
app.title("ODS to XLSX Converter")
# ボタンの作成
convert_button = tk.Button(app, text="ODSファイルを選択してXLSXに変換", command=convert_ods_to_xlsx)
convert_button.pack(pady=20)
# アプリの実行
app.mainloop()


PCではエラーとなって動かなかったが、
見事に成功!
Pythonでオープンオフィスの`.odt`ファイルをMicrosoft Excelのファイル形式(`.xlsx`)に変換するGUIアプリを作成するには、`tkinter`を使ってGUIを作成し、`odfpy`や`pandas`、`openpyxl`などのライブラリを使ってファイルの変換を行います。
以下は、そのようなアプリのサンプルコードです。
### 必要なライブラリのインストール
まず、必要なライブラリをインストールします。
```bash
pip install pandas openpyxl odfpy
```
### サンプルコード
```python
import tkinter as tk
from tkinter import filedialog, messagebox
import pandas as pd
import zipfile
import xml.etree.ElementTree as ET
def odt_to_dataframe(odt_file):
# .odtファイルを解凍して内容を読み取る
with zipfile.ZipFile(odt_file, 'r') as z:
with z.open('content.xml') as f:
tree = ET.parse(f)
root = tree.getroot()
# 名前空間を定義
namespaces = {
'office': 'urn:oasis:names:tc:opendocument:xmlns:office:1.0',
'table': 'urn:oasis:names:tc:opendocument:xmlns:table:1.0',
'text': 'urn:oasis:names:tc:opendocument:xmlns:text:1.0'
}
# テーブルデータを取得
rows = root.findall('.//table:table-row', namespaces)
data = []
for row in rows:
cells = row.findall('.//table:table-cell', namespaces)
row_data = []
for cell in cells:
cell_text = ''.join(cell.itertext())
row_data.append(cell_text)
data.append(row_data)
# DataFrameに変換
df = pd.DataFrame(data)
return df
def convert_odt_to_xlsx():
# ファイル選択ダイアログを開く
odt_file = filedialog.askopenfilename(filetypes=[("OpenDocument Text", "*.odt")])
if not odt_file:
return
# 変換先のファイル名を指定
xlsx_file = filedialog.asksaveasfilename(defaultextension=".xlsx", filetypes=[("Excel files", "*.xlsx")])
if not xlsx_file:
return
try:
# .odtファイルを読み込む
df = odt_to_dataframe(odt_file)
# DataFrameをExcelファイルに保存
df.to_excel(xlsx_file, index=False, header=False)
messagebox.showinfo("成功", f"ファイルが正常に変換されました: {xlsx_file}")
except Exception as e:
messagebox.showerror("エラー", f"ファイルの変換中にエラーが発生しました: {str(e)}")
# GUIアプリの作成
app = tk.Tk()
app.title("ODT to XLSX Converter")
# ボタンの作成
convert_button = tk.Button(app, text="ODTファイルを選択してXLSXに変換", command=convert_odt_to_xlsx)
convert_button.pack(pady=20)
# アプリの実行
app.mainloop()
```
### 説明
1. **odt_to_dataframe関数**: `.odt`ファイルを読み込み、その内容を`pandas.DataFrame`に変換します。`.odt`ファイルはZIP形式で圧縮されているため、`zipfile`を使って解凍し、`content.xml`からテーブルデータを抽出します。
2. **convert_odt_to_xlsx関数**: ユーザーに`.odt`ファイルを選択させ、変換先の`.xlsx`ファイルを指定させます。その後、`odt_to_dataframe`関数を使ってデータを読み込み、`pandas`の`to_excel`メソッドでExcelファイルに保存します。
3. **GUI**: `tkinter`を使ってシンプルなGUIを作成し、ユーザーがファイルを選択して変換できるようにします。
### 実行方法
このコードを実行すると、ウィンドウが表示され、「ODTファイルを選択してXLSXに変換」ボタンをクリックすることで、`.odt`ファイルを選択し、変換先の`.xlsx`ファイルを指定できます。
### 注意点
- `.odt`ファイルの構造が複雑な場合、このコードでは対応できないことがあります。その場合は、`odfpy`などのライブラリを使ってより詳細な処理を行う必要があります。
- このコードはシンプルなテーブルデータの変換を想定しています。複雑なフォーマットの`.odt`ファイルには対応していない場合があります。
このコードをベースに、必要に応じて機能を拡張してください。

英訳アプリのPydroidソースコードをDeepSeekで書いてもらった。
import tkinter as tk
from tkinter import ttk
from googletrans import Translator
import pykakasi
# ローマ字を日本語に変換する関数
def romaji_to_japanese(text):
kks = pykakasi.kakasi()
result = kks.convert(text)
japanese_text = "".join([item['hira'] for item in result])
return japanese_text
# 翻訳関数
def translate_text():
input_text = input_box.get("1.0", tk.END).strip()
if input_text:
# ローマ字を日本語に変換
japanese_text = romaji_to_japanese(input_text)
intermediate_box.delete("1.0", tk.END)
intermediate_box.insert("1.0", japanese_text)
# 日本語を英語に翻訳
translator = Translator()
translated = translator.translate(japanese_text, src='ja', dest='en')
output_box.delete("1.0", tk.END)
output_box.insert("1.0", translated.text)
# メインウィンドウの作成
root = tk.Tk()
root.title("和文英訳アプリ (ローマ字入力対応)")
root.geometry("500x400")
# 入力ボックス
input_label = ttk.Label(root, text="ローマ字で日本語を入力してください:")
input_label.pack(pady=5)
input_box = tk.Text(root, height=5, width=50)
input_box.pack(pady=5)
# 翻訳ボタン
translate_button = ttk.Button(root, text="翻訳", command=translate_text)
translate_button.pack(pady=10)
# 中間表示ボックス(ローマ字→日本語変換結果)
intermediate_label = ttk.Label(root, text="変換された日本語:")
intermediate_label.pack(pady=5)
intermediate_box = tk.Text(root, height=5, width=50)
intermediate_box.pack(pady=5)
# 出力ボックス
output_label = ttk.Label(root, text="英語訳:")
output_label.pack(pady=5)
output_box = tk.Text(root, height=5, width=50)
output_box.pack(pady=5)
# アプリの実行
root.mainloop()

googletransというライブラリとpykakasiという謎のライブラリをインポートしている。
試しに「賄賂裁判官が逮捕された。」を英訳させようとしたのだが、Pydroidは日本語キーボードが使えないので、ローマ字に置き換えてから英訳するようにしてみた。

お見事!!!
ちなみに「chinpo」と入力すると・・・www
p e n i sと英訳してくれるwww
さらに…www

これはさすがにヤバいだろ?www