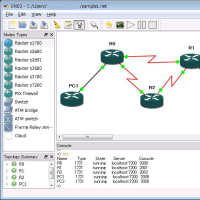
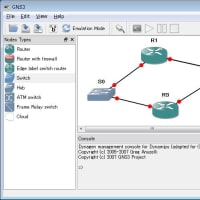
前回の検証で、HTTP、FTP通信がうまくいかないので、dynamips内で検証できるようにするため、CiscoでSSHの設定手順を書きとめておく。
検証したIOSは、「C1700 Software (C1700-K9O3SY7-M), Version 12.3(11)T」です。
(1)ホスト名の設定
ホスト名を設定しないといけないらしい。
しないと、以下のように出力される・・・。
Router(config)#cry key generate rsa
% Please define a hostname other than Router.
(2)ドメイン名の設定
(config)# ip domain-name johonet.local
(2)ユーザ名とパスワードの設定
SSHでログインするときに使用するユーザ名とパスワード
今回は、ユーザ名をcisco パスワードを ciscoとする。
(config)# username cisco password cisco
(3)SSHでのKEYの作成
OUT1(config)#crypto key generate rsa
Choose the size of the key modulus in the range of 360 to 2048 for your
General Purpose Keys. Choosing a key modulus greater than 512 may take
a few minutes.
How many bits in the modulus [512]: 1024 ←入力
*Mar 1 00:07:25.211: %SSH-5-DISABLED: SSH 1.99 has been disabled1024
% Generating 1024 bit RSA keys ...[OK]
(4)SSHのパラメータ設定
(config)# ip ssh time-out 60
(config)# ip ssh authentication-retries 2
(5)SSHを受信できるように設定(telnetも受信できるように)
(config)#line vty 0 4
(config-line)# login local ←これで、 usernameを見るようになる。
(config-line)# transport input telnet ssh
(6)show コマンドで確認
#show ssh
%No SSHv2 server connections running.
%No SSHv1 server connections running.
#show ip ssh
SSH Enabled - version 1.99
Authentication timeout: 60 secs; Authentication retries: 2
(7)別のクライアントから通信
#ssh -c 3des -l cisco 192.168.17.150 ← ver1のとき
#ssh -c aes192-cbc -l cisco 192.168.17.150 ← ver2のとき
Password: cisco ←入力
> ←ログイン完了
忘れずに、メモメモ。
[参考]
SSH は、次の IOS プラットフォームおよびイメージに導入されています。
・SSH バージョン 1.0(SSHv1)サーバは、12.0.5.S 以降のいくつかの IOS プラットフォームおよびイメージに導入されています。
・SSH クライアントは、12.1.3.T 以降のいくつかの IOS プラットフォームおよびイメージに導入されています。
・SSH 端末回線アクセス(別名、リバース Telnet)は、12.2.2.T 以降のいくつかの IOS プラットフォームおよびイメージに導入されています。
・SSH バージョン 2.0(SSHv2)サポートは、12.1(19)E 以降のいくつかの IOS プラットフォームおよびイメージに導入されています。