


LUA開発環境が整ったところで、今度はLUAから見た時のinterfaceや使用したモジュールの使い方のポイントについて記載します。
nodeMCU v1.0 Pins
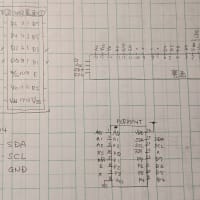
EPS8266Devkitの基板上に書かれたPinの名称(GPIO番号<以下の表では"ESP8266 Pin"の項目>)は、nodeMCUのポート(I/O index)番号とは異なります。以下がそのMapになります。i2cで使ったSCLとSDAのPinを表の右に示します。(i2cでは、この信号Pinと、電源:3V3、GNDの合計4本が必要です)
NodeMCU provides access to the GPIO (General Purpose Input/Output) and a pin mapping table is part of the API documentation.[17]
<figure></figure>
I/O index ESP8266 pin 備考 0 [*] D0:GPIO16 1 D1:GPIO5 SCL 2 D2:GPIO4 SDA 3 D3:GPIO0 4 D4:GPIO2 5 D5:GPIO14 6 D6:GPIO12 7 D7:GPIO13 8 D8:GPIO15 9 RX:GPIO3 10 TX:GPIO1 11 SD2:GPIO9 12 SD:3GPIO10 [*] D0 (GPIO16) can only be used for GPIO read/write. It does not support open-drain/interrupt/PWM/I²C or 1-Wire.
上記はhttps://en.wikipedia.org/wiki/NodeMCUから持ってきたものに、I/O indexに9-12と備考を追加したもの。2019/7/21
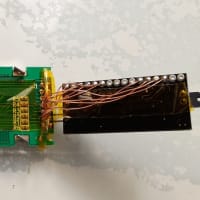
■ESP8266Devkitにi2cをつなげる
温度、気圧センサBMP280をi2cでESP8266Devkitに接続します。i2cはSCL(clock)、SDA(data)とGNDの3本(電源の供給も必要であれば4本)の信号線でデバイスを接続します。hardware編で記載したように接続します。まずはちゃんとnodeMCUからBMP280が見えるかどうか確認します。もちろん、nodeMCU上にi2cのソフトウェアモジュールが必要です。なければnodeMCUの再構築が必要となります。
■i2cの接続確認 "i2c_scanner.lua"
- 必要なnodeMCUモジュール:i2c
LUAで自動的にi2cの接続されているpin番号と、i2cのアドレスをチェックしてくれるプログラム。i2cの接続確認に非常に役に立ったので載せておきます。
https://www.esp8266.com/viewtopic.php?f=19&t=1049#p6198 です。
-- i2c_scanner.lua
-- Based on work by sancho and zeroday among many other open source authors
-- This code is public domain, attribution to gareth@l0l.org.uk appreciated.
id=0  -- need this to identify (software) IC2 bus?
gpio_pin= {5,4,0,2,14,12,13} -- this array maps internal IO references to GPIO numbers
-- user defined function: see if device responds with ACK to i2c start
function find_dev(i2c_id, dev_addr)
i2c.start(i2c_id)
c=i2c.address(i2c_id, dev_addr ,i2c.TRANSMITTER)
i2c.stop(i2c_id)
return c
end
print("Scanning all pins for I2C Bus device")
for scl=1,7 do
for sda=1,7 do
  tmr.wdclr() -- call this to pat the (watch)dog!
  if sda~=scl then -- if the pins are the same then skip this round
       i2c.setup(id,sda,scl,i2c.SLOW) -- initialize i2c with our id and current pins in slow mode :-)
       for i=0,127 do -- TODO - skip invalid addresses
            if find_dev(id, i)==true then
            print("Device found at address 0x"..string.format("%02X",i))
            print("Device is wired: SDA to GPIO"..gpio_pin[sda].." - IO index "..sda)
            print("Device is wired: SCL to GPIO"..gpio_pin[scl].." - IO index "..scl)
            end
       end
  end
end
end
以下は、実際にESP8266Devkitに接続したBMP280の接続確認結果。 上記プログラムを、file名'i2c_scan.lua'でnodeMCUに登録(Save to ESPで書き込む)して、ESPloereの右ペインの最下段から”dofile('i2c_scan.lua')”で起動した結果です。I/O index 1,2 (GPIO4,5)につながった0x76番デバイスを見つけたことになります。私が使ったBMP280モジュールはdefaultでアドレスが0x76でした。BMP280を複数つなげるときには、アドレスを変更するため(同一i2cBUS上に同じアドレスは許容されない)にBMP280モジュール側でジャンパ等の対応をする必要があります。これにより0x77に設定できるようです。
dofile("i2c_scan.lua")
--
Scanning all pins for I2C Bus device
Device found at address 0x76
Device is wired: SDA to GPIO4 - IO index 2
Device is wired: SCL to GPIO5 - IO index 1
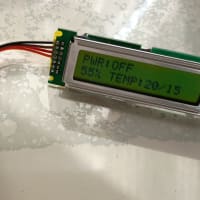
■i2cで接続されたBMP280から気温と気圧を得る
- 必要なnodeMCUモジュール:i2c、BME280
timer割り込みを使って、設定された時間(ここでは60sec)ごとに計測した温度と気圧を表示します。
★hints:
tmrモジュールはhttps://nodemcu.readthedocs.io/en/master/modules/tmr/ の記載(以下の注意書き)にあるように、2019年Q1(第一四半期)にI/Fが変更されていて、internet上に転がっている古いLUAプログラムを持ってきて動かすとエラーになることがあります。→私ははじめこれがわからず、随分苦労しました。nodeMCUのバージョンとLUAの組み合わせには注意が必要です。以下は、新しいnodeMCUで動作しますが、古いnodeMCUではエラーになります。
これをやっていた頃は2019の夏、丁度切り替わりの時期だったんですね。混乱しました。
■Attention
NodeMCU formerly provided 7 static timers, numbered 0-6, which could be used instead of OO API timers initiated with
tmr.create(). After a long period of deprecation, these were removed in 2019 Q1.https://nodemcu.readthedocs.io/en/master/modules/tmr/ に記載があります。
tmr moduleは、static と dynamicがあって、staticは将来なくなる、と記載あり。で、例えば
--
NodeMCU custom build by frightanic.com branch: master commit: c16adb5dfb8c02b692034bbd553502765b9733cc SSL: false modules: adc,bme280,file,gpio,http,i2c,mqtt,net,node,pwm,rtctime,tmr,uart,wifi build created on 2019-07-20 23:15 powered by Lua 5.1.4 on SDK 2.2.1(6ab97e9) lua: cannot open init.lua
--
では、staticではエラーとなる。なので”dynamic”で動かす必要ある。
tmr.alarm([id/obj],interval,,,,,, と書いてあるので、[id/obj]を抜けばよいような気もする。→未確認。
2019/8/7
--- read-baro-temp-by-timer.lua
--- alarmを使って定期的に気圧と気温を得る
--- 2019/7/20

alt=50
scl=1   ---D1, GPIO05
sda=2   ---D2, GPIO04
interval = 60000
i2c.setup(0,sda,scl,i2c.SLOW)
bme280.setup()
print("## Start sensing with interval ", interval ,"msec ##")
tmr.create():alarm(interval, tmr.ALARM_AUTO, function()
P = bme280.baro()
T = bme280.temp()
print(string.format("QFE=%d.%03d Temp=%d.%02d", P/1000, P%1000, T/100, T%100))
end)
以下は、上記のプログラムの出力、60秒ごとに気圧と気温情報を取得して値を印字する。上記は、nodeMCUで、BME280モジュールが必要です。今回接続しているモジュールはBMP280ですが、nodeMCUのモジュール名はBME280です。nodeMCUがrestartされた時の搭載モジュール名にBME280がなければ、nodeMCUの再構築が必要です。
## Start sensing with interval 	60000	msec ##
QFE=1769.129 Temp=26.88
QFE=1769.143 Temp=26.89
QFE=1769.178 Temp=26.90
QFE=1769.205 Temp=26.91
QFE=1769.247 Temp=26.92
QFE=1769.288 Temp=26.94
QFE=1769.329 Temp=26.95
気圧が1769ヘクトパスカル、このBMP280の気圧の数値は明らかにおかしい。二個買ったのでもう一つで確認したところ、1000位の数値を出したので、そちらが正しい模様。この個体は不良品でした。


※コメント投稿者のブログIDはブログ作成者のみに通知されます