


前々回の記事で、CordovaアプリからIoT Hubにデータを送信してみました。
今回は、スマホでBLE Beaconを検知して、情報をIoT Hubに上げる処理を作ってみます。
BLE Beaconには、Aplix社のUSB型のMy Beaconを使っています。
アプリを実行する実機は、Androidの場合はバージョンが4.4以上、ハードウェアがBluetooth 4.0以上に対応している必要があります。
1.CordovaアプリでBLE Beaconを検知させるために、プラグインを追加します。
プラグインはこちらのサイトのものを使用します。
コマンドプロンプトを起動し、カレントディレクトリをCordovaアプリのプロジェクト用フォルダに移動後、以下のコマンドを実行します。
cordova plugin add https://github.com/petermetz/cordova-plugin-ibeacon.git
プラグインの追加が完了するまで少しお待ちください。
2.プラグインの追加が完了したら、次はiBeacon検知用のコードを作成します。
今回は、前々回作成したデータ送信用ボタンの処理を変更し、
Beaconの検知用コードに変更します。
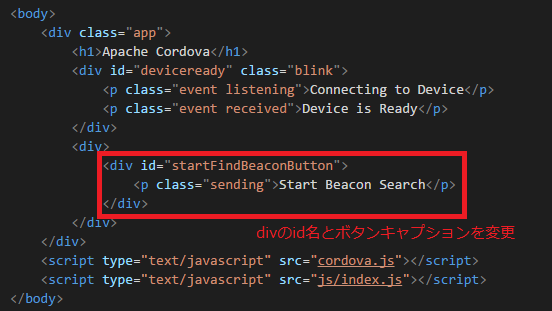
wwwフォルダ内のindex.html
作業用フォルダ(ここではtempフォルダ)内のindex.js
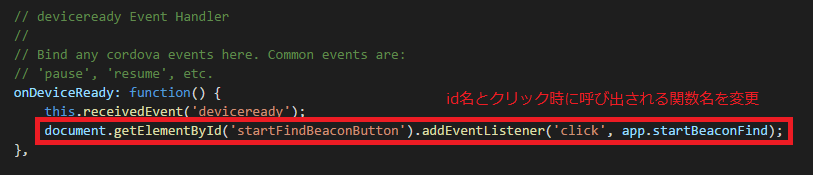
onDeviceReady関数内で、ボタンクリック時に呼び出す処理を変更します。
id名は上記のindex.htmlでの変更内容に合わせます。
startBeaconFind関数は、プラグインのサイトのサンプルコードを参考に、以下のコードを実装。
※スペースが全角になっているので、コピペする場合は注意してください。
BeaconRegion関数の引数で[]で表記している個所は、各自で設定ください。
startBeaconFind: function() {
window.locationManager = cordova.plugins.locationManager;
var delegate = new cordova.plugins.locationManager.Delegate()
delegate.didDetermineStateForRegion = function(pluginResult)
{
console.log('didDetermineStateForRegion:' + JSON.stringify(pluginResult));
}
delegate.didStartMonitoringForRegion = function(pluginResult)
{
console.log('didStartMonitoringForRegion:' + JSON.stringify(pluginResult));
}
delegate.didRangeBeaconsInRegion = function(pluginResult)
{
var resultJson = JSON.stringify(pluginResult);
console.log('didRangeBeaconsInRegion: ' + resultJson);
app.sendData(resultJson);
}
var br1 = new cordova.plugins.locationManager.BeaconRegion('[任意の文字列]', '[検知したいBeaconのUUID]', [検知したいBeaconのMajor番号], [検知したいBeaconのMajor番号]);
locationManager.setDelegate(delegate);
cordova.plugins.locationManager.requestWhenInUseAuthorization();
cordova.plugins.locationManager.startMonitoringForRegion(br1)
.fail(function(e) { console.error(e); })
.done();
cordova.plugins.locationManager.startRangingBeaconsInRegion(br1)
.fail(function(e) { console.error(e); })
.done();
},
sendData関数は、Beaconが検知された時の情報(JSONデータ)を受け取れるよう引数を追加し、
その引数内のデータをそのままIoT Hubに送信するようにします。
sendData: function(resultJson) {
var connectionString = '[IoT Hub device connection string]';
var clientFromConnectionString = require('azure-iot-device-http').clientFromConnectionString;
var client = clientFromConnectionString(connectionString);
var Message = require('azure-iot-device').Message;
var connectCallback = function (err) {
if (err) {
console.error('Could not connect: ' + err);
} else {
console.log('Client connected');
var msg = new Message(resultJson);
client.sendEvent(msg, function (err) {
if (err) {
console.log(err.toString());
} else {
console.log('Message sent');
};
});
};
};
client.open(connectCallback);
}
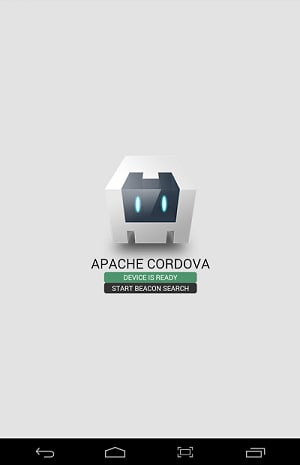
3.コードの変更後、前々回同様の手順でビルドします。
コマンドプロンプトでカレントディレクトリを作業用フォルダ(ここではtemp)に移動し、以下のコマンドを実行
browserify index.js -o ../www/js/index.js
Visual Studio Codeでプロジェクトをビルドし、実機で実行してみてください。
4.Device ExplorerのDataタブを開き、Monitoringをクリックし、IoT Hubのデータを観察できるようにしておきます。
実機のBluetoothデバイス機能を有効にしたあと、アプリの「START BEACON SEARCH」ボタンをクリックしてください。
Device Explorerには以下のようなデータが送信されているはず。
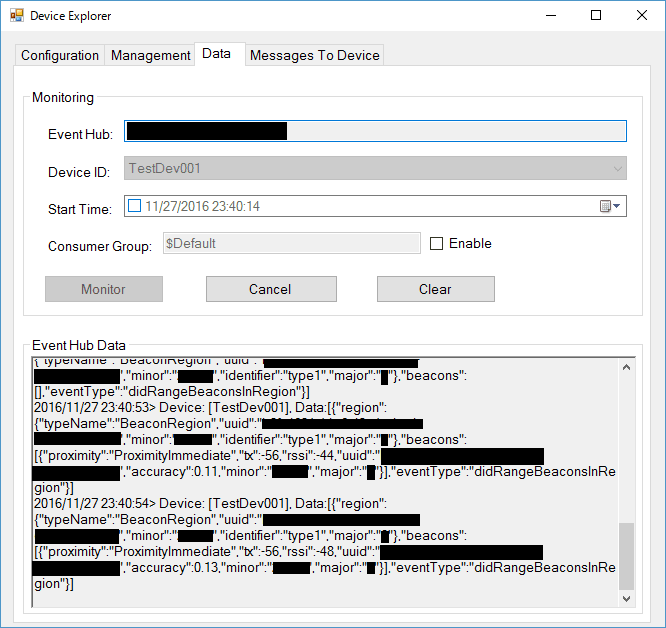
RSSIが電波強度ですね。1秒周期程度でBeaconのデータを受信してIoT Hubに送信していることがわかります。
⇒Beaconの検知周期って、どこで設定しているんだろう・・・(汗)。
今回は、スマホでBLE Beaconを検知して、情報をIoT Hubに上げる処理を作ってみます。
BLE Beaconには、Aplix社のUSB型のMy Beaconを使っています。
アプリを実行する実機は、Androidの場合はバージョンが4.4以上、ハードウェアがBluetooth 4.0以上に対応している必要があります。
1.CordovaアプリでBLE Beaconを検知させるために、プラグインを追加します。
プラグインはこちらのサイトのものを使用します。
コマンドプロンプトを起動し、カレントディレクトリをCordovaアプリのプロジェクト用フォルダに移動後、以下のコマンドを実行します。
cordova plugin add https://github.com/petermetz/cordova-plugin-ibeacon.git
プラグインの追加が完了するまで少しお待ちください。
2.プラグインの追加が完了したら、次はiBeacon検知用のコードを作成します。
今回は、前々回作成したデータ送信用ボタンの処理を変更し、
Beaconの検知用コードに変更します。
wwwフォルダ内のindex.html
作業用フォルダ(ここではtempフォルダ)内のindex.js
onDeviceReady関数内で、ボタンクリック時に呼び出す処理を変更します。
id名は上記のindex.htmlでの変更内容に合わせます。
startBeaconFind関数は、プラグインのサイトのサンプルコードを参考に、以下のコードを実装。
※スペースが全角になっているので、コピペする場合は注意してください。
BeaconRegion関数の引数で[]で表記している個所は、各自で設定ください。
startBeaconFind: function() {
window.locationManager = cordova.plugins.locationManager;
var delegate = new cordova.plugins.locationManager.Delegate()
delegate.didDetermineStateForRegion = function(pluginResult)
{
console.log('didDetermineStateForRegion:' + JSON.stringify(pluginResult));
}
delegate.didStartMonitoringForRegion = function(pluginResult)
{
console.log('didStartMonitoringForRegion:' + JSON.stringify(pluginResult));
}
delegate.didRangeBeaconsInRegion = function(pluginResult)
{
var resultJson = JSON.stringify(pluginResult);
console.log('didRangeBeaconsInRegion: ' + resultJson);
app.sendData(resultJson);
}
var br1 = new cordova.plugins.locationManager.BeaconRegion('[任意の文字列]', '[検知したいBeaconのUUID]', [検知したいBeaconのMajor番号], [検知したいBeaconのMajor番号]);
locationManager.setDelegate(delegate);
cordova.plugins.locationManager.requestWhenInUseAuthorization();
cordova.plugins.locationManager.startMonitoringForRegion(br1)
.fail(function(e) { console.error(e); })
.done();
cordova.plugins.locationManager.startRangingBeaconsInRegion(br1)
.fail(function(e) { console.error(e); })
.done();
},
sendData関数は、Beaconが検知された時の情報(JSONデータ)を受け取れるよう引数を追加し、
その引数内のデータをそのままIoT Hubに送信するようにします。
sendData: function(resultJson) {
var connectionString = '[IoT Hub device connection string]';
var clientFromConnectionString = require('azure-iot-device-http').clientFromConnectionString;
var client = clientFromConnectionString(connectionString);
var Message = require('azure-iot-device').Message;
var connectCallback = function (err) {
if (err) {
console.error('Could not connect: ' + err);
} else {
console.log('Client connected');
var msg = new Message(resultJson);
client.sendEvent(msg, function (err) {
if (err) {
console.log(err.toString());
} else {
console.log('Message sent');
};
});
};
};
client.open(connectCallback);
}
3.コードの変更後、前々回同様の手順でビルドします。
コマンドプロンプトでカレントディレクトリを作業用フォルダ(ここではtemp)に移動し、以下のコマンドを実行
browserify index.js -o ../www/js/index.js
Visual Studio Codeでプロジェクトをビルドし、実機で実行してみてください。
4.Device ExplorerのDataタブを開き、Monitoringをクリックし、IoT Hubのデータを観察できるようにしておきます。
実機のBluetoothデバイス機能を有効にしたあと、アプリの「START BEACON SEARCH」ボタンをクリックしてください。
Device Explorerには以下のようなデータが送信されているはず。
RSSIが電波強度ですね。1秒周期程度でBeaconのデータを受信してIoT Hubに送信していることがわかります。
⇒Beaconの検知周期って、どこで設定しているんだろう・・・(汗)。