最初はLチカ

片リンだけ動きます

3.3Vでは少し弱いとおもい
5V接続、5,16番ピンをフォトカプラでスイッチング
フォトカプラだと少し弱くなる

ということで
リレー946H-1C-3D
リレーは2種類もっていたのですが小さい方はブレッドボードにささりません。
配置場所はブレッドボードの中央にしか配置できません。
タイヤの左右に配置したかったのですが1列たりませんでした。
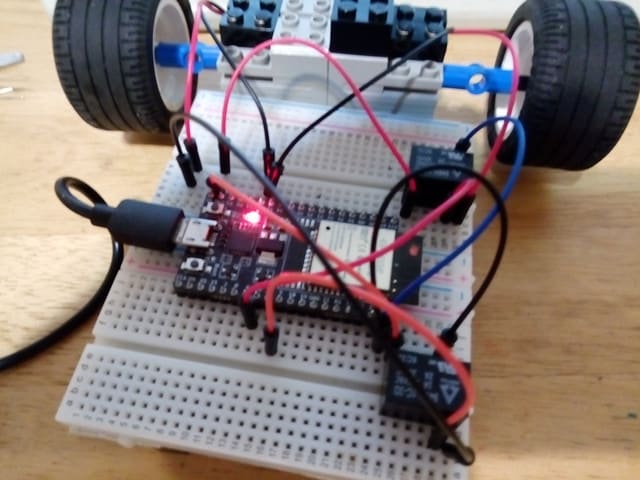
色々試行錯誤したのですがうまく動きません
リレーを入れ替えてみるとどうもリレー1つ動かないようです。
arduino-1.8.8で書き込んだプログラム
exampls-WiFi-SimpleWiFiServerに16pinを追加しただけです。
#include <WiFi.h>
const char* ssid = "xxxxxxxxxxxx";
const char* password = "xxxxxxxxxxxx";
WiFiServer server(80);
void setup()
{
Serial.begin(115200);
pinMode(5, OUTPUT); // set the LED pin mode
pinMode(16, OUTPUT); // set the LED pin mode
delay(10);
// We start by connecting to a WiFi network
Serial.println();
Serial.println();
Serial.print("Connecting to ");
Serial.println(ssid);
WiFi.begin(ssid, password);
while (WiFi.status() != WL_CONNECTED) {
delay(500);
Serial.print(".");
}
Serial.println("");
Serial.println("WiFi connected.");
Serial.println("IP address: ");
Serial.println(WiFi.localIP());
server.begin();
}
int value = 0;
void loop(){
WiFiClient client = server.available(); // listen for incoming clients
if (client) { // if you get a client,
Serial.println("New Client."); // print a message out the serial port
String currentLine = ""; // make a String to hold incoming data from the client
while (client.connected()) { // loop while the client's connected
if (client.available()) { // if there's bytes to read from the client,
char c = client.read(); // read a byte, then
Serial.write(c); // print it out the serial monitor
if (c == '\n') { // if the byte is a newline character
// if the current line is blank, you got two newline characters in a row.
// that's the end of the client HTTP request, so send a response:
if (currentLine.length() == 0) {
// HTTP headers always start with a response code (e.g. HTTP/1.1 200 OK)
// and a content-type so the client knows what's coming, then a blank line:
client.println("HTTP/1.1 200 OK");
client.println("Content-type:text/html");
client.println();
// the content of the HTTP response follows the header:
client.print("Click <a href=\"/H\">here</a> to turn the LED on pin 5 on.<br>");
client.print("Click <a href=\"/L\">here</a> to turn the LED on pin 5 off.<br>");
client.print("Click <a href=\"/P\">here</a> to turn the LED on pin 16 on.<br>");
client.print("Click <a href=\"/Q\">here</a> to turn the LED on pin 16 off.<br>");
// The HTTP response ends with another blank line:
client.println();
// break out of the while loop:
break;
} else { // if you got a newline, then clear currentLine:
currentLine = "";
}
} else if (c != '\r') { // if you got anything else but a carriage return character,
currentLine += c; // add it to the end of the currentLine
}
// Check to see if the client request was "GET /H" or "GET /L":
if (currentLine.endsWith("GET /H")) {
digitalWrite(5, HIGH); // GET /H turns the LED on
}
if (currentLine.endsWith("GET /L")) {
digitalWrite(5, LOW); // GET /L turns the LED off
}
// Check to see if the client request was "GET /P" or "GET /Q":
if (currentLine.endsWith("GET /P")) {
digitalWrite(16, HIGH);
}
if (currentLine.endsWith("GET /Q")) {
digitalWrite(16, LOW);
}
}
}
// close the connection:
client.stop();
Serial.println("Client Disconnected.");
}
}