X-431 GDS

Launch X431 GDS , Launch GDS ,X-431 GDS

SD Connect C4 dead, not power up (customer solution)

2019-06-29 10:40:16 | 日記


<nav role="navigation" id="nav-above" class="site-navigation post-navigation">

Post navigation


</nav>


<article id="post-2670" class="post-2670 post type-post status-publish format-standard hentry category-mb-star tag-benz-star-c4 tag-mb-sd-c4 tag-mb-sd-c4-star-diagnostic-tool tag-mb-sd-connect-c4 tag-mb-sd-connect-compact-4 tag-mb-star-c4 tag-mb-star-c4-sd-connect tag-mb-star-compact-c4 tag-mb-star-diagnosis-c4 tag-mb-star-diagnosis-sd-connect-c4 tag-mercedes-benz-diagnostic-scanner tag-sd-connect-c4 tag-star-c4">


<header class="entry-header">

SD Connect C4 dead, not power up (customer solution)


</header>


Share an easy way to repair sd connect c4 multiplexer if your multiplexer is dead, not powering up via any adapter cable.


NOTE:
TRY AT YOUR OEWN RISK!


First open the MB SD C4 main unit. Slide PCB out a little bit, from the connector side, so you can see the units buttons wiring. Carefully pry the lock out & up, after that you can pull the wiring and PCB out.


sd-connect-c4-not-power-up-1


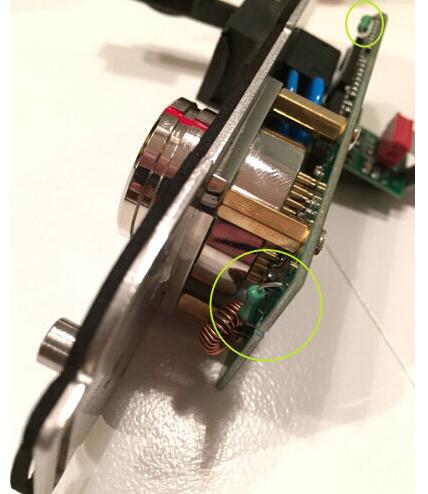
Then Open 4 Main PCB screws, Carefully wiggle the PCB off from another, it might be pretty tight, so carefully, side from side!


sd-connect-c4-not-power-up-2


sd-connect-c4-not-power-up-3
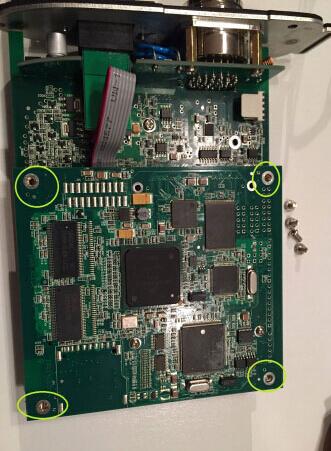
Disconnect the LAN cable, carefully, pretty easy to break the small clip.


sd-connect-c4-not-power-up-4


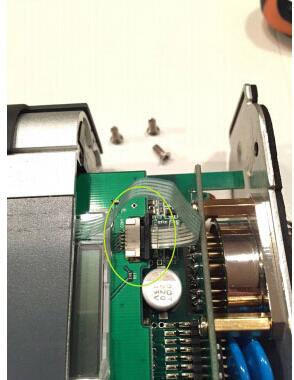
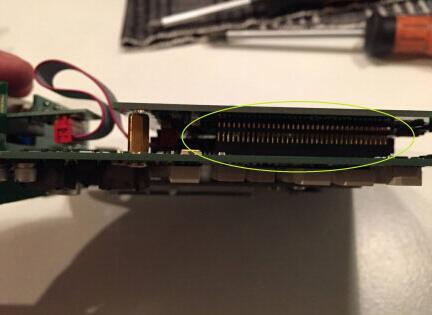
Then you can disconnect the Connector PCB, very carefully, might be really thight! Again slowly from both sides. You now have access to the small Fuses.


sd-connect-c4-not-power-up-5


sd-connect-c4-not-power-up-6


You can use multi-meter to see if they work, usually the LAN connector side 5A is burnt. So desolder the broken one, install new & enjoy your powering up mux again!


This repairing above requires experienced and professional techniques; or you are suggested to buy a cheap clone MB SD Connect C4 of high quality to replace it. Google to get the good one. I helped to put the first site here for you (no affiliation to the vendor)


<footer class="entry-meta">
Posted in MB STAR | Tagged , , , , , , , , , , , , |

Leave a reply


</footer>


</article>


<nav role="navigation" id="nav-below" class="site-navigation post-navigation">

Post navigation


</nav>


Leave a Reply


<form action="http://obd2trade.com/wp-comments-post.php" method="post" id="commentform" class="comment-form">

Your email address will not be published. Required fields are marked *

<label for="author">Name *</label> <input id="author" name="author" type="text" value="" size="30" aria-required="true">


<label for="url">Website</label> <input id="url" name="url" type="text" value="" size="30">


<label for="comment">Comment</label> <textarea id="comment" name="comment" cols="45" rows="8" aria-describedby="form-allowed-tags" aria-required="true"></textarea>

You may use these HTML tags and attributes: <a href="" title=""> <abbr title=""> <acronym title=""> <b> <blockquote cite=""> <cite> <code> <del datetime=""> <em> <i> <q cite=""> <strike> <strong>


<input name="submit" type="submit" id="submit" class="submit" value="Post Comment">
<input type="hidden" name="comment_post_ID" value="2670" id="comment_post_ID">
<input type="hidden" name="comment_parent" id="comment_parent" value="0">


<input type="hidden" id="akismet_comment_nonce" name="akismet_comment_nonce" value="84a74dbedd">

<input type="hidden" id="ak_js" name="ak_js" value="1561809870380"></form>


Xentry error 2221-45 No access authorization solution

2019-06-29 10:40:16 | 日記
One of customer had the Xentry error 2221-45 No access authorization when running Mercedes MB SD Connect C4
2016.07V Xentry diagnostic software. Here is the final solution provided by mbstarhsop.com engineer.
Problem:
(2221-45) No access authorization for XENTRY Diagnostic was found on the server. You must contact the User Help Disk.
xentry-2221-45-error
Solution I from mbstarshop engineer:
If you running Windows 7 hard drive, then
Browse to C:\Mercedes-Benz\Xentry\fusoko\eclipse\plugins, delete com.daimler_xentry.diagservice_1.6_0.2016.07181047 file.
xentry-2221-45-solution
2. If you running Windows 8 hard drive,then
Browse to C:\Program Files\Mercedes-Benz\Xentry\fusoko\eclipse\plugins folder,
Delete com.daimler.xentry.diagservice_1.6.0.201607151427 file
xentry-2221-45-win8-solution
Problem has been solved.
Solution II from a user
Software version: Xentry 2016.05
In folder
C:\Program Files (x86)\Mercedes-Benz\Xentry\fusoko\eclipse\plugins
Rename
com.daimler.xentry.diagservice_1.6.0.201603141505.jar
to
com.daimler.xentry.diagservice_1.6.0.201603141505.jarold
Then paste in
com.daimler.xentry.diagservice_1.6.0.201603141505.jar
from 2221 052016 folder
Solution III from another user
Software version: 05.2016 Xentry
Free download Xentry-2221-45-fix.rar:
https://mega.nz/#!Ip1GkQhR!hHakXl1U1Q5SEE_5NlIZcfSNRE_2CKDJSL9OLXTexYw
(2 fix)
Solution IV with lots of thanks & likes in a forum
Software version: Xentry 2016.5
replace the file call com.daimler.xentry.diagservice_1.6.0.201605121225.jar in the folder
c:\program Files(x86)\Mercedes-Benz\Xentry\fusoko\eclipse\plugins
with the attachment below
2016.05-Xentry-[2221-45]-Fix.rar:
https://mega.nz/#!11kxTZZA!uBWlUVOx7XzWai-T7eSPJt6V_lVhG2Pl5PI02oUNXUM

Volvo Tech Tool 2.7.25 Win7 install & activate for Vocom 88890300

2019-06-20 18:24:55 | 日記


Topic: Volvo Tech Tool 2.7.30 win7 install and activate for Vocom 88890300. Then diagnose Volvo.
Volvo Tech Tool 2.7.25 can get DTC Info For VERSION3, VERSION4 el.
system trucks etc.


Volvo Tech Tool 2.7.25 version Update info:


Operation 37 11-08-03-03 Data Links, Fault Tracing with Oscilloscope”
has been updated to make it easier to evaluate CAN signal disturbance.
NOX sensor values added in operation 25920-3/32589-08-03-02 ‘Exhaust aftertreatment system, service regeneration’.


Install or run program from your media.
volvo-tech-tool-2-7-25-install-1
Setup Microsoft.NET Framework 4.6.1.
volvo-tech-tool-2-7-25-install-2
User Login.
volvo-tech-tool-2-7-25-install-3 volvo-tech-tool-2-7-25-install-4
Installing Tech Tool 2.75.25.1
It will take about 2 minutes to finish acquiring package.
volvo-tech-tool-2-7-25-install-5


volvo-tech-tool-2-7-25-install-6
Next is to apply package 10/46, it will take about 2 minutes.


volvo-tech-tool-2-7-25-install-7
Finish installing Tech Tool 2.75.25.1
volvo-tech-tool-2-7-25-install-8
Open Tech tool installation folder.
volvo-tech-tool-2-7-25-install-9
Open developer packages.
volvo-tech-tool-2-7-25-install-10
Open “1-developement” to automatically run until finished.
volvo-tech-tool-2-7-25-install-11
Open “2 – Devpatches” to automatically run “Windows configures VCADS Pro Development Content”.


volvo-tech-tool-2-7-25-install-12
Close ” Tech tool installation folder”.
Auto play DVD-1, until open the Tech tool folder, at this time, new
create one folder named “APCI”, then copy and paste the files from the
folder to the new folder “APCI”.
volvo-tech-tool-2-7-25-install-13


volvo-tech-tool-2-7-25-install-14


volvo-tech-tool-2-7-25-install-15
Auto play DVD-2, copy and paste the files to the new folder “APCI”.
volvo-tech-tool-2-7-25-install-16
Extract the decompresseders.
Set the computer to not show the hidden files, folders and drivers.


volvo-tech-tool-2-7-25-install-17
Go to Disk C -> ProgramData -> Tech Tool-> Waf, delete “DtR” and “OtD”.
volvo-tech-tool-2-7-25-install-18
Then copy the same folder “”DtR” and “OtD” to Disk C -> ProgramData -> Tech Tool-> Waf.
volvo-tech-tool-2-7-25-install-19
Go to Disk C -> Program Files-> Client Update -> Console,
change the file name extension of “CLUPConsole.exe” as “CLUPConsole.ex”.
volvo-tech-tool-2-7-25-install-20
Go to Disk C -> Program Files-> Tech Tool -> ApciPlus, change the file name extension of “apcidb.dll” as “apcidb.dl”.
volvo-tech-tool-2-7-25-install-21
Copy “apcidb.dll” to Disk C -> Program Files-> Tech Tool -> ApciPlus.


volvo-tech-tool-2-7-25-install-22
volvo-tech-tool-2-7-25-install-23
Restart the PC.
volvo-tech-tool-2-7-25-install-24
Open the new folder “APCI”, copy “TechToolLicenseEditor” from “2.7 Full” folder.
volvo-tech-tool-2-7-25-install-25
Then copy and paste “Devtool 2.7.xx”.
volvo-tech-tool-2-7-25-install-26
Click on “Get _FW_ID.exe” to copy the ID to the supplier (uobdii.com) for activation.


volvo-tech-tool-2-7-25-install-27
Receive two folders (Act and Dev) from Obd2tool.com.
volvo-tech-tool-2-7-25-install-28
Open “Act” to copy the “Regkey.dat” to Disk C -> TechToolLicenseEditor.


volvo-tech-tool-2-7-25-install-29
volvo-tech-tool-2-7-25-install-30
volvo-tech-tool-2-7-25-install-31
Open the folder ” Dev” to copy “regkey.dat” to Disk C -> TechToolLicenseEditor – Devtool 2.7.xx.


volvo-tech-tool-2-7-25-install-32
Open “DevTool.exe”.
volvo-tech-tool-2-7-25-install-33
Send “DevTool.exe” to the desktop.
Open Developer Tool Plus 2.6/2.7
volvo-tech-tool-2-7-25-install-34
Volvo Vocom PTT 2.7.25.1 is language is multi-choice.
volvo-tech-tool-2-7-25-install-35


volvo-tech-tool-2-7-25-install-36
Open PTT 2.7.25.1 full, then “cmd run as admin techtoollicense editor command.tx”, follow the instruction.


volvo-tech-tool-2-7-25-install-37 volvo-tech-tool-2-7-25-install-38 volvo-tech-tool-2-7-25-install-39
User type “Developer”.
volvo-tech-tool-2-7-25-install-40
Click on “Created DB with new key”.


Get message :
Database clean success
Wait…
Syncid populate error!
volvo-tech-tool-2-7-25-install-41
If you will get error sync pop ID just start and close ptt.
Open Tech Tool and it requires User ID, exit.
Once again, click on ” “Created DB with new key”.
Click on “Patch Login”.
DB created.
Login patched successfully


volvo-tech-tool-2-7-25-install-42 volvo-tech-tool-2-7-25-install-43
Copy the user ID “XX78911” in the TechTool 2.6XX && 2.7 license editor.
And rename “Tech Tool” (on the desktop) as “XX78911”.
Open “XX78911”, enter User ID “XX78911”.
Tick on “Work offline”.
volvo-tech-tool-2-7-25-install-44
Enter TechTool 2.7.25“.
volvo-tech-tool-2-7-25-install-45
Plug Volvo 88890300 Vocom Interface to the computer.
volvo-tech-tool-2-7-25-install-46


volvo-tech-tool-2-7-25-install-47 volvo-tech-tool-2-7-25-install-48
Create Chassis ID.
volvo-tech-tool-2-7-25-install-49
Work order number.
volvo-tech-tool-2-7-25-install-50


volvo-tech-tool-2-7-25-install-51
Tech Tool -Login


volvo-tech-tool-2-7-25-install-53 volvo-tech-tool-2-7-25-install-54
Electrical system: Version2
volvo-tech-tool-2-7-25-install-55
Model FH12.
volvo-tech-tool-2-7-25-install-56
Diagnose (Read out trouble codes)
volvo-tech-tool-2-7-25-install-57
Job is done.


Autel Maxisys Elite Diagnostic Tool

2019-06-16 18:35:23 | 日記

The MaxiSys Elite, the newest addition to the MaxiSys line of highly advanced smart diagnostic tools, is based on the fast and intuitive Android operating system. Powered by NVIDIA’s Tegra? 4, the world’s fastest mobile processor, its visually stunning 9.7” Retina display offers ultra-high resolutions up to 2048×1536 and an optimized array of sophisticated and powerful applications. The Autel Maxisys Elite rapidly performs every job from comprehensive vehicle diagnostics & analysis to advanced ECU programming. 2x faster than any comparable device, the MaxiSys Elite provides extended battery life and intelligent power saving. The MaxiSys Elite offers a super-sensitive capacitive screen able to respond to gloved, moistened, and even greasy fingers! The ergonomically angled docking station provides optimum visibility and convenient charging that eliminates power concerns.


Get Autel MaxiSys Elite Now for 4 Reasons:
1. FAST: Autel MaxiSys Elite is equipped with the NVIDIA Tegra”4 Quad-Core Processor 1.8HGz that provides you with a fast operation speed and a quick diagnosis, the boot up time is within 20 seconds, all these give you a wonderful diagnostic experience
2. SMART: This diagnostic tool has some excellent functions such as automatically read VIN and One-Click Upgrade, Autel Cloud Technology (MaxiFix Platform, Data Management, Data Feedback) gives you support anytime, anywhere
3. MOBILE: This diagnostic scanner is with exceptional OE-Level functionality that works on most OBD1/OBD2 protocols, the enhanced wireless connectivity between the tablet and VCI device allows greater mobility and ease at work
4. POWERFUL: This diagnostic scanner can complete online ECU programming on Benz and BMW vehicles, ALL system diagnoses, and other various advanced functions and common functions


Autel Scanner Advanced functions:
*   ECU matching on Ford enables you match the new ECU with your vehicle after replacing the old one
*   Coding function helps you do programming and coding on some specified control modules
*   Leading function for VW&Audi offers you a step-by-step guidance as how to fix the problem when you diagnosed the problem of the vehicle
*   Anti-theft matching can disable the lost key and add the new key’s information to program to ensure the security of your vehicle
*   SAS reset will calibrate the steering angle sensor after the replacement to make sure the ECU issued the correct steering instructions and memorize the max angle’s position
*   Tire pressure reset is to make up or replace the tire, tell the ECU that the tire pressure returned to normal and keep all the information in record
*   Injector programming will write the new code to the ECU after replacement of injector, so that the injector works
*   DPF reset is to retrieve/erase DPF-related codes, reset the DPF light after the filter has been replaced
*   Throttle matching is to do ECU matching after throttle cleaning or replacement…


AUTEL MS908P Customer Reviews

2019-06-16 11:03:36 | 日記

OBD2TOOL has collected some customer reviews on Autel Maxisys Pro MS908P. Post them here for you to take a reference.


If your a serious do-it-your-selfer and never want to have to pay a
dealer or big shop for diagnostic work and can afford to spring for it,
this is the one you need.


As someone who works almost exclusively with Mercedes i can say with
certainty that this little computer is worth its weight in gold so far.
if you have the diligence to do your part and learn how to use it, there
is very little it will not do. from reading and clearing trouble codes
that may or may not set your check engine light to reprogramming newly
installed sensors or ecu’s (although you will need some manufacturer
info to do these last two) I am more than pleased with the specific
breakdown of each code in the fault report readout. after having used
the older Snap-on systems in the past (which were a huge headache and
provided what seemed to me, a very vague answer to every code) this
thing is a pleasure to work with. It also provides a search icon next to
each code it lists in the fault report…..click the search icon and the
computer immediately searches the web for all articles, blogs, forum
threads, service bulletins, recalls, YouTube videos etc etc related to
your code (which can prove helpful if its something you happen to be
unfamiliar with). If your a serious do-it-your-selfer and never want to
have to pay a dealer or big shop for diagnostic work and can afford to
spring for it, this is the one you need. Likewise if your pro grease
monkey, this will do just about anything you’ll ever need it to.


The Autel wins


I have used this tool on European, Asian and American vehicles. So
far haven’t found anything it couldn’t do. I even did variant coding on a
2002 Mercedes-Benz directly from the tool! The only drawback so far is
you can’t download play store app. If, for instance you want to watch a
youtube video, you have to go through the browser. (this next part is an
edit to my original post) I also have a GM Tech 2 and a Snapon Modis Elite. Today I compared the Autel ms908p to the
other two on a 2004 Chevrolet 2500 with a Duramax diesel. The Autel
wins.It did everything the tech2 (which is the factory tool) could do.
In fairness to the modis it did also but you have to change personality
keys twice. The Autel is much faster than the others.


So far its an excellent tool. Purchased for our collision shop and
needed a better scanner with print capability since our old one wouldnt
do it. Recieved this tool and we have this thing out daily now doing
things we didnt know was possibile with the increased capability this
unit offers. Also much cheaper for the level of usefulness than the
other scanners out there now.


Stop paying your dealership money!


Great product! Have a 45 car a week shop in Lindenhurst, NY. And I
use this product to stop me from having to take me/be to the dealer for
collision avoidance reset. Headlamp recalibration, and much more


Saves me time and tons of money by fixing things myself.


I have multiple different makes of vehicles to maintain. When the
decision to purchase a Mercedes Benz was made, I knew that my cheap code
reader was not going to cut it any more. The MS908P that I bought is
awesome. Not only because it works on all vehicles, it does so much. I
already used it to find an ABC issue on the SL55 AMG. I can’t wait to
find out how much I can do with this unit. This has renewed my interest
in hobby mechanics. Although I am sure professionals would find this
unit very useful for their business. Love it so far.