Fiber Optic Tech

Sharing various fiber optic news, inforamtion, topics, etc.

How to Punch Down Keystone Jacks?

2016-12-30 16:41:37 | Copper Net...

Keystone jack, also known as keystone module connector, is a snap-in package used for mounting various types of low-voltage electrical jacks. It can also be used for mounting optical connectors into the wall plate or patch panel for network wiring installs. There are numerous requests for wiring diagrams or general information on how to punch down or terminate keystone jacks (Cat5e / Cat6) after running your telecom network's cross-connect cabling. This article will cover materials needed to solve this problem. With our easy-to-follow wiring guide, you'll have your Cat5e and Cat6 keystone jack wired, installed and ready to go in no time!

Step 1: Make sure the stripper is adjusted properly on a scrap piece of cable. The Stripper should be adjusted to only score the jacket to make removing it easier and not nick the twisted pairs. Using a Coaxial Stripper strip around 1 inch of the jacket off. Be careful not to nick the conductors as this will cause the wire to break or short out the connection causing problems down the road. Inspect all wires for damage before proceeding to step 2.

keystone jacks

Step 2: Straighten the pairs out completely and lay them over the top of the keystone jack noting the color pattern for the 568b wiring. Note: Each keystone jack is slightly different in how they are labeled and how the colors are arranged. The 568B standard is most commonly used and ends of the cable must have the same standards to communicate. We have the 3 most common keystone jack styles pictured here. The first jack pictured has the 2 standard pairs on the right, and the 2 variable pairs on the left. The A standard is the center column and the B standard is on the left. Both A and B standard applies to the right side of the jack. The solid color box with the lower right corner missing represents the solid color wire with the white stripe. The white box with the colored tip represents the white wire with the colored stripe.

Step 3: Keeping the pairs as twisted as possible press the wire into the correct groove with your thumbs. If you completely straighten the wires to run them through the jack you will risk cross talk between the pairs.

punch down tool

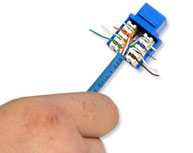
Step 4: Using a punch down tool to punch the wires down into the blades built into the keystone jack. The blades in the jack are designed to work with solid cable, and may not work with stranded cable. Make sure the blade is facing the outside of the keystone jack. If you reverse it you will cut the wires inside the keystone jack rendering them useless. The punch down tool should cut off the remaining pieces of the wire on the outside, but sometimes you may need to punch them down a 2nd time and wiggle the wire to it breaks clean off. Then you can install the dust covers if your keystone jack comes with them.

Keystone jacks have been widely used in data communication and LAN wiring. FS.COM offers cost-effective Cat5e and Cat6 keystone jack with RJ45 connector-style. They also provide keystone Cat5e toolless style connectors which make for a simple installation without the need for a punch down tool. Toolless keystone jacks are an ideal solution for terminating and connecting network cable. For more details, please visit www.fs.com.


D-Rings for Cable Management

2016-12-20 18:23:42 | Cable Mana...

In high-density data centers, disorder of cable assemblies can lead to poor system performance, difficult maintenance, unnecessary downtime, and even safety hazards. Good management will enhance your system availability and efficiency by well organizing the mass of cables. D-rings, as one of the common types of cable management products, play an important role in building an easier and safer cabling environment.

What Can D-Ring Cable Manager Achieve?

D-ring, also known as D-ring cable manager, is a basic manager that organize cables. It is commonly used individually on any suitable plat like wall or installed on cable management panel to provide easy and orderly cable routing, making it one of the most versatile cable managers on the market! Whether you’re routing cables from the front to the back of your cabinet or organizing and supporting patch cables, the D-ring cable manager will be an effective tool for your IT installation.

Types and Selection of D-Ring Cable Manager

D-ring cable managers are designed with different sizes, shapes and materials for different applications. There are mainly two types of D-ring according applications one is for vertical cable management and the other is for horizontal cable management. As for the materials, durable metal is more popular during applications. The selection of D-ring cable manager should also consider the size of a D-ring and cable count the D-ring going to hold. The following picture shows horizontal cable management and vertical cable management applications of D-rings.

D-Ring

How to Use D-Ring in Cable Management

The using and installation of D-ring cable manager is simple and easy. With screws and installing tools, you can make full use of this cable management accessory. As the above mentioned, D-ring is usually installed on cable management panels. Here will introduce how to use D-ring in vertical cable management and horizontal cable management in details.

  • D-Ring in Vertical Cable Management When a D-ring is used for vertical cable management, it can be directly installed on the server rack using appropriate fasteners. It can be used for both front or rear cable management providing tidy cabling appearance and easy cable adding or removing in vertical cabling environment.
  • D-Ring in Horizontal Cable Management The using of D-ring in horizontal cable management is more flexible and can be used with a wide range of cable management products for different applications. In most horizontal applications, D-ring is installed on cable management panels. Here introduce two of the most commonly seen applications of D-ring. The first one is using D-ring with patch panel, the second one is using D-ring with rack unit enclosures.

The following picture shows a simple example of fiber cabling using cable management panel with D-ring on the front panel, fiber patch panel installed on the IT rack and a lacing bar on the rear side. Four 24-fiber LC adapter panels are installed on the fiber patch panel. The cable management panel with D-ring is installed on the front side of this IT rack providing an organized channel for the fiber optic cables connected to the fiber adapter panels. Fiber cables connected to the rear side are supported by the lacing bar which provides cable strain relief.

panel with D-ring

Conclusion

D-ring is a small but indispensable accessory in cable management, which can promote clean and tidy cabling environment. Apart from the D-rings mentioned above, there are many other small but effective tools for cable management, such as cable ties, cable lacing bars, J-Hooks, and wire looms which are also very necessary for cable organization.


Understanding DWDM in Optical Communication

2016-12-13 11:49:12 | WDM

Without optical communication we might be still sending mail, going to the newsstand to buy a newspaper, sending mail and postcards and renting movies, no internet would have been possible, no digital communications as we know it.

Among the many unsung technologies that make all this possible, Dense Wavelength Division Multiplexing (DWDM) is without any doubt one of the most important. As a kind of WDM technology, DWDM has the capability to send multiple signals on the same fiber, using different wavelengths. DWDM devices combine the output from several optical transmitters for transmission across a single optical fiber. At the receiving end, another DWDM device separates the combined optical signals and passes each channel to an optical receive. One of the nice characteristics of the optical fiber is that different channel can travel one close to the other with very little, almost negligible in most cases, crosstalk. Thanks to DWDM, we’re now able to pack 10 TBits/s of traffic per single fiber and send it more than 1000Km.

DWDM started as high end transport technology, but made its way to regional and metropolitan network and finally into transceivers. Several generation of DWDM transceivers have already been released (XENPAK, X2, XFP, SFP, SFP+), providing networking equipment not only with the capability to transport a huge amount of data with a single fiber, simplifying cabling and reducing cost, but also reducing the number of equipment needed. Before, if an operator wanted to connect 2 switches located some tens of kilometers apart, it needed non-coloured optics on the switch, connected with the same kind of optics on the transport system transponder shelf, this last piece of equipment did the conversion from non-DWDM wavelengths to DWDM wavelengths before they were optically multiplexed and transported over the DWDM link, the opposite process at receiving site. With DWDM transceivers directly on the switch, they can be connected directly to the optical multiplexing gear. It is evident that this solution has numerous advantages.

DWDM

If it is clear that DWDM optics come with great advantages, but the device is more complex and more optical variables comes into play. With uncoloured optics everything is pretty simple , they come with a “distance” tag attached (10km, 40km, 300m), power budget is pretty much the only parameter that the end user should care about. With DWDM there is no specific target distance power levels are of course still important, but other parameter, such as OSNR (optical signal to noise ratio) and CD (chromatic dispersion) come into play, in fact, often specifications are given in the form of a combination of the three mentioned parameters.

An optical signal travelling on a fiber experiences an attenuation of about 0.2dB/Km, so if you want to transmit it for long distances it needs to be amplified along the way and probably more than once. Erbium doped fiber amplifiers (EDFAs) do exactly this, but, at every amplifying stage, noise is added to the signal. The longer you want to go, the more amplifiers you need, the noisier the signal at the end of the line. Below a certain OSNR, which depends on the device to device, becomes impossible to detect the signal with an acceptable bit error rate.

DWDM is ready made for long-distance telecommunications operators that use either point-to-point or ring topologies. It provides ultimate scalability and reach for fiber networks. Without the capacity and reach of DWDM systems, most cloud-computing solutions today would not be feasible. Establishing transport connections as short as tens of kilometers to enabling nationwide and transoceanic transport networks, DWDM is the workhorse of all the bit-pipes keeping the data highway alive and expanding.


Guideline to Choose the Right Fiber Optic Cables

2016-12-08 14:04:38 | Fiber Optic Cable

It’s well-known that fiber optics is the way most of the IT infrastructure service companies currently transmit information. It makes sense if you bear in mind that it allows information and data to travel at greater speeds, through greater distances, and in never-before-seen bundles.

If you plan to enhance the build-out of your network through fiber optics, start by doing an in-depth assessment of your current and future needs. Knowing for sure how your networks will be used and for what is essential for this evaluation since it will allow you to properly and accurately select the type of fiber you might need depending on the application. Some key points to consider when selecting the fiber optic cable that best fits your needs are:

Distances of Transmission

You must be fully cognizant of the distances that the information you will handle must travel. This is crucial in determining what type of cable best suits you. Fiber optic cables are the wisest choice over copper cables which have been traditionally used until recently. It can most definitely support many further distances of input travel than its metal counterpart but the exact distance is difficult to determine as it is limited by a plurality of factors. This is a vital issue for optical communications since it prides itself in being super-fast (as it indeed is) putting data transmission distance under the spotlight.

LC fiber

The signal transmitting the information from point A to point B may possibly weaken if the distance is very long. There are many methods that can be applied and components that can be used to diminish the limitations inflicted by optical transmission distance.

Bandwidth Requirements

Basically, the amount of data or information that can be transmitted through a cable in a fixed or given amount of time is called bandwidth. If it's referring to a website, for example, bandwidth determines the quantity of information and the level of traffic that can transfer between the site, its users, and the Internet as a whole which is why web hosting companies are prone to offer maximum levels of bandwidth as part of their hosting packages.

Network architecture

The way your entire network (hardware, software, communication and connectivity protocols and modes of transmission) is laid out should be taken into consideration when selecting your fiber optics.

Types of Fiber Optic Cables

There are two types of well–known optical fiber cables and each has their own set of unique qualities and characteristics: single-mode and multi-mode.

Single mode optical fiber usually has an 8.3-micron diameter core and makes use of laser technology and light to send and receive data. A micron is a unit of measure equal to 1 millionth of a meter. So you can picture it: one strand of human hair has a diameter of more or less 100 microns.

singlemode-cable-fiber-optic-os1-os2

So single mode fibers have the ability to carry information for miles without losing too many data which makes it ideal for companies that offer services such as cable and telephone providers.

Transmission distance is affected by chromatic dispersion because the core of single-mode fibers is much smaller than that of multimode fibers. And it is also the reason why single-mode fiber can have longer transmission distance than multimode fiber. If you need to handle large amounts of data with the least dispersion, single mode fiber might be your best choice. Just take into consideration that these fibers are noticeably more expensive than multimode ones since the technology used is a bit more sophisticated.

Multimode optical fiber, as its very name indicates, allows the signal to travel through different pathways or modes that are placed inside of the cable’s core. For these types of fibers, the transmission distance is largely affected by modal dispersion.

multimode-cable-fiber-optic-om1-om2-om3-om4

Due to the fact that the fibers in multimode cables have imperfections, the optical signals are not able to arrive at the same time causing a delay between the fastest traveling modes and the slowest ones, which in turn causes the dispersion and limits multimode fiber performance.

Multimode fibers can be found in 4 different presentations identified with the acronym OM which stands for optical multi-mode and varies according to performance criteria determined by ISO/IEC 11801 standards. These presentations are OM1, OM2, OM3, and OM4.

Conclusion

Choosing the proper fiber optic cable to fit your needs may seem like a daunting task but it really isn’t. Just invest some time to do the necessary research beforehand and you'll save yourself a lot of time and trouble as well as money.


Five Easy Steps to Install a Wired Home Network

2016-12-05 16:13:02 | Copper Net...

It is well known that the usage of WiFi connection is the most popular option among the general public, but when talking about efficiency, wired connection is more recommendable. A direct connection made with cables provide a faster and more secure network, if you can’t connect wireless gadgets like tablets and cellphone to this type of circuit the rest of your devices will function better with this modality.

Of course, setting up a wired network is more complex than just installing a router but we have a step by step guideline that will help you achieve this goal.

Decide the coverage area of the wires

First but foremost, you need to think about what you want from the connection. Some of the decisions that you must make are how many devices will be connected to the network, where located them and in which place set the wires.

Remember that this type of interconnection between the devices will require a lot of cables, so if you don’t want to make a mess, it is really important to consider how the wires will be distributed. In our experience, we can tell that planning the design of your home network is the best way to anticipate to possible problems that may surge during the installation.

By the way, don’t forget that it is also important that the router’s spot be a central point that can reach a good signal, this is an essential consideration if you are planning to combine the wire connection with WiFi. Also, think about the way you prefer this distribution be made, thinks like how the cables will be placed in the path to the devices if you are going to stick them to the floor or the walls.

Remember to avoid placing the cables close to devices like microwaves or TVs when you design the network, because the electromagnetic interference could affect the efficiency of the wired network.

Select the type of cable you want to use

It turns out that the cable that you choose to use has a significant influence on the network speed. The wires used for internet connections are Ethernet cables, and they have several categories for you to choose. We recommend you to decide between two most common categories, Cat5e and Cat6a cable, both of which are some of the best options based in a cost-efficiency relation.

ethernet-cable

Calculate the budget

This step will help you to have an estimated of how much money will be needed to invest in the network.

Once you have decided where and how the wires distribution will be made and which cable category you will choose, it is time to measure the distances.

Calculate the lengths of cable that you will need, that way you wouldn’t buy less material of what you will use but, keep in mind that always is a good idea to acquire at least two more lengths of the planned just in case.

Also consider the rest of the materials you need to use such as wall plates, jack ports, drywall cutters, cable clips, etc.

Before starting to make the installation, remember to check that you have all the necessary equipment to do the job, that way you wouldn’t have to stop in the middle of the process because something is missing.

Set up the cables

Ok, so once you have decided how the installation will be made and which materials you will use for your wired network is time to start to place the cables and connectors.

Here is the thing, you need to be clear that this part of the process is going to be complicated if you don’t have a basic knowledge in electrical installation so maybe you should consult an electrician before rummage with high voltages cables.

You already know the path that the cables will take so, the start by selecting where the router will be. From that spot, you must start to put the cables in the direction of the devices that will be interconnected. To pass the cables from one room to other some people make holes on their home’s walls but is necessary to use tools like a pointed hand saw to do it appropriately.

Install wall jack plates

After setting up the cables, you can proceed to install the wall jack plates. This step is probably the most complicated of the process to build a wired home network.

The wall plates allow you to have multiples ports for different devices in the same place. According to the jacks that you select the wall plate can have a combination of keystone jacks for copper cable, USB, HDMI, BNC, etc. which made this article very useful. To make the installation of the wall jacks plates is necessary to locate the internal cables in the wall and you need some tools such as stud finder, a drywall saw or a pointed hand saw to make the installation.

Once you complete all these five steps you will have a wired home network that will offer you a faster and better internet connection.