


◆Raspberry Pi Pico W と PC をWIFI接続して、センサ測定値を取得する手順。Raspberry Pi は Arudino IDE、PC は Visual C# でプログラムを開発。Raspberry Pi はサンプルスケッチの HelloServer を改変。Visual C# は HttpClient() で通信。
1.準備
●MPU:Raspberry Pi Pico W
●IDE(Raspberry Pi):Arduino IDE 2.2.1
●Language(Raspberry Pi):C++
●PC:Windows 10 Pro 64bit Version 22H2
●IDE(PC):Visual Studio Community 2022 Version 17.8.3
●Language(PC):VIsual C#
●Framewaork: .NET 8.0
2.HelloServer ソースコードの改変

<ファイル>→<スケッチ例>→<WebServer>→<HelloServer>
・・・
#define STASSID "your-ssid" // PCと同じ2.4GHzのSSIDに変更
#define STAPSK "your-password" // SSIDのパスワードを入力

String strMeasurementData = String(12); // センサ測定値(グローバル変数)

・・・
void setup(void) {
  ・・・
  server.on("/Measurement", []() {
    server.send(200, "text/plain", strMeasurementData);
  });
  ・・・
}
void loop(void) {
  ・・・
  Measurement_act = センサ測定値取得関数();  // センサ測定値を取得
  strMeasurementData = String(Measurement_act, 2);
  ・・・
}
センサ測定値取得関数() は使用するセンサに合わせて作成
必ずSTASSID、STAPSK は自分のWIFI環境に書き換える
3.Visual C#ソースコード
MainWindow.xaml
<Window x:Class="Simple_Raspi_HttpClient.MainWindow"
        xmlns="http://schemas.microsoft.com/winfx/2006/xaml/presentation"
        xmlns:x="http://schemas.microsoft.com/winfx/2006/xaml"
        xmlns:d="http://schemas.microsoft.com/expression/blend/2008"
        xmlns:mc="http://schemas.openxmlformats.org/markup-compatibility/2006"
        xmlns:local="clr-namespace:Simple_Raspi_HttpClient"
        mc:Ignorable="d"
        Title="MainWindow" Height="450" Width="800">
    <Grid>
        <TextBlock x:Name="MeasuarmentDataReceive"
            HorizontalAlignment="Left"
            VerticalAlignment="Top"
            TextWrapping="Wrap"
            ScrollViewer.VerticalScrollBarVisibility="Auto" />
    </Grid>
</Window>
MainWindow.xaml.cs
using System.ComponentModel;
using System.Diagnostics;
using System.Net.Http;
using System.Windows;
using System.Windows.Threading;

namespace Simple_Raspi_HttpClient
{
    ///
    /// Interaction logic for MainWindow.xaml
    ///
    public partial class MainWindow : Window
    {
        private DispatcherTimer timer1 = new DispatcherTimer(DispatcherPriority.Normal)
        {   // タイマーインターバル = 1秒
            Interval = TimeSpan.FromMilliseconds(1000),
        };
        string iotDeviceUrl = "http://your-iot-device-api-endpoint";
        public MainWindow()
        {
            InitializeComponent();

            timer1.Tick += new EventHandler(RunTimer1);
            timer1.Start();
            this.Closing += new CancelEventHandler(StopTimer1);
            MeasuarmentDataReceive.Text = string.Empty;
        }

        private async void RunTimer1(object sender, EventArgs e)
        {
            string MeasurementData = await ReadMeasurementData(iotDeviceUrl);
            MeasuarmentDataReceive.Text += MeasurementData + "\r\n";
        }

        private void StopTimer1(object sender, EventArgs e)
        {
            timer1.Stop();
        }

        private async Task ReadMeasurementData(string _url)
        {
            using (HttpClient client = new HttpClient())
            {
                try
                {
                    // HTTP GETリクエストを送信
                    HttpResponseMessage response = await client.GetAsync(_url);

                    // 応答が成功した場合は、データを取得して返す
                    if (response.IsSuccessStatusCode)
                    {
                        string data = await response.Content.ReadAsStringAsync();
                        return data;
                    }
                    else
                    {
                        // エラーメッセージを表示
                        Console.WriteLine("Error: " + response.StatusCode);
                        return null;
                    }
                }
                catch (Exception _ex)
                {
                    Trace.WriteLine($"URL:{_url}:{_ex}");
                    return null;
                }
            }
        }
    }
}
http://your-iot-device-api-endpoint は Raspberry Pi のアドレスが 192.168.0.123 の場合
http://192.168.0.123/Measurement に変更
4.実行
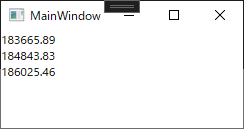
Raspberry Pi のプログラムをスタート
PC のプログラムをスタート
1秒ごとにセンサ測定値が表示されることを確認
─以上─