Color

日々の備忘録

LibVLCSharp で動画再生

2022年08月20日 00時07分42秒 | Windows

◆LibVLCSharp を用いて動画再生手順

1.準備
●OS:Windows 10 Pro 64bit Version 21H2
●IDE:Visual Studio Community 2022 Version 17.3.1
2.新しいプロジェクトの作成

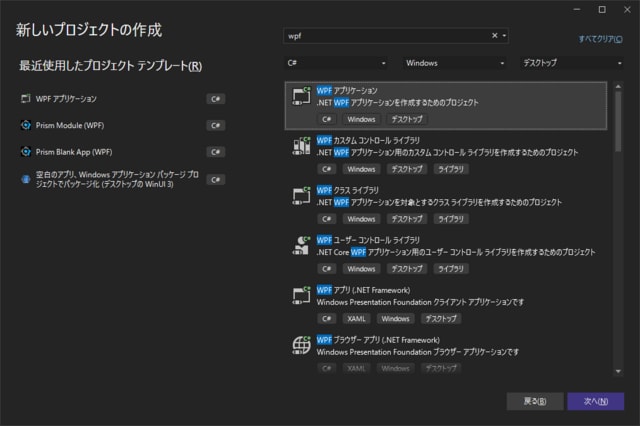
Visual Studio 2022 を起動
<ファイル(F)> → <新規作成(N)> →
WPFアプリケーションを選択 →
<次へ(N)>

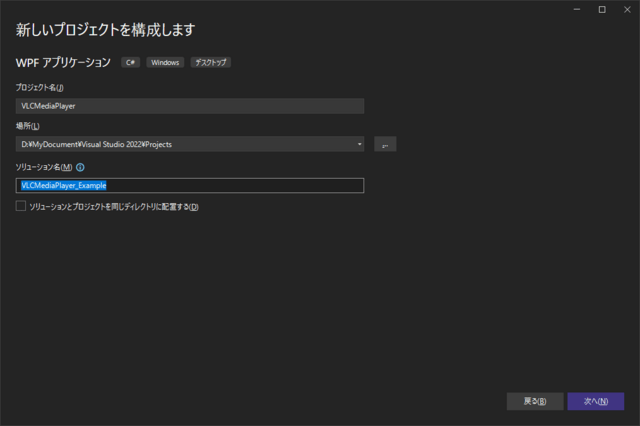
プロジェクト名: VLCMediaPlayer
ソリューション名: VLCMediaPlayer_Example
<次へ(N)>

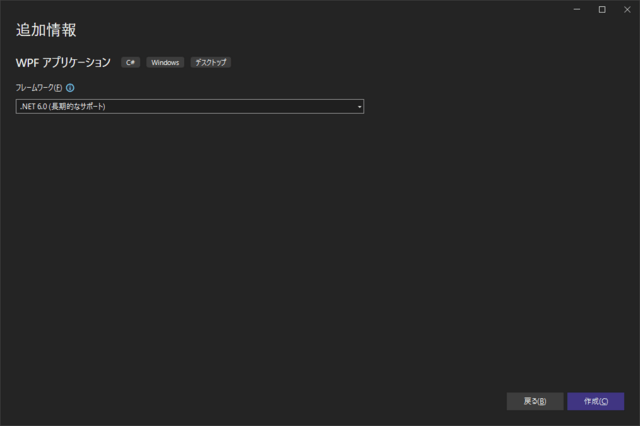
.NET 6.0(長期的なサポート)を選択
<作成(C)>

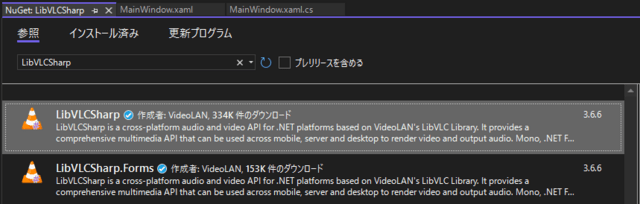
<プロジェクト(P)> → <Nugetパッケージの管理(N)> → 
LibVLCSharp を検索して、インストール

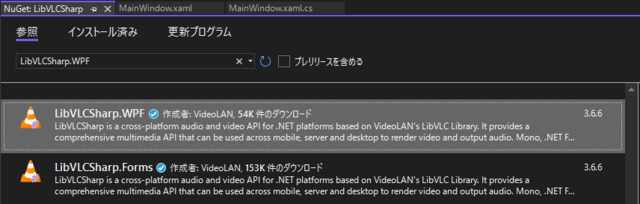
LibVLCSharp.WPF を検索して、インストール

VideoLAN.LibVLC.Windows を検索して、インストール

3.MainWindow.xaml

ここを参照すること

    001: <Window x:Class="VLCMediaPlayer.MainWindow" 002: xmlns="http://schemas.microsoft.com/winfx/2006/xaml/presentation" 003: xmlns:x="http://schemas.microsoft.com/winfx/2006/xaml" 004: xmlns:d="http://schemas.microsoft.com/expression/blend/2008" 005: xmlns:mc="http://schemas.openxmlformats.org/markup-compatibility/2006" 006: xmlns:local="clr-namespace:VLCMediaPlayer" 007: xmlns:uc="clr-namespace:LibVLCSharp.WPF;assembly=LibVLCSharp.WPF" 008: mc:Ignorable="d" 009: Title="Media Player" Height="450" Width="800" Closed="MainWindow_Closed"> 010: <Grid> 011: <uc:VideoView x:Name="VideoView" MediaPlayer="{Binding" Path="VideoPlayer}" Panel.ZIndex="1"> 012: <StackPanel Orientation="Horizontal" x:Name="videoPanel"> 013: <Button Content="PLAY" Height="25" Width="50" VerticalAlignment="Bottom" HorizontalAlignment="Left" Click="PlayButton_Click" /> 014: <Button Content="STOP" Height="25" Width="50" VerticalAlignment="Bottom" HorizontalAlignment="Left" Click="StopButton_Click" /> 015: </StackPanel> 016: </uc:VideoView> 017: </Grid> 018: </Window>

4.MainWindow.xaml.cs

    001: using LibVLCSharp.Shared; 002: using System; 003: using System.IO; 004: using System.Windows; 005: using System.Windows.Controls; 006: using System.Windows.Media; 007: using MediaPlayer = LibVLCSharp.Shared.MediaPlayer; 008: 009: 010: namespace VLCMediaPlayer 011: { 012: /// <summary> 013: /// Interaction logic for MainWindow.xaml 014: /// </summary> 015: public partial class MainWindow : Window 016: { 017: LibVLC _libVLC; 018: MediaPlayer _mediaPlayer; 019: Label _label; 020: public MainWindow() 021: { 022: InitializeComponent(); 023: _label = new Label 024: { 025: Content = "TEST", 026: HorizontalAlignment = HorizontalAlignment.Right, 027: VerticalAlignment = VerticalAlignment.Bottom, 028: Foreground = new SolidColorBrush(Colors.Red) 029: }; 030: videoPanel.Children.Add(_label); 031: _libVLC = new LibVLC(); 032: _mediaPlayer = new MediaPlayer(_libVLC); 033: // we need the VideoView to be fully loaded before setting a MediaPlayer on it. 034: VideoView.Loaded += (sender, e) => VideoView.MediaPlayer = _mediaPlayer; 035: } 036: 037: /// <summary> 038: /// MediaPlayer再生開始 039: /// </summary> 040: /// <param name="sender"></param> 041: /// <param name="e"></param> 042: private void PlayButton_Click(object sender, RoutedEventArgs e) 043: { 044: if (!_mediaPlayer.IsPlaying) 045: { 046: string _myVideoPath = System.Environment.GetFolderPath(Environment.SpecialFolder.MyVideos); 047: string _fileName = _myVideoPath ?? "C:"; 048: _fileName += @"\sample.mp4"; 049: if (File.Exists(_fileName)) 050: { 051: _label.Content = _fileName; // ファイル名表示 052: using (var media = new Media(_libVLC, new Uri(_fileName))) 053: _mediaPlayer.Play(media); 054: } 055: } 056: } 057: 058: /// <summary> 059: /// MediaPlayer再生停止 060: /// </summary> 061: /// <param name="sender"></param> 062: /// <param name="e"></param> 063: private void StopButton_Click(object sender, RoutedEventArgs e) 064: { 065: if (_mediaPlayer.IsPlaying) 066: { 067: _mediaPlayer.Stop(); 068: } 069: } 070: 071: /// <summary> 072: /// Window閉じるときの手当 073: /// </summary> 074: /// <param name="sender"></param> 075: /// <param name="e"></param> 076: private void MainWindow_Closed(object sender, EventArgs e) 077: { 078: _mediaPlayer.Stop(); 079: _mediaPlayer.Dispose(); 080: _libVLC.Dispose(); 081: } 082: } 083: } 084:

5.動画ファイルの用意

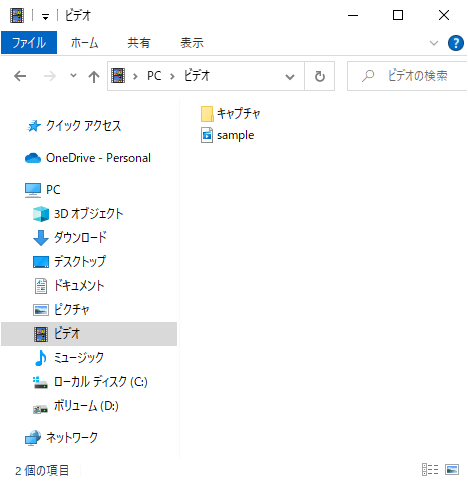
ビデオフォルダに sample.mp4 を用意

6.実行

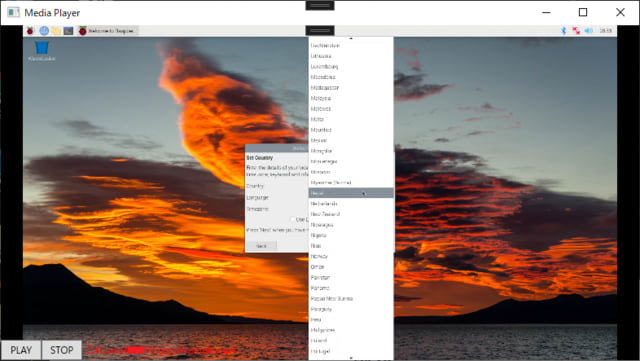
<デバッグ(D)> → <デバッグの開始(S)>
<PLAY>
動画の再生開始を確認

─以上─


Pan Tilt Platform for Raspberry Pi【SKU:B0283】を Paython で制御

2022年08月18日 10時54分12秒 | Raspberry ...

◆Raspberry Pi で Arducam パン・チルト回転台を Python で制御する手順

1.準備
●CPU : Raspberry Pi 4 Model B 4GB
●SSD : ASU650SS-120GT-R [ ADATA ]
●SATA-USB Adapter : OWL-PCSPS3U2 [ Owltech ]
●AC/DC : Google 30W USB-C 充電器
●Case : Raspberry Pi 4アルミニウムケース 冷却ファン付き
●Tripod : Pan Tilt Platform for Raspberry Pi【SKU:B0283】

2.OS環境

~$ uname -a

~$ lsb_release -a

3.パン・チルト回転台・組立
ここを参照

VCC:紫色
SDA:青色
SCL:緑色
GND:黄色
Pコネクタ(パン軸)
G:黒色
V:赤色
S:白色
Tコネクタ(チルト軸)
G:黒色
V:赤色
S:白色

カメラをチルト軸に取付

Raspberry Pi のGPIOに接続
5V PWR:紫色
SDA1:青色
SCL1:緑色
GND:黄色

4.PCA9685動作確認
~$ git clone https://github.com/ArduCAM/PCA9685.git
~$ cd PCA9685/
~$ make
~$ sudo ./RunServoDemo
↑↓カーソルキーでチルト動作
←→カーソルキーでパン動作

5.I2C通信を有効
~$ sudo raspi-config

3 Interface Options を選択
<Select>

I5 I2C を選択
<Select>

<Yes>

<OK>

<Finish>
~$ sudo apt-get install i2c-tools

~$
sudo i2cdetect -y 1
チャンネル40を確認

6.サーボドライブライブラリ導入
~$ sudo pip3 install adafruit-circuitpython-servokit
~$ python3 ./PCA9685/example/Jetson/ServoKit.py
Jetson用サンプルプログラムが Raspberry Piで動作する

─以上─


Autofocus Camera for Raspberry Pi に Picamera2を導入

2022年08月17日 15時22分35秒 | Raspberry ...

◆Raspberry Pi用のPythonライブラリー「Picamera2」の導入手順

1.準備
●CPU : Raspberry Pi 4 Model B 4GB
●SSD : ASU650SS-120GT-R [ ADATA ]
●SATA-USB Adapter : OWL-PCSPS3U2 [ Owltech ]
●AC/DC : Google 30W USB-C 充電器
●Case : Raspberry Pi 4アルミニウムケース 冷却ファン付き
●Camera : 64-Megapixel Autofocus Camera for Raspberry Pi【超高解像度オートフォーカスカメラモジュール】
●Tripod : Pan Tilt Platform for Raspberry Pi【SKU:B0283】
●PC OS : Windows 10 Pro 64bit
●SSH Tool : TeraTerm-4.106
●VNC Tool : VNC Viewer 6.21.1109

2.OSの書込み

Raspberry Pi Imager を起動

Raspberry Pi OS(64-bit) を選択

PCにSSDを接続して、SSD を選択

カスタマイズオプション → いつも使う設定
SSHを有効、Wi-Fiを設定

<書き込む>

<はい>

Raspberry Pi Imager を終了、SSD をRaspberry Pi のUSBポートに接続して電源投入

PC の TeraTerm を起動
SSH接続で<OK>

<続行(C)>

パスフレーズ入力
<OK>

3.VNCの設定

~$ sudo raspi-config
Configuration Tool を起動
3 Inerface Options を選択

I3 Interface Options の選択

<Yes>

<OK>

<Finish>
PC で VNC Viewer を起動

<Continue>

Raspberri Pi と接続完了

4.ドライバーの導入
参照サイト
VCN上で LXTerminal を起動
#OS Update
~$ sudo apt update
~$ sudo apt full-upgrade -y
~$ sudo apt autoremove -y
~$ sudo apt clean
※2022年8月16日現在、ファームウェアがupgradeされるとドライバが認識されない。アップデートを禁止する。
#Download the bash scripts
~$ cd ~
~$ wget -O install_pivariety_pkgs.sh https://github.com/ArduCAM/Arducam-Pivariety-V4L2-Driver/releases/download/install_script/install_pivariety_pkgs.sh
~$ chmod +x install_pivariety_pkgs.sh
~$ ./install_pivariety_pkgs.sh -p 64mp_pi_hawk_eye_kernel_driver
#Install libcamra-dev
~$ ./install_pivariety_pkgs.sh -p libcamera_dev
#Install libcamera-apps
~$ ./install_pivariety_pkgs.sh -p libcamera_apps

5.config.txt の設定
~$ sudo nano /boot/config.txt
----------------------------------
[all]
dtoverlay=arducam_64mp
dtoverlay=arducam_64mp,cam0
[pi4]
arm_boost=1
dtoverlay=vc4-kms-v3d,cma-512
----------------------------------
上書き保存で、テキストエディタを終了
#reboot
~$ sudo reboot
再起動を実行

6.カメラ動作確認

#List all cameras:

~$ libcamera-still --list-cameras
#Specify a camera: 
~$ libcamera-still -t 0 -camera 0
画像が表示される事を確認

7.Picamera2 の導入
#libcamera
~$ dpkg -l | grep libcamera
--------------------------------------------------------
ii  libcamera-apps 0.0.8 arm64 libcamera-apps
ii  libcamera-dev 0.0.8 arm64 libcamera
--------------------------------------------------------
#Installing Picamera2
~$ sudo apt install -y python3-kms++
~$ sudo apt install -y python3-pyqt5 python3-prctl libatlas-base-dev ffmpeg
~$ sudo pip3 install numpy --upgrade

~$ sudo pip3 install picamera2
エラーメッセージが多数表示される
sudo apt install -y python3-pyqt5 python3-prctl libatlas-base-dev ffmpeg --fix-missing などを実行して、再度、pip3 を実行
#Running Picamera2 Examples
~$ git clone https://github.com/raspberrypi/picamera2.git
~$ cd picamera2/examples

~$ python3 app_capture.py
64-Megapixel Autofocus Camera for Raspberry Pi の場合、遅延が酷い
リアルタイム処理は不向きである

─以上─