Color

日々の備忘録

Arduino IoT Cloud で LED Blink を実行

2023年11月17日 08時22分10秒 | Arduino

◆Arduino IoT Cloud上で Arduino UNO R4 WIFI の LED を Blink する実装手順

1.準備
●MPU:Arduino UNO R4 WIFI
●PC:Windows 10 Pro 64bit Version 22H2
●Cable:USB3.1ケーブル(A-TypeC)USB3-APAC10WH[ELECOM]
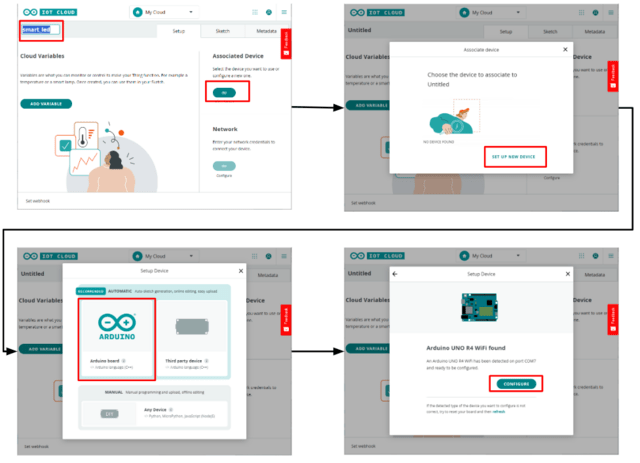
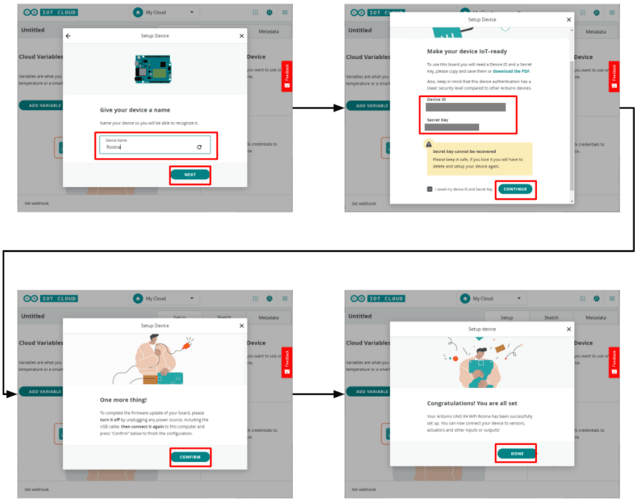
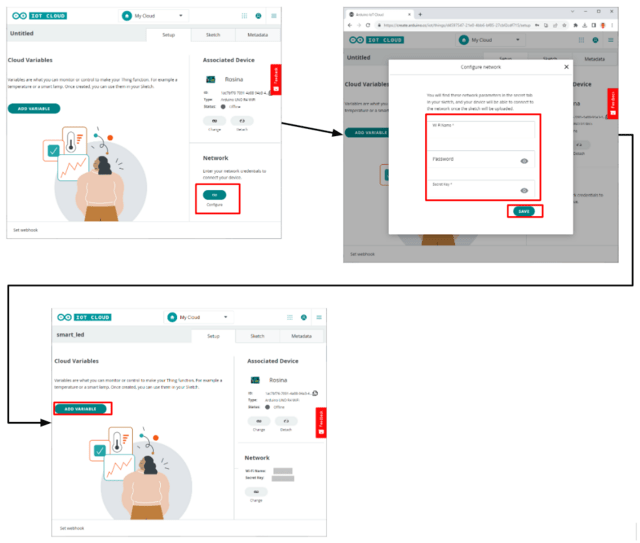
前回の記事内容が完了している事

2.Verify実行

Verifyボタンをクリック
ターミナルにエラーが表示されないことを確認
 

3.Upload実行

Uploadボタンをクリック
ターミナルにエラーが表示されないことを確認
 

4.WIFI接続確認
 
  Serialモニタボタンをクリック
  Arduino UNO R4 WIFI の RESETボタンを押す
  モニタ画面にWIFI接続が成功していることを確認
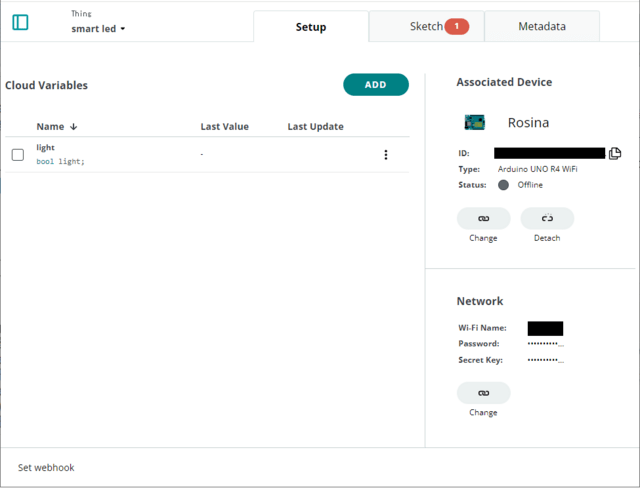
 

5.Dashboard作成

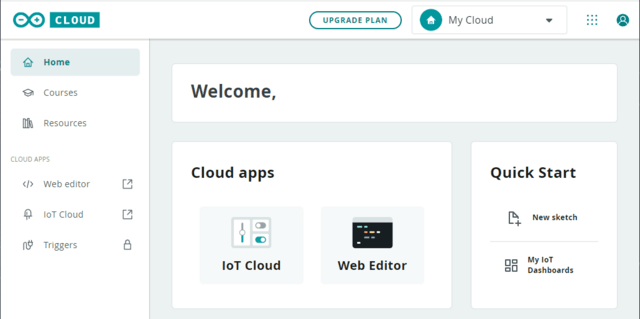
Arduino Cloud のマイページを開く、Dashboards をクリック
<CREATE DASHBOARD> をクリック
Dashboards の名前を入力して、<ADD>をクリックして、Switch を選択
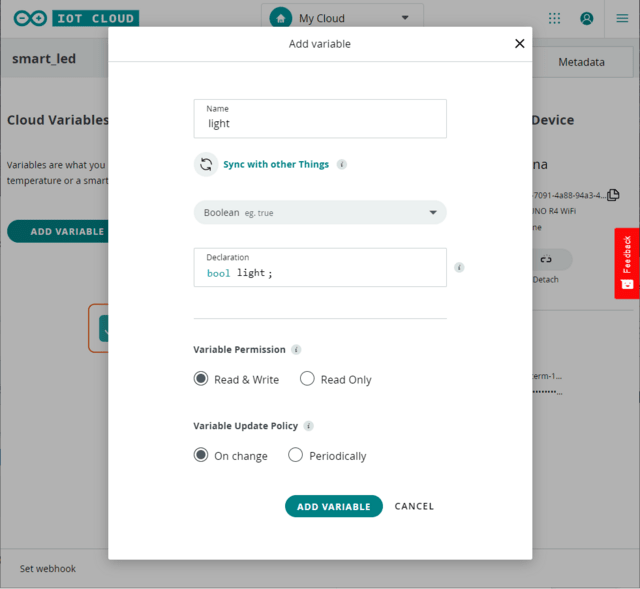
Widget の名前を入力して、Linked Variable の<🔗>をクリック
Variables の light を選択して、<LINK VARIABLE>をクリック

<DONE>をクリック、Dashboards に LED_light の Widget が追加されていることを確認
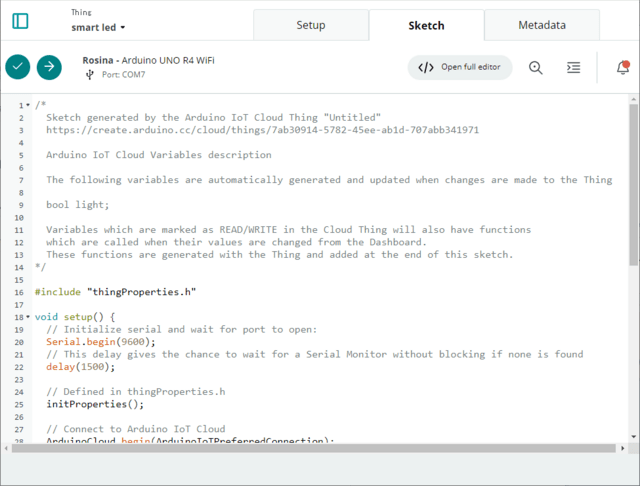
6.ソースコードの改変
  void setup() {
    // initialize digital pin LED_BUILTIN as an output.
  pinMode(LED_BUILTIN, OUTPUT);
  :::::
  }
  void onLightChange()  {
  // Add your code here to act upon Light change
if(light){
digitalWrite(LED_BUILTIN, HIGH);  // turn the LED on (HIGH is the voltage level)    
  }else{
digitalWrite(LED_BUILTIN, LOW);   // turn the LED off by making the voltage LOW
  }
}
上記のソースコード追記する
Sketch のUploadボタンをクリックして、Arduino UNO R4 WIFI にプログラムをアップロード

7.Dashboard操作

Dashboards 上で、LED_light の Widget をクリックして Arduino UNO R4 WIFI の LED点灯が連動していることを確認

─以上─


Arduino UNO R4 WIFI を Arduino Web Editor、Arduino IoT Cloudでプログラム開発

2023年11月16日 08時07分35秒 | Arduino

◆Arduino UNO R4 WIFI を Arduino Web Editor、Arduino IoT Cloudでプログラム開発する手順

1.準備
●MPU:Arduino UNO R4 WIFI
●PC:Windows 10 Pro 64bit Version 22H2
●Cable:USB3.1ケーブル(A-TypeC)USB3-APAC10WH

2.Arduino Create Agentをインストール
このページを参照

Arduino Create agent installation ページにアクセスして、<START>をクリック
【注意点】この時、PCとArudino UNO R4 はUSBケーブルで接続されていること

<DOWNLOAD FOR WIN64>をクリックしてインストーラーをダウンロード
Arduino Create agent installation ページを開いたままにして、

ArduinoCreateAgent-1.3.5-windows-amd64-installer.exeをインストール
<NEXT>→<NEXT>→<NEXT>→<NEXT>→<Finish>をクリック

インストールが成功すると、このページが表示されます。<NEXT>→<GO TO WEB EDITOR>をクリック
Arduino Create agent installation ページを閉じる

<SIGN IN>をクリック、サインインする

マイクラウドの <IoT Cloud> をクリック
3.Arduino UNO R4 WIFI デバイスセットアップ

タイトルを入力して、Associated Device の<🔗>→<SET UP NEW DEVICE>→<ARDUINO>→<CONFIGURE>

デバイス名を入力、<NEXT>→[Device ID, Secret Key をメモする]→<CONTINUE>→<CONFIGURE>→<DONE>
4.Network、Cloud Variables セットアップ

Network の<🔗>をクリック
Wi-Fi Name には、必ず2.4GHzネットワーク名SSID を入力
Password は、SSID の暗号化キーAES を入力
Secret Key には、Associated Device でメモしたSecret Key を入力
<SAVE>→<CONFIGURE>→<ADD VSRIABLE> をクリック

Name には、light を入力
変数型は、Boolean を選択 
Declaration に、bool light ; が自動的に入力される
<ADD VARIABLE> をクリック

<Sketch>タブをクリック

サンプルコードが自動的に更新されていることを確認

─以上─


Arduinoと.NET Coreでのプログラミング2

2020年06月24日 15時43分18秒 | Arduino
◆ArduinoとPCとのアプリケーションを.NET Coreで構築する手順およびDispatcherTimerの使い方


1.準備
OS:Windows 10 Pro Version 1909
IDE:Visual Studio Community 2019 Version 16.6.2
Board:Arduino UNO
 
2.プロジェクトの作成
Visual Studio起動後に
新しいプロジェクトの作成(N)をクリック
すべての言語(L) → C#
すべてのプラットフォーム → Windows
すべてのプロジェクト種類 → デスクトップ
WPF App(.NET Core) を選択
<次へ(N)>をクリック
プロジェクト名(N)) → Wpf_NET_Core_Timer と入力
<作成(C)>をクリック
<プロジェクト(P)> → <NuGetパッケージの管理(N)> でNuGetパッケージマネージャーを開く
検索ボックスに System.IO.Ports と入力
System.IO.Poats 作成者:Microsoft を選択
<インストール> をクリック
<OK> をクリック

3.PC側MainWindow.xamlソースコード
 1
 2
 3
 4
 5
 6
 7
 8
 9
10
11
12
13
14
15
16
17
18
19
20
<Window x:Class="Wpf_NET_Core_Timer.MainWindow"
        xmlns="http://schemas.microsoft.com/winfx/2006/xaml/presentation"
        xmlns:x="http://schemas.microsoft.com/winfx/2006/xaml"
        xmlns:d="http://schemas.microsoft.com/expression/blend/2008"
        xmlns:mc="http://schemas.openxmlformats.org/markup-compatibility/2006"
        xmlns:local="clr-namespace:Wpf_NET_Core_Timer"
        mc:Ignorable="d"
        Title="Wpf .NET Core Timer Sample" Height="220" Width="400">
    <Grid>
        <Grid.RowDefinitions>
            <RowDefinition Height="1*"/>
            <RowDefinition Height="1*"/>
        </Grid.RowDefinitions>
        <TextBox Name="txtTimer" Text="Timer1" Grid.Row="0" HorizontalAlignment="Center" VerticalAlignment="Bottom" FontSize="56" TextWrapping="Wrap"/>
        <StackPanel Name="panel1" Grid.Row="1" HorizontalAlignment="Center" Orientation="Horizontal">
            <Button Name="btnDown" Content="◀" VerticalAlignment="Top" FontSize="64" Click="btnDown_Click"/>
            <Button Name="btnUp" Content="▶" VerticalAlignment="Top" FontSize="64" Click="btnUp_Click"/>
        </StackPanel>
    </Grid>
</Window>


4.PC側MainWindow.xaml.csソースコード
  1
  2
  3
  4
  5
  6
  7
  8
  9
 10
 11
 12
 13
 14
 15
 16
 17
 18
 19
 20
 21
 22
 23
 24
 25
 26
 27
 28
 29
 30
 31
 32
 33
 34
 35
 36
 37
 38
 39
 40
 41
 42
 43
 44
 45
 46
 47
 48
 49
 50
 51
 52
 53
 54
 55
 56
 57
 58
 59
 60
 61
 62
 63
 64
 65
 66
 67
 68
 69
 70
 71
 72
 73
 74
 75
 76
 77
 78
 79
 80
 81
 82
 83
 84
 85
 86
 87
 88
 89
 90
 91
 92
 93
 94
 95
 96
 97
 98
 99
100
101
102
103
104
105
106
using System;
using System.IO.Ports;
using System.Windows;
using System.Windows.Threading;

namespace Wpf_NET_Core_Timer
{
    /// <summary>
    /// Interaction logic for MainWindow.xaml
    /// </summary>
    public partial class MainWindow : Window
    {
        /// <summary>
        /// インスタンス
        /// </summary>
        SerialPort _serialPort1 = new SerialPort();
        DispatcherTimer _timer1 = new DispatcherTimer(DispatcherPriority.Normal)
        {   // タイマーインターバル = 500mSEC
            Interval = TimeSpan.FromMilliseconds(500),
        };
        /// <summary>
        /// LEDフラグ
        /// </summary>
        Boolean _ledFlag;
        /// <summary>
        /// タイマーインターバル値
        /// </summary>
        double _timer1Inerval;
        /// <summary>
        /// メインメソッド
        /// </summary>
        public MainWindow()
        {
            InitializeComponent();
            setupTimer();
            setupSerial();
            _timer1Inerval = 500;
            this.txtTimer.Text = _timer1Inerval.ToString();
            _ledFlag = true;
        }
        /// <summary>
        /// タイマー生成
        /// </summary>
        private void setupTimer()
        {
            _timer1.Tick += (sender, e) =>
              { // タイマーイベントの記述
                  if (_ledFlag)
                      _serialPort1.WriteLine("H");  // LED点灯
                  else
                      _serialPort1.WriteLine("L");  // LED消灯
                  _ledFlag = !(_ledFlag);
                  _timer1.Interval = TimeSpan.FromMilliseconds(_timer1Inerval); // タイマーインターバル値代入
                  this.txtTimer.Text = _timer1Inerval.ToString();   // タイマーインターバル値表示
              };
            _timer1.Start();    // タイマーイベント開始
            this.Closing += (sender, e) => _timer1.Stop();  // プログラム終了時の手当て
        }
        /// <summary>
        /// シリアルポート設定
        /// </summary>
        private void setupSerial()
        {
            _serialPort1.PortName = "COM4"; // 自分の環境に合わせる事
            _serialPort1.BaudRate = 9600;
            _serialPort1.Parity = Parity.None;
            _serialPort1.DataBits = 8;
            _serialPort1.StopBits = StopBits.One;
            _serialPort1.Handshake = Handshake.None;
            _serialPort1.NewLine = "\n";
            _serialPort1.DtrEnable = true;
            _serialPort1.ReadTimeout = 1000;
            try
            {
                _serialPort1.Open();    // シリアルポート開通
            } 
            catch(Exception ex)
            {
                MessageBox.Show(ex.Message);
            }
        }
        /// <summary>
        /// 減算ボタンイベント
        /// </summary>
        ///  name="sender"></param>
        ///  name="e"></param>
        private void btnDown_Click(object sender, RoutedEventArgs e)
        {
            if (_timer1Inerval < 200)
                return;
            _timer1Inerval -= 100;
        }
        /// >
        /// 加算ボタンイベント
        /// </summary>
        ///  name="sender"></param>
        ///  name="e"></param>
        private void btnUp_Click(object sender, RoutedEventArgs e)
        {
            if (_timer1Inerval > 3000)
                return;
            _timer1Inerval += 100;

        }
    }
}

5.Arduino側ソースコード
<ファイル> → <スケッチ例> → <4.Communication> → <PhysicalPixel> を選択


6.実行

ArduinoのLEDがインターバール間隔で点滅をする
ボタンをクリックして、インターバル間隔が増減する事を確認

━以上━

Arduinoと.NET Coreでのプログラミング

2020年06月23日 15時52分53秒 | Arduino
◆ArduinoとPCとの通信アプリケーションを.NET Coreで構築する手順

1.準備
OS:Windows 10 Pro Version 1809
IDE:Visual Studio Community 2019 Version 16.6.2
Board:Arduino PRO or PRO Mini

2.プロジェクトの作成
新しいプロジェクトの作成(N)をクリック
すべての言語(L) → C#
すべてのプラットフォーム → Windows
すべてのプロジェクト種類 → デスクトップ
WPF App(.NET Core) を選択
<次へ(N)>をクリック
プロジェクト名(N)) → Wpf_NET_Core_Serial と入力
<作成(C)>をクリック
<プロジェクト(P)> → <NuGetパッケージの管理(N)> でNuGetパッケージマネージャーを開く
検索ボックスに System.IO.Ports と入力
System.IO.Poats 作成者:Microsoft を選択
<インストール> をクリック
<OK> をクリック
 
3.PC側MainWindow.xaml.csソースコード
  1
  2
  3
  4
  5
  6
  7
  8
  9
 10
 11
 12
 13
 14
 15
 16
 17
 18
 19
 20
 21
 22
 23
 24
 25
 26
 27
 28
 29
 30
 31
 32
 33
 34
 35
 36
 37
 38
 39
 40
 41
 42
 43
 44
 45
 46
 47
 48
 49
 50
 51
 52
 53
 54
 55
 56
 57
 58
 59
 60
 61
 62
 63
 64
 65
 66
 67
 68
 69
 70
 71
 72
 73
 74
 75
 76
 77
 78
 79
 80
 81
 82
 83
 84
 85
 86
 87
 88
 89
 90
 91
 92
 93
 94
 95
 96
 97
 98
 99
100
101
102
103
104
105
106
107
108
109
110
111
112
113
114
115
116
117
118
119
120
121
122
123
124
125
126
127
128
129
130
131
132
133
134
135
136
137
138
139
140
141
142
143
144
145
146
147
148
149
150
151
152
153
154
155
156
157
158
159
160
161
162
163
164
165
166
167
using System;
using System.Collections.Generic;
using System.Linq;
using System.Text;
using System.Threading.Tasks;
using System.Windows;
using System.Windows.Controls;
using System.Windows.Data;
using System.Windows.Documents;
using System.Windows.Input;
using System.Windows.Media;
using System.Windows.Media.Imaging;
using System.Windows.Navigation;
using System.Windows.Shapes;
using System.IO.Ports;

namespace Wpf_NET_Core_Serial
{
    /// <summary>
    /// Interaction logic for MainWindow.xaml
    /// </summary>
    public partial class MainWindow : Window
    {
        /// <summary>
        /// シリアルポートインスタンス
        /// </summary>
        SerialPort _serialPort = null;
        /// <summary>
        /// アプリケーションメインウィンドウ
        /// </summary>
        public MainWindow()
        {
            InitializeComponent();
            // シリアルポートの列挙
            string[] PortList = SerialPort.GetPortNames();
            this.cmbPort.Items.Clear();
            foreach (string p in PortList)
            {
                this.cmbPort.Items.Add(p);
            }
        }
        /// <summary>
        /// 接続ボタンイベント
        /// </summary>
        /// <param name="sender"></param>
        /// <param name="e"></param>
        private void btnOpen_Click(object sender, RoutedEventArgs e)
        {
            // ポートが選択されている場合
            if (this.cmbPort.SelectedValue != null)
            {
                // ポート名を取得
                var port = this.cmbPort.SelectedValue.ToString();
                // まだポートに繋がっていない場合
                if (_serialPort == null) 
                {
                    // serialPortの設定
                    _serialPort = new SerialPort();
                    _serialPort.PortName = port;
                    _serialPort.BaudRate = 9600;
                    _serialPort.Parity = Parity.None;
                    _serialPort.DataBits = 8;
                    _serialPort.StopBits = StopBits.One;
                    _serialPort.Handshake = Handshake.None;
                    _serialPort.NewLine = "\r";     // for Arduino PRO Mini
                    _serialPort.DtrEnable = true;   // for Arduino PRO Mini
                    _serialPort.ReadTimeout = 1000;

                    //新たに追加 データ受信時のイベントを設定 関数は後述のserialPort_DataReceived
                    _serialPort.DataReceived += new SerialDataReceivedEventHandler(_serialPort_DataReceived);
                    // シリアルポートに接続
                    try
                    {
                        // ポートオープン
                        _serialPort.Open();
                    }
                    catch (Exception ex)
                    {
                        MessageBox.Show(ex.Message);
                    }
                    finally
                    {
                        this.btnOpen.IsEnabled = false;
                        this.btnClose.IsEnabled = true;
                        this.txtReceive.Text = string.Empty;
                        this.txtSend.Text = string.Empty;
                    }
                }
            }
        }
        /// <summary>
        /// 送信ボタンイベント
        /// </summary>
        /// <param name="sender"></param>
        /// <param name="e"></param>
        private void btnSend_Click(object sender, RoutedEventArgs e)
        {
            if (_serialPort == null) return;
            if (!_serialPort.IsOpen) return;

            try
            {
                _serialPort.WriteLine(this.txtSend.Text);
            }
            catch (Exception ex)
            {
                MessageBox.Show(ex.Message);

            }
            finally
            {
                this.txtSend.Text = string.Empty;
            }
        }
        /// <summary>
        /// 切断ボタンイベント
        /// </summary>
        /// <param name="sender"></param>
        /// <param name="e"></param>
        private void btnClose_Click(object sender, RoutedEventArgs e)
        {
            if (_serialPort == null) return;
            if (!_serialPort.IsOpen) return;

            try
            {
                _serialPort.Dispose();
                _serialPort = null;

            }
            catch (Exception ex)
            {
                MessageBox.Show(ex.Message);

            }
            finally
            {
                this.btnOpen.IsEnabled = true;
                this.btnClose.IsEnabled = false;
            }
        }
        /// <summary>
        /// データ受信イベントで呼び出される関数
        /// </summary>
        /// <param name="sender"></param>
        /// <param name="e"></param>
        private void _serialPort_DataReceived(object sender, System.IO.Ports.SerialDataReceivedEventArgs e)
        {
            if (!_serialPort.IsOpen) return;

            try
            {
                this.txtReceive.Dispatcher.Invoke(new Action(() =>
                {
                    // 受信データを読込
                    string data = _serialPort.ReadExisting();
                    // 受信したデータをテキストボックスへ
                    this.txtReceive.Text += data;
                }));
            }
            catch (Exception ex)
            {
                MessageBox.Show(ex.Message);
            }
        }
    }
}


4.PC側MainWindow.xamlソースコード
 1
 2
 3
 4
 5
 6
 7
 8
 9
10
11
12
13
14
15
16
17
18
19
20
21
22
23
24
25
26
27
28
29
30
31
32
33
34
<Window x:Class="Wpf_NET_Core_Serial.MainWindow"
        xmlns="http://schemas.microsoft.com/winfx/2006/xaml/presentation"
        xmlns:x="http://schemas.microsoft.com/winfx/2006/xaml"
        xmlns:d="http://schemas.microsoft.com/expression/blend/2008"
        xmlns:mc="http://schemas.openxmlformats.org/markup-compatibility/2006"
        xmlns:local="clr-namespace:Wpf_NET_Core_Serial"
        mc:Ignorable="d"
        Title="Serial Test WPF .NET Core" Height="450" Width="800">
    <Grid>
        <Grid.RowDefinitions>
            <RowDefinition Height="50"/>
            <RowDefinition Height="50"/>
            <RowDefinition Height="*"/>
            <RowDefinition Height="50"/>
        </Grid.RowDefinitions>
        <Grid.ColumnDefinitions>
            <ColumnDefinition Width="100"/>
            <ColumnDefinition Width="100"/>
            <ColumnDefinition Width="*"/>
        </Grid.ColumnDefinitions>
        <ComboBox Name="cmbPort" Grid.Row="0" Grid.Column="0" Margin="5"/>
        <Button Name="btnOpen" Content="接続" Grid.Row="0" Grid.Column="1" Margin="5" Click="btnOpen_Click"/>
        <Button Name="btnClose" Content="切断" Grid.Row="1" Grid.Column="1" Margin="5" Click="btnClose_Click" IsEnabled="False"/>
        <Border BorderBrush="DimGray" BorderThickness="2" Grid.Row="2" Grid.Column="0" Grid.ColumnSpan="2" Margin="10">
            <TextBox Name="txtSend" Text="送信文字列" TextWrapping="Wrap" AcceptsReturn="True" VerticalScrollBarVisibility="Visible" />
        </Border>
        <Button Name="btnSend" Content="送信" Grid.Row="3" Grid.Column="0" Grid.ColumnSpan="2" Margin="5" Click="btnSend_Click"/>
        <ScrollViewer Name="scrView2" VerticalScrollBarVisibility="Auto" Grid.Row="0" Grid.RowSpan="4" Grid.Column="2" Grid.ColumnSpan="2" Margin="10">
            <Border BorderBrush="DimGray" BorderThickness="2">
                <TextBlock Name="txtReceive" Text="受診文字列" TextWrapping="Wrap" TextAlignment="Left"/>
            </Border>
        </ScrollViewer>
    </Grid>
</Window>

 5.Arduino側ソースコード


 <ファイル> → <スケッチ例> → <4.Communication> → <SerialEvent> を選択
54行目: if (inChar == '\n') { を
    if (inChar == '\r') { へ変更する事

6.動作確認

送信ボックスに適当な文字列を入力して、<送信>ボタンをクリック

受信ボックスに同一の文字列が受信されることを確認

━以上━


SPRESENSEでJPEG画像取得

2019年02月19日 17時12分47秒 | Arduino
1.準備
●PC : LENOVO G50-80E5019PJP
●OS : Windows 10 Pro 64bit Insider Preview Build 18334.1
●IDE : Arduino IDE 1.8.8
●CPU : CXD5602PWBMAIN1
●EXT : CXD5602PWBEXT1
●SD : SDSDQUPN-008G-J35A

2.ISX012カメラボード接続
2.2.3. SpresenseメインボードとSpresenseカメラボードの接続方法と準備
この説明通りに接続する事
SDカードを挿入【FAT32でフォーマットされている事】

3.Camera設定
Arduino 1.8.8 を起動
<ファイル> → <スケッチ例> → <Camera> → <Camera>を選択
<スケッチ> → <マイコンボードに書き込む>を実行

<ツール> → <シリアルモニタ>を選択

カメラが動作していることを確認

4.USB Mass Storege設定
Arduino 1.8.8 を起動
<ファイル> → <スケッチ例> → <SDHCI> → <UsbMsc>を選択
<スケッチ> → <マイコンボードに書き込む>を実行

<ツール> → <シリアルモニタ>を選択

USB MSC起動を確認

5.JPEG画像確認

USBケーブルを拡張ボード側へ接続

1280x960サイズのJPEG画像が取得できる

今回の組合せでは、次のフレームを取得するのに約2秒弱必要である


━以上━