


表を作った時などに、この項目は縦書きにしておきたいな、なんて
思った場合、Excelでも縦書きができます。
Excel使いの人には、かな~り出番のある「セルの書式設定」の出番です。
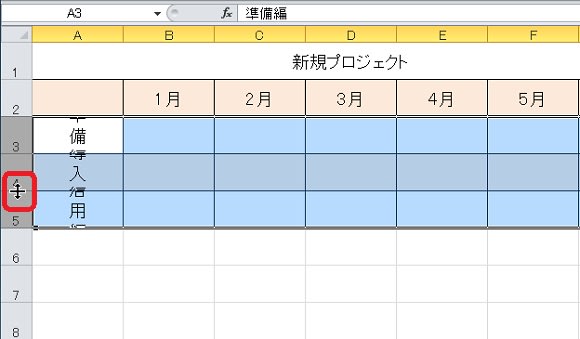
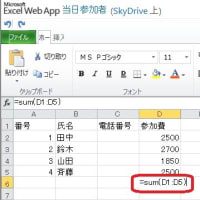
まず縦書きから。縦書きにしたいところを選択して
選択したところで右クリックし「セルの書式設定」をクリックします。
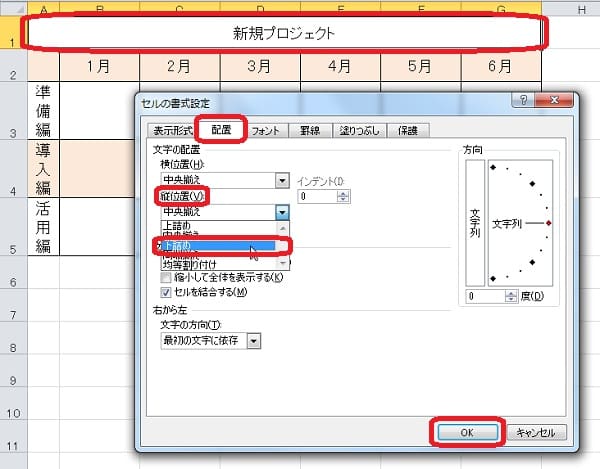
セルの書式設定の「配置」。文字の配置にかかわることは「配置」タブです。
そこに1か所だけ縦書きで書いてある文字があります。
「文字列」と縦に書いてある場所。そこが縦書きボタンの役割にもなっています。
ここをクリック! そしてOK。

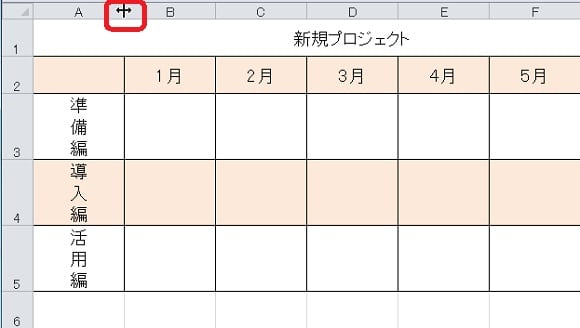
そうすると縦書きになります。
縦書きになって、文字が見えなくなってしまった場合には
自動調整しましょう。行の番号の上をドラッグして選択し、行番号の
境界線を軽くダブルクリックします。
自動調整は列でもできますから、もし縦書きのところの列幅の
広さが気になる場合は、列番号の境界線を軽くダブルクリックします。
これはもちろん、手でドラッグして好みの幅でもよいのです。
文字をもうちょっと下に詰めたいなあ、なんて時にもセルの書式設定は
その希望を叶えてくれます。
下に詰めたいセルを選択し、右クリック。セルの書式設定をクリックします。
配置タブの「縦位置」に「下詰め」というのがあります。
下には詰めるって言うんですね。寄せるって言わないのね。
するとこんな感じです。

これが、Office2003までのやり方でした。
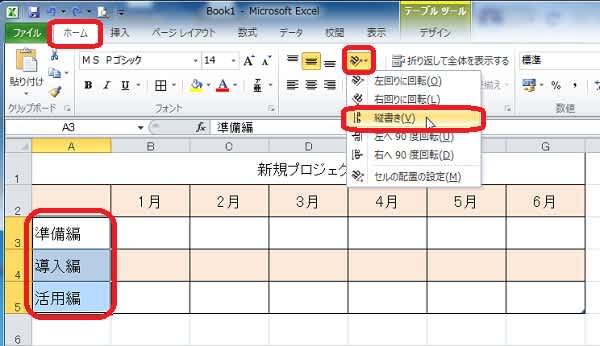
Office2007、Office2010では、このよく使う機能がボタンとなって
表に出てきましたよ。
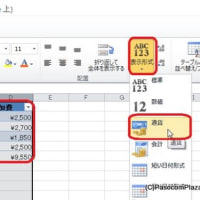
縦書きはホームタブに! 坂道を上がっていくabのボタンが見えますか?
ここに縦書きが。縦書きにしたいセルを選択して、このボタンをクリックします。
次に下詰め。同じくホームタブに!
ここでは「下揃え」って表示されますね。

きっとよく使うのだと思います。この機能。
縦書きは・・・漢字圏の人用でしょうか。アメリカには縦書きが
ないでしょうしねえ。
英語ならこれかな?? 「左へ90度回転」

 目次はこちら

思った場合、Excelでも縦書きができます。
Excel使いの人には、かな~り出番のある「セルの書式設定」の出番です。
まず縦書きから。縦書きにしたいところを選択して
選択したところで右クリックし「セルの書式設定」をクリックします。
セルの書式設定の「配置」。文字の配置にかかわることは「配置」タブです。
そこに1か所だけ縦書きで書いてある文字があります。
「文字列」と縦に書いてある場所。そこが縦書きボタンの役割にもなっています。
ここをクリック! そしてOK。
そうすると縦書きになります。
縦書きになって、文字が見えなくなってしまった場合には
自動調整しましょう。行の番号の上をドラッグして選択し、行番号の
境界線を軽くダブルクリックします。
自動調整は列でもできますから、もし縦書きのところの列幅の
広さが気になる場合は、列番号の境界線を軽くダブルクリックします。
これはもちろん、手でドラッグして好みの幅でもよいのです。
文字をもうちょっと下に詰めたいなあ、なんて時にもセルの書式設定は
その希望を叶えてくれます。
下に詰めたいセルを選択し、右クリック。セルの書式設定をクリックします。
配置タブの「縦位置」に「下詰め」というのがあります。
下には詰めるって言うんですね。寄せるって言わないのね。
するとこんな感じです。
これが、Office2003までのやり方でした。
Office2007、Office2010では、このよく使う機能がボタンとなって
表に出てきましたよ。
縦書きはホームタブに! 坂道を上がっていくabのボタンが見えますか?
ここに縦書きが。縦書きにしたいセルを選択して、このボタンをクリックします。
次に下詰め。同じくホームタブに!
ここでは「下揃え」って表示されますね。
きっとよく使うのだと思います。この機能。
縦書きは・・・漢字圏の人用でしょうか。アメリカには縦書きが
ないでしょうしねえ。
英語ならこれかな?? 「左へ90度回転」


More useful than ever.