Cell Phone spare parts online - ETrade Supply

https://www.etradesupply.com/

8 Aspects You May not Know About iPhone Face ID Recognition System

2019-07-31 12:01:22 | iPhone

Most people may not know that the iPhone' Face ID system is much better than the primary Touch system on accuracy and recognition speed. To get to know more about this mobile security system, here we would like to share 8 aspects of iPhone's Face ID system with you. Let's specify them on the description below.

1. Face ID’s “Required Attention” is Optional

2. Dim the Screen Automatically When You Not Looking At It

3. Face ID Now Supports 2 Faces recognition 

4. You can reactivate Face ID for Rescanning

5. You can quickly Disable Face ID

6.  Control App what Face ID unlocks

7. You Don’t Need to Wait for the Padlock To Unlock

8. You Need to Reset Face ID if it failed for recognition for many times

Your iPhone is far more interesting and intelligent than you ever knew as long as you keep discovering. With the time you are using the iPhone, it is recommended that you should get to know some iPhone XR replacement parts. Etrade Supply would be grateful if you need help or repair technical support from us. Please leave your comments below or contact us if you have new ideas.

iPhone Face ID system

Article resources from Etrade Supply Blog of www.etradesupply.com/blog 


12 Mistakes You Probably Make While Charging Your Phone

2019-07-25 10:07:26 | Phone Tips

Mobile phones have all kinds of functions, which make our life more convenient and interesting. With the time we are using, we find out that our phone battery is running so quickly. Although the producers have been working on the phone battery improvement on faster charging and longer using life, we still believe there are some tricks to keep our phone battery in a long using life. Here Etrade Supply mainly concludes 12 mistakes we probably make while charging our phone, and some of which we might take for granted but are not true. Let’s see what they are.

 1. Charging your phone to the max before using it for the first time.
2. Not using your phone while it's charging.
 3. Being afraid that chargers from a different brand will kill your battery.
4. Thinking that turning your phone off will damage the battery.
5. Trying to “train” your battery
6. Not charging your phone overnight for fear of damaging the battery
7. Putting the battery in the freezer to make it last longer
8. Using task managers to prolong battery life
9. Fearing to leave your phone charger plugged in
10. Not charging laptops all the time to prevent damage
11. Turning off Bluetooth, GPS, and Wi-Fi to prolong the battery life
12. Tips to prolong battery life: keep the battery cool, store battery with a bit of charge.

These 12 mistakes are fake conception for us on our phone battery charging. Anyway, keep our phone in good condition is good to prolong our battery life. You might also check on the phone replacement battery if it is necessary to do so. Here we recommend our new iPhone 6 replacement battery, 1715 mAh to 2000mAh battery with long battery life. Perfect choice to solve your problems of iPhone battery draining fast. Do you have any tips on prolonging phone battery? Leave your comments below so that we can share.

Article resources from Etrade Supply of www.etradesupply.com/blog


Samsung S10 Plus Teardown and Reinstallation Demonstration

2019-07-24 10:49:08 | Samsung Galaxy

Samsung S10 Plus is a complex mobile phone device. The whole process of teardown and reinstall demonstration would be a little longer than other smartphone models. Let's check this out step by step with patience and resistance. 

1. Samsung S10 Plus Teardown:

Before we start the process of Samsung S10 teardown, we should take all the tools ready like the prying tools, screen opening suck-cup, Philip screwdriver. The whole process is complex and a bit difficult, we need to be careful and patient. Some of the internal parts and flex may be easy to break, we should focus on it. Now let’s do it.

1.1 Power off the phone, separate the backplate by prying it off with the pry tool

1.2 Undo the 16 Phillip screws on the backplate, take down the wireless charging pad

1.3 Remove the bottom plastic cover 

1.4 Disconnect the battery cable, the string cable, the headphone jack cable, the front-facing camera cable and remove the front-facing camera

1.5 Unscrew the three Phillip screws on the board and remove the headphone jack

1.6 Remove the mainboard by prying up slowly, disconnect the back Samsung S10 Plus rear-facing cameras cable and remove it from the board

1.7 Peel off the protective tape and pry up and remove the copper vapor chamber

1.8 Separate the screen from the frame with a triangle prying tool

1.9 Tear off the protective adhesive tape and pry up the screen flex cable, don’t break the screen fingerprint scanner flex

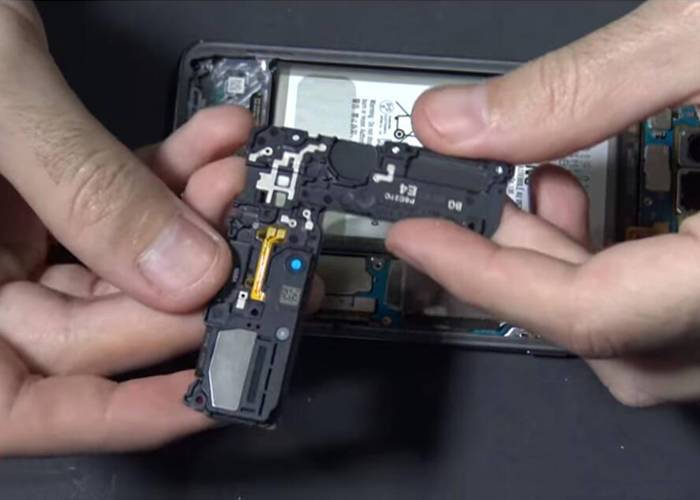
1.10 Pry off the battery from the frame and then the vibrator motor and earpiece speaker as well

2. Samsung S10 Plus Restall:

The restore process is easier than teardown, we just follow the above step order back and reinstall the parts. On the other hand, we have to keep in mind the right place each part it used to be and don’t mess up the order. Here we go.

2.1 Put the headphone sticker and the vibrator motor back in the frame, as well as the battery

2.2 Insert the cable back to the slot, reseal the screen back to the frame and adjust the right position

2.3 Place the copper vapor chamber back

2.4 Put the front cameras back to the mainboard and connect the cable

2.5 Place the mainboard back and screw the three Phillip screws

2.6 Connect the headphone jack and the screen flex back to the mainboard, install the front-facing cameras back

2.7 Restore the speaker assembly and connect the battery cable back to the mainboard

2.8 Put the plastic cover with wireless charging pot back, screw the 16 Philip screws back

2.9 Seal up the backplate back, better cover with new adhesive on the edge by hot gun blowing  

The demonstration steps might be a little complicated, but we have learned much about Samsung S10 Plus model from this article. On the other hand, you will know much about Samsung S10 Plus internal parts and repair technology if you are clear about all these steps. As a mobile phone parts supplier, we suggest you take attention on the parts like Samsung Galaxy S10 Plus LCD Screen and Digitizer Assembly or Samsung Galaxy S10 Plus Rear Face Camera if you are running a repair shop. Any new idea about Samsung S10 repair or questions the above steps, please leave your comment below.


How to Upgrade Your iPhone 6/6S Storage From 16G to 128G

2019-07-18 10:41:24 | iPhone

Users have complained a lot that the iPhone 6/6s 16G storage doesn’t satisfy us. Even though the 128G model is optional, we still hope our iPhone internal memory could be more powerful on storage. Here we try to introduce a new technology of iPhone 6s storage upgrade from 16G to 128G. Let's check this out: 

Step 1. Check your iPhone 6/6s functions, make sure they are OK

Step 2. Restore your iPhone data with the iPhone system repair tool

Step 3. Teardown iPhone 6/6s and remove the iPhone 6/6s LCD screen

Step 4. Pry the drive from the motherboard

Step 5. Rewrite the iPhone drive date with 128G via system repair tool

Step 6. Clean the PBC black adhesive and the tins

Step 7. Align drive with PCB bonding pad and coated with solder paste

Step 8. Align BGA stencil with the drive, adjust it by hot air gun blowing

Step 9. Connect motherboard back to motherboard plate after it is cold down, install the LCD screen back  

Step 10. Restore iPhone via iTunes and activate it, check the current capacity. Storage upgrade completed.

These are all the steps about how to upgrade your iPhone 6/6s storage from 16G to 128G. We suggest you go to a professional repair center if you really need to upgrade your iPhone internal memory storage. Besides, anything about our iPhone replacement parts, please go to our online store or contact us if you have interest. 


How to Make Aftermarket iPhone X OLED Screen Have True Tone?

2019-07-12 16:23:17 | iPhone

The true tone function is a special feature of iPhone. With this function, the display screen can be switched from warm yellow color to cold bright color automatically to balance the cold and warm tone of the surrounding environment and make eyes comfortable to watch on the screen. Most people complain that the true tone is missing after their iPhone X screens were broken and replaced with an aftermarket iPhone X OLED screen. Will the true tone function of iPhone X still work on the replacement aftermarket OLED screen? We say yes to this question for sure.

As long as we record the date from the original screen by IP Eeprom programmer tool, and rewrite the date in the aftermarket OLED screen, we can make the aftermarket iPhone X OLED screen to have the true tone function. Details please check our website blog on here: www.etradesupply.com/blog