半角チルダ

ExcelVBA、その他。
覚え書きや、補足資料などのスクラップブック。
end-u(1037781)

■AutoFilter[Filters プロパティ]

2008-01-31 22:30:00 | VBA Tips
AutoFilterつながりで。
フィルタをかけている時、設定している抽出条件を取得したいというQがたまにあります。
ヘルプの[AutoFilter オブジェクト]関連に使用例が載ってるのですが
状況によってはエラーだし、[Filters プロパティの使用例]は意味不明なところがあるからわかりにくいのでしょうか。
#ぃや、意味不明なのはこれに限った事ではないので今さら..ですが :-/

Sub try()
  Dim n As Long
  Dim i As Long

  With ActiveSheet
    If .AutoFilterMode Then
      n = .AutoFilter.Filters.Count
      ReDim v(1 To n)
      For i = 1 To n
        With .AutoFilter.Filters(i)
          v(i) = i & vbTab & .On
          If .On Then
            v(i) = v(i) & vbTab & .Operator & vbTab & .Criteria1
            If (.Operator = xlAnd) Or (.Operator = xlOr) Then
              v(i) = v(i) & vbTab & .Criteria2
            End If
          End If
        End With
      Next
    End If
  End With
  'Debug.Print Join(v, vbLf)
  MsgBox Join(v, vbLf)
End Sub


...ついでに。
2007からは変わったようですが、2003以前のバージョンでは
抽出条件を設定しているFilterのDropDown▼の『青』が区別しにくいので変更できないか、というQも時々見かけます。
下記は、条件設定した時のイベントをSUBTOTAL関数を使って擬似的に捉え、
[On プロパティ]で判断してセルに色付けするサンプルです。
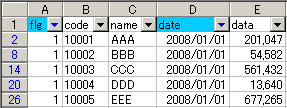


AutoFilter監視対象シートがSheet1だとします。
それとは別のダミーシートの任意の1セルに数式を設定します。
=SUBTOTAL(3,Sheet1!A:A)
あとは、そのダミーシートのシートモジュールのCalculateイベントを使います。

'SheetModule
Option Explicit

Private Sub Worksheet_Calculate()
  Static r As Range
  Dim f  As Filter
  Dim i  As Long

  On Error GoTo errHndler
  With Sheets("sheet1")
    If .AutoFilterMode Then
      With .AutoFilter
        If r Is Nothing Then Set r = .Range.Rows(1)
        For Each f In .Filters
          i = i + 1
          '33が、識別用 ColorIndex。任意で。
          r.Cells(i).Interior.ColorIndex = IIf(f.On, 33, xlNone)
        Next f
      End With
    Else
      If Not r Is Nothing Then r.Interior.ColorIndex = xlNone
      Set r = Nothing
    End If
  End With
errHndler:
  If Err.Number <> 0 Then MsgBox Err.Number & ":" & Err.Description
End Sub

工夫すれば、アドイン化してApplication単位での汎用処理が可能ですが、
そこまで苦労するほどのニーズがあるのかどうか。
Comment
  • X
  • Facebookでシェアする
  • はてなブックマークに追加する
  • LINEでシェアする

■AutoFilterの限定解除

2008-01-30 23:50:00 | VBA Tips
AutoFilter使用時、1列目のあるセルをDoubleClickして、
その行以降の隠れた行を一時的に表示させたい。
再度DoubleClickすると元の状態に戻したい。
(例えば下の例では15~19行)


'SheetModule
Option Explicit

Private Sub Worksheet_BeforeDoubleClick( _
    ByVal Target As Range, Cancel As Boolean)
  Static Hrow As Long
  Dim n    As Long

  With Target
    If .Column <> 1 Then Exit Sub
    n = .Row + 1
    Select Case .Interior.ColorIndex
      Case xlNone
        If (Hrow = 0) And Rows(n).Hidden Then
          Do
            If Not Rows(n + Hrow).Hidden Then Exit Do
            Hrow = Hrow + 1
          Loop
          Rows(n).Resize(Hrow).RowHeight = .Height
          .Interior.ColorIndex = 6
        End If
      Case 6
        If (Hrow <> 0) And AutoFilterMode Then _
          Rows(n).Resize(Hrow).RowHeight = 0
        .Interior.ColorIndex = xlNone
        Hrow = 0
    End Select
  End With
  Cancel = True
End Sub

AutoFilterを使っていて、隠れた行が妙に気になってしかたなく、
でもFilter条件を解除/再設定するのが面倒な時...

...なんていうニーズは多分ないと思う。
#ごめんなさい。scrapなTipでしたorz
Comment
  • X
  • Facebookでシェアする
  • はてなブックマークに追加する
  • LINEでシェアする

■Chartの[Export メソッド]を使った画像保存

2008-01-29 21:50:00 | VBA Tips
またもや画像関連で。
Q&A板でもたまにあるお題。
ワークシート範囲やシェイプを画像ファイルとして保存したい...など。
私は普通にキャプチャソフトを使ってしまうが、意外とニーズがあるよう。
本格的なものはWin32APIを使うのだろうし、
大量の画像であればPublishObjectsを使うのかな、という気がするけど、
まぁ、お手軽感という意味で。

Sub try()
  Const f As String = "D:¥test¥test."
  Const e As String = "png"
  Dim r  As Object

  On Error GoTo errHndr
  Set r = Selection
  r.CopyPicture Appearance:=xlScreen, Format:=xlBitmap
  With Workbooks.Add(xlWBATWorksheet)
    With .Sheets(1).ChartObjects.Add(r.Left, r.Top, r.Width, r.Height).Chart
      .Paste
      .ChartArea.Border.LineStyle = 0
      .Shapes(1).Left = -3.4
      .Shapes(1).Top = -3.4
      .Export Filename:=f & e, Filtername:=e
    End With
    .Close savechanges:=False
  End With
errHndr:
  Set r = Nothing
  If Err.Number <> 0 Then MsgBox Err.Number & ":" & Err.Description
End Sub

ChartObjects.Addを繰り返すとファイルサイズが大きくなっていく...という話もあったので
作業Workbooks.Addで書いてみたけど、事の真相は未確認。
ChartObjectsのAdd/Deleteでいいような気もします。
コード中の -3.4 は余白の調整ですが、なんかちょっとカッコ悪いかも。
それに環境によって違うかもしれないし :-(

(出力sample)
Comment
  • X
  • Facebookでシェアする
  • はてなブックマークに追加する
  • LINEでシェアする

■ワークシート上のPictureの回転(2002/2003)

2008-01-28 21:50:00 | VBA Tips
ついでに画像ネタ3(これも仕事では使わない) :-P
単独セルでもSelectionでも、範囲に応じて Rotation するマクロ。
実行ごとに右回転します。


Sub try()
    Const n As Long = 4 'margin
    Dim pc  As Picture
    Dim r   As Range
    Dim i   As Long
    Dim x   As Single
    Dim y   As Single
    Dim z   As Double

    If TypeName(Selection) <> "Range" Then Exit Sub
    Application.ScreenUpdating = False
    Set r = Selection
    For Each pc In ActiveSheet.Pictures
        If Not Intersect(r, Range(pc.TopLeftCell, _
                                  pc.BottomRightCell)) Is Nothing Then
            Exit For
        End If
    Next
    If Not pc Is Nothing Then
        With pc
            With .ShapeRange
                .LockAspectRatio = msoTrue
                i = Int(.Rotation / 90) * 90
                .IncrementRotation 90
                x = IIf(i Mod 180, .Width, .Height)
                y = IIf(i Mod 180, .Height, .Width)
                z = Application.Min((r.Width - n) / x, (r.Height - n) / y)
                .Width = .Width * z
            End With
            .Left = r.Left + (r.Width - x * z) / 2
            .Top = r.Top + (r.Height - y * z) / 2
        End With
    End If
    Application.ScreenUpdating = True
    Set pc = Nothing
    Set r = Nothing
End Sub


#2000はシェイプの回転機能がないので、仕事上ではWin32API関数を使ってやってたりしてます
#...が、完全に内容を理解しているとは言い難いため、非公開。 :-|

(※追記)
>x = IIf(i Mod 180, .Width, .Height)
>y = IIf(i Mod 180, .Height, .Width)

ここは
If i Mod 180 = 0 Then
  x = .Height
  y = .Width
Else
  x = .Width
  y = .Height
End If
...ですね。
記述の簡便さよりコーリツが大事なのであったorz
Comment
  • X
  • Facebookでシェアする
  • はてなブックマークに追加する
  • LINEでシェアする

■ワークシート上のPictureのtrimming

2008-01-25 23:59:00 | VBA Tips
昨日に続いて画像シリーズ(?)2 :-)

これも仕事上では使わないのですが、
Pictureのトリミングをする時に、矩形で範囲選択できたらいいのでは?
と思って書いたレスから。

取り込んだPictureを選択して、Sub trimm1()を実行します。
Sub trimm1()の内容は、Pictureにトリミングするマクロを登録し、
Rectangleを描画するコマンドバーのクリックを実行するという内容です。
その後は、トリミングしたい箇所を矩形ドラッグし、Pictureをクリックすると
Sub trimm2()が走り、描画されたRectangleの枠に合わせてtrimmingします。

Sub trimm1()
  If TypeName(Selection) <> "Picture" Then Exit Sub
  With Selection
    .OnAction = "trimm2"
    With .ShapeRange.PictureFormat
      .CropLeft = 0
      .CropTop = 0
      .CropRight = 0
      .CropBottom = 0
    End With
  End With
  MsgBox "トリミング範囲ドラッグ後、写真クリック。"
  Application.CommandBars.FindControl(ID:=1111).Execute
End Sub
'-------------------------------------------------
Sub trimm2()
  Dim sp As Shape
  Dim pc As Picture
  Dim w As Single
  Dim h As Single
  Dim x As Double
  Dim y As Double

  Application.ScreenUpdating = False
  With ActiveSheet
    Set pc = .Pictures(Application.Caller)
    Set sp = .Shapes(.Shapes.Count)
    If Not Intersect(.Range(pc.TopLeftCell _
               , pc.BottomRightCell) _
            , .Range(sp.TopLeftCell _
               , sp.BottomRightCell)) Is Nothing Then
      With pc
        .OnAction = ""
        .Select
        w = .Width
        h = .Height
        Application.CommandBars.FindControl(ID:=1362).Execute
        x = .Width / w
        y = .Height / h
        .Width = w
        .Height = h
        With .ShapeRange.PictureFormat
          .CropLeft = Application.Max(0, (sp.Left - pc.Left) * x)
          .CropTop = Application.Max(0, (sp.Top - pc.Top) * y)
          .CropRight = Application.Max(0, (pc.Width - sp.Width) * x)
          .CropBottom = Application.Max(0, (pc.Height - sp.Height) * y)
        End With
      End With
      sp.Delete
    End If
  End With
  Application.ScreenUpdating = True

  Set sp = Nothing
  Set pc = Nothing
End Sub
'-------------------------------------------------
Sub spDef_set()
  With ActiveSheet.Rectangles.Add(0, 0, 10, 10).ShapeRange
    .Fill.Transparency = 0.8
    .SetShapesDefaultProperties
    .Delete
  End With
End Sub
'-------------------------------------------------
Sub spDef_reset()
  With ActiveSheet.Rectangles.Add(0, 0, 10, 10).ShapeRange
    .Fill.Transparency = 0
    .SetShapesDefaultProperties
    .Delete
  End With
End Sub

Sub spDef_set()はRectangleを半透明にし、それを[オートシェイプの規定値に設定]。
これによってトリミング時のシェイプ透過度を変更し、作業し易くします。
Sub spDef_reset()は半透明解除し、[オートシェイプの規定値に設定]。

任意で実行したり、またはブックのOpen/Closeイベントに登録したりなどすると良いかもしれません。

ちょっと「?」なのは
Application.CommandBars.FindControl(ID:=1362).Execute
これで[図のリセット]し、画像が拡大縮小されていた場合の比率を取得し、
トリミング値調整をしているところ。
もっと簡単に画像の元サイズや拡大縮小率を得る手段がなかったか、調べ中 :-(

(追記)
>調べ中 :-(
...わかんないorz
でもちょっとだけ修正しておこ。

Sub trimm2()
  Dim sp As Shape
  Dim pc As Picture
  Dim w As Single
  Dim h As Single
  Dim x As Double
  Dim y As Double

  Application.ScreenUpdating = False
  With ActiveSheet
    Set pc = .Pictures(Application.Caller)
    Set sp = .Shapes(.Shapes.Count)
    If Not Intersect(.Range(pc.TopLeftCell _
               , pc.BottomRightCell) _
            , .Range(sp.TopLeftCell _
               , sp.BottomRightCell)) Is Nothing Then
      With pc
        .OnAction = ""
        w = .Width
        h = .Height
        .ShapeRange.ScaleWidth 1, msoTrue
        .ShapeRange.ScaleHeight 1, msoTrue
        x = .Width / w
        y = .Height / h
        .Width = w
        .Height = h
        With .ShapeRange.PictureFormat
          .CropLeft = Application.Max(0, (sp.Left - pc.Left) * x)
          .CropTop = Application.Max(0, (sp.Top - pc.Top) * y)
          .CropRight = Application.Max(0, (pc.Width - sp.Width) * x)
          .CropBottom = Application.Max(0, (pc.Height - sp.Height) * y)
        End With
      End With
      sp.Delete
    End If
  End With
  Application.ScreenUpdating = True

  Set sp = Nothing
  Set pc = Nothing
End Sub
Comment
  • X
  • Facebookでシェアする
  • はてなブックマークに追加する
  • LINEでシェアする