


@media (max-width: 1200px) { }
body .novashare-buttons.novashare-inline .novashare-button-icon { width: 100%; }
Share this Article:
TwitterFacebookPinterestPrint
body .novashare-pinterest-image{display:block;position:relative;margin:0;padding:0;line-height:0}figure>.novashare-pinterest-image{height:100%;width:100%}body .wp-block-image .novashare-pinterest-image+figcaption{display:block}body .novashare-pinterest-image-button{opacity:0;transition:.3s;position:absolute;height:18px;max-height:18px;width:auto!important;padding:10px;cursor:pointer;background:#c92228;color:#fff;font-size:16px;line-height:18px;z-index:1;text-decoration:none;box-sizing:content-box;top:50%;left:50%;transform:translate(-50%,-50%)}body .novashare-pinterest-image-button:hover{background:#b51f24}body .novashare-pinterest-image-button:visited{color:#fff}body .novashare-pinterest-image:hover .novashare-pinterest-image-button{opacity:1}body .novashare-pinterest-image-button svg{width:18px;height:18px;vertical-align:middle;pointer-events:none}
Learn how to laminate fabric the easy way! Laminating fabric is the process of bonding layers of material together by adding a layer of plastic or protective material. It is bonded in such a way that the two become one entity. Laminating adds strength and insulation to the properties of the fabric. The greatest advantage of laminating fabric is that the fabric becomes waterproof making it suitable for a large range of crafts and applications.
 PinHow to Laminate Fabric
Contents
How to Laminate FabricWhat you Need to Laminate FabricSteps to Laminate FabricStep 3 - JoiningStep 4 - PressingStep 5 - SewingHow to Make a Laminated PouchSuppliesHow to Make the Laminated PouchLaminated Fabric ProjectsTips for Using Laminated FabricHow to Laminate Fabric - In ConclusionMore Fabric Articles
How to Laminate Fabric
Laminating fabric to make it waterproof is a great project for aprons, table mats, and upholstery you want to be able to wipe down when the family has finished dinner. It is not a difficult process.
There is one disadvantage and that is the laminating iron-on vinyl is generally narrow and this factor limits it to laminating in a 15”to 20” width. There are many items that benefit from being laminated, but sometimes you need to be creative to work with the narrower widths.
Preparation is key to laminating fabric. You want to laminate the pre-cut fabric pieces, but because this is an iron-on process it is easier to work in rectangles and then cut out the pattern from the laminated rectangles. There will be some scrap and odd shapes left over, but these could be used for other projects. Remember ‘waste not want not’ and squirrel your pieces away for other small projects.
What you Need to Laminate Fabric
IRON ON VINYL - These come in small rolls and can be matt or gloss finished. CUTTING TOOLS - Paper cutting scissors or a rotary cutting blade.PRESSING TOOLS - Iron and ironing board.FABRIC - Cotton fabric like quilting fabric, canvas or duck cloth.WEIGHTS - Pattern weights need to be used as pins will leave holes in your laminated fabric. If you don`t have pattern weights, use tins from your pantry. OPTIONAL – freezer paper, brown craft paper, glitter. Pin How to Laminate Fabric Supplies
Steps to Laminate Fabric
Step 1 - Cutting
Cut out a piece of the iron-on vinyl. Use the grid on the back as a guide for the amount of fabric required.Use some fabric weights to hold down the edges of the vinyl because it will want to curl.
 Pin How to Laminate - Cutting
Step 2 - Preparation
Lay your fabric piece right side up on your ironing board. Iron it so there are no wrinkles and no threads or lint on the right side of the fabric. Pull the backing off the laminate vinyl. Keep the backing you have pulled off as it will have a use in the end.
 Pin How to Laminate - Peel
Step 3 - Joining
Press the sticky side of the laminate vinyl onto the right side of the fabric with your hand. It smoothes on quite easily and does not stick firmly at this stage so it can be lifted and gently moved if necessary.Place the backing paper shiny side over the fabric. If you did not keep the backing paper then freezer paper will serve the same purpose. Put the shiny side of the freezer paper over the fabric.
Step 4 - Pressing
Use the freezer paper or the backing paper as your presser cloth and set your iron on medium heat with NO steam.Press the iron down and hold for eight seconds on one spot. Lift the iron and move to another spot and repeat the press and hold action for another eight seconds.Be careful not to touch the plastic because the heat of the iron will melt the plastic and if it sticks to the iron it makes a terrible mess.Flip the fabric to the other side, the wrong side, and press again with the iron. This helps to fuse the vinyl further and make sure it is really stuck to the fabric.
 Pin How to Laminate - Press
Step 5 - Sewing
You are good to go to start sewing now. Cut out your pattern and sew up the article you plan to make. Remember to use clips instead of pins to hold the pieces together. If you must use pins, then pin outside the seam allowance line so any holes won`t show.
 Pin How to Laminate Fabric
How to Make a Laminated Pouch
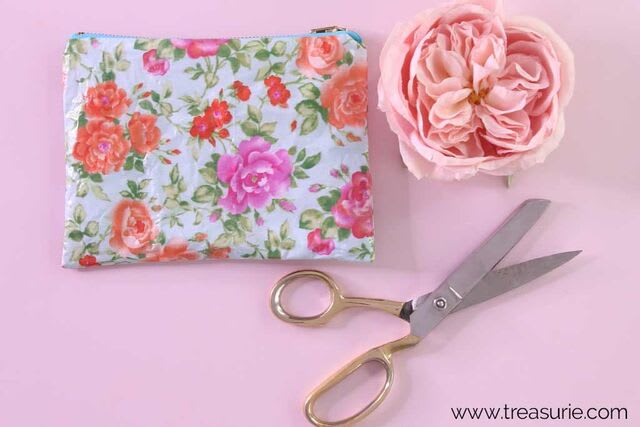
You can make a laminated pouch for your cosmetics or other items that need waterproof fabric. This pouch was made using the techniques in my how to make a zipper pouch tutorial.
Supplies
FABRIC - Cut 4 rectangles of fabric 9x6 inches. The rectangles can actually be any size you choose as long as you have a matching zipper. Two will be for the outside and two for the lining. It is up to you whether you want to have the laminated fabric outside and inside or just the one. It is definitely a little bulkier to use laminate on both sides so choose a fabric that is not too thick to start with. Zipper - 8" measured along the teeth. The tape will be the length of your fabric rectangles.
 PinLaminated Pouch Supplies
How to Make the Laminated Pouch
Watch this video showing you how to sew a zipper pouch, otherwise skip to the instructions and photos below. Subscribe to my YouTube channel for weekly sewing and craft videos.
Place your zipper right side up on top of the right side of your lining fabric. Place the outside fabric on top with right sides together. You will have created a sandwich with the zipper in the middle. Using a zipper foot, stitch along the zipper.
 PinHow to Laminate Fabric Pouches
Open up the seam and press using a pressing cloth. Remember not to place the iron on the plastic as it will melt. Sew the other side of the zipper the same way. The zipper will be placed between the outside and inside fabrics which will be right sides together. Open up.
 Pin How to Laminate Fabric Pouches
 Put the lining sides together and the outside fabric pieces together and sew all the way around leaving a gap at the bottom of the lining.
 Pin How to Make a Laminated Pouch
 Turn right side out through the gap and stitch closed. You should use matching thread.
 Pin How to Make a Laminated Pouch
 Poke the lining to the inside and you are all done!
 Pin How to Make a Laminated Pouch
 Laminated Fabric Projects
Here are some suggestions for different projects that benefit from laminated vinyl fabric:
Wipeable baby bibsReusable lunch bagsKitchen apronsBathroom wash bagsPool and beach tote bagsPlace mats
Tips for Using Laminated Fabric
Here are some extra tips to consider when using laminated fabric:
DESIGN CHOICE - Keep it simple. Laminated fabric will not pleat, tuck and curve easily.TEST - Test your machine settings on a scrap before sewing with laminate fabric.FOOT - See if your machine has or needs a special foot to sew laminated fabric. Due to the sticky nature of the vinyl, a walking foot or Teflon foot can help it glide under the foot as you sew. This will minimize skipped stitches. NEEDLES - Remember to check your machine’s needle size because laminated fabric will be thicker than most fabrics.THREAD - A strong polyester thread is recommended.BASTING - Avoid using straight pins if possible and use clips like paper clips instead. Pins leave holes in the laminate fabric.FINISHING - Neaten edges with pinking shears because the laminated fabric will not fray. Avoid sewing with a serger because there will be too many holes left by the multiple needles.DECORATING - If you want to get fancy with some glitter or extra decorative ideas, Scatter glitter on the right side of the fabric before the laminate vinyl is set and ironed on. This is best done between step four and five. Try other ideas on a scrap first to be sure they will not upset the bonding of the vinyl.How to Laminate Fabric - In Conclusion
Preparing and using laminated fabric is really an easy process. Taking it step-by-step and using simple patterns will ensure your success with this wonderful waterproof fabric.
More Fabric Articles
Make your own Clothing Labels: DIY Fabric Labels CheaplyHow to Tie DyeHow to Dye FabricHow to Stiffen Fabric for Sewing and CraftFabric Painting | BEST Tips and TechniquesHow to Waterproof Fabric
Rate this post


