


@media (max-width: 1200px) { }
body .novashare-buttons.novashare-inline .novashare-button-icon { width: 100%; }
Share this Article:
TwitterFacebookPinterestPrint
body .novashare-pinterest-image{display:block;position:relative;margin:0;padding:0;line-height:0}figure>.novashare-pinterest-image{height:100%;width:100%}body .wp-block-image .novashare-pinterest-image+figcaption{display:block}body .novashare-pinterest-image-button{opacity:0;transition:.3s;position:absolute;height:18px;max-height:18px;width:auto!important;padding:10px;cursor:pointer;background:#c92228;color:#fff;font-size:16px;line-height:18px;z-index:1;text-decoration:none;box-sizing:content-box;top:50%;left:50%;transform:translate(-50%,-50%)}body .novashare-pinterest-image-button:hover{background:#b51f24}body .novashare-pinterest-image-button:visited{color:#fff}body .novashare-pinterest-image:hover .novashare-pinterest-image-button{opacity:1}body .novashare-pinterest-image-button svg{width:18px;height:18px;vertical-align:middle;pointer-events:none}
Learn the best way how to sew a patch. Patched up and patched over sounds as if you have something to hide. In the sewing world, you are probably trying to hide a hole or tear in the fabric. Luckily, with the types of creative patches available today, it does not have to seem like a cover-up. Putting patches on a garment has become a world of creativity of its own. A technique that is purposeful and pretty at the same time.
 PinHow to Sew Patches
Contents
Why Sew a Patch?How to Sew a PatchHow to Sew a Patch by HandTypes of Hand Sewn PatchesHow to Sew a Patch by MachineHow to Sew a Patch on the OutsideHow to Sew a Set-In Patch with a MachineDecorative PatchingSew on BadgesHow to Sew a BadgeNo-Sew Options - Iron On PatchesHow to Sew a Patch - In ConclusionRelated Articles
Why Sew a Patch?
Firstly it is a way of repairing or covering a tear in a garment. Old favorites do not have to be cast out as the knees or elbows give way. Sewing on a patch can give new life to an old garment. A patch can cover or mend a tear. Accidents happen, especially with active children. Sewing on a patch can help keep the torn garment in circulation for longer.Patches or badges and logos add value to a garment as achievements can be displayed on a blazer or uniform.Patchwork, including embroidery or creating your own patch, is a decorative art and will add that personal touch to a jacket or pair of old jeans.
How to Sew a Patch
There are several methods of adding patches to different articles of clothing. Sewing by hand, machine sewing, or a little bit of a cheat method with bonding glue. However, the best methods, the lasting ones, require needle and thread for a secure and strong patch. Hand sewing with decorative thread adds a little bit of flair, while machine sewing is sturdy and long-lasting.
How to Sew a Patch by Hand
Here are some tips and ways to sew patches by hand.
NEATEN - Preparation is important. Examine the tear or the hole and neaten the area trimming away torn edges.BE CREATIVE - Cut out a shape if you intend to patch with a shape. A heart or square for example can turn an ugly hole into a fashionable statement.BEST FABRIC - Choose your patch fabric. You may like a contrast for effect or you may like to blend in and use the same fabric to avoid seeing the patch. If there is a pattern or pile on the garment, look a the patch that works with the garment fabric and not against it.BACKING - Lightweight fabrics may need some backing or a double layer of the fabric to make a more substantial patch on areas Iike knees and elbows. Use some bonding with fusible webbing before sewing on the patch. Bonding is also useful to secure the patch before sewing. Thicker fabrics like denim don`t usually need a backing. LEARN TO HAND SEW - Hand sewn patches look good with decorative embroidery stitches. Blanket stitch, whip stitch or small running stitches add charm and decorative finishes. PinStitches for Decorating Patches
Types of Hand Sewn Patches
Type A is sewn on the right side of the fabric as a cover over of the area to be patched. The cover can be any shape you like. You can also buy patches or badges in endless shapes and motifs if you don`t want to make your own.
Read how to applique.
 PinHow to Sew a Patch with Applique
Type B is known as reverse appliqué patchwork. The hole or damaged area is cut into a shape or cut-out area and the fabric is placed underneath. Stitching is done on the main garment top catching in the fabric below.
 PinHow to Sew a Patch with Reverse Applique
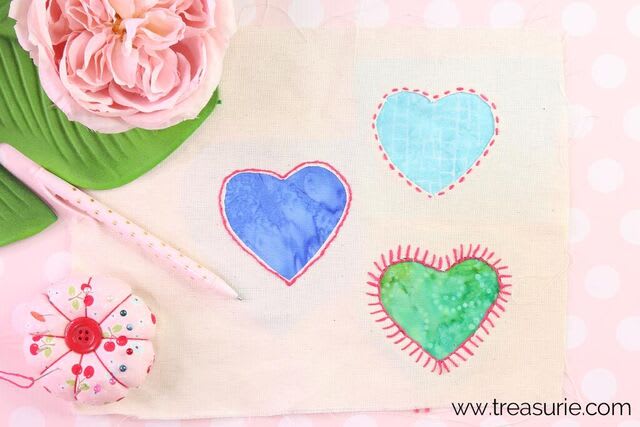
The patch is laid underneath the cut-out area. The outline of the cut out pattern is stitched on the right side while the patch is attached to the wrong side of the garment. Decorative stitches using embroidery thread make this style of patchwork look very pleasing to the eye. The actual patch is serving its purpose from underneath the tear or torn part of the fabric.How to embroiderUseful hand stitches include blanket stitch, running stitch and backstitch.
 PinHow to Sew a Patch with Hand Stitches
Both types of hand-sewn patches can be done in contrast fabrics. Use decorative thread and add a touch of whimsy with sequins, buttons and bows added to the patched area.
How to Sew a Patch by Machine
Machine sewn patches are more secure and longer-lasting. When there is a seriously worn or torn garment in your sewing bundle, you will want to fix it so it lasts. A machine-sewn patch is the best tough love approach for this project.
How to Sew a Patch on the Outside
Prepare your patch in the same way as a hand-sewn patch.
Neaten the edges of the holePlace the patch over the hole. Thinner fabrics may benefit from some bonding webbing or interfacing to stop further damage.
For a simple quick and easy repair use a zig-zag machine stitch and set the stitch length and width to give a close stitch to hold and neaten the edges.
Here are some examples of zig-zag settings.
 Pin
PinYou can try other machine stitches for a decorative effect. Fusing the patch to the fabric and following with some over stitching works well as a machined patch repair.
How to Sew a Set-In Patch with a Machine
A set in patch gives a very professional finish and is recommended if you want to machine the patch for a longer-lasting option. Knee patches and elbow patches work well with a set in patch.
Step One - Trim around the hole or tear and cut a neat square shape. Use your scissors to snip into each corner. Make your snip about ¼” to ½” (6-12mm) to allow you to turn the edges around the square under from the right side to the wrong side of the tear. Press the turned edges under. When repairing jeans, you may want to leave the edges raw and scruffy as it can be part of the look. Step Two - Cut a square patch of matching or contrasting fabric that is ½” (12mm) larger than the hole. You could fuse the patch with a bonding web or cut double fabric for extra strength. Step Three - Place the prepared patch piece under the cut hole in the garment. The patch will be right sides up and it will fit underneath. Step Four - Secure the patch with some basting stitches or pin in place ready to machine stitch around the edges. Now you are ready to hem the patch in place. As you can see in the photos below you can stitch neatly around the outside or reinforce with stitches going across the hole. Use a straight stitch or a zig zag stitch. Pin
PinDecorative Patching
Then there is the opportunity to turn a hole or tear in a garment into something creative. Embroidery stitches with colorful threads are an obvious choice. Patches made of felt are also good decorative ideas. Felt can be cut and stitched onto different parts of clothing. Felt does not fray and that makes it perfect for a decorative patch.
Further Reading:Sewing Felt
Sew on Badges
Badges are always popular and in some cases are earned for some achievement. The wearer wants to show off their badges on their clothing. Make your own badges too if you feel so inclined or buy motifs to sew on and decorate any type of clothing. Denim jackets and jeans do well with patches and badges sewn on.
 Pin
PinHow to Sew a Badge
Thread a needle with a double thread and knot the end. Use a matching thread color to the edge of the patch. (How to thread a needle)Insert the needle at the back of the fabric and come up on the edge of the patch. Put the needle back down at the edge of the border. Continue sewing over and over the border with around ⅛ to ¼ between stitches. (3-6mm). This over and over stitch is called a whip stitch. More experienced sewers may use a blanket stitch. Finish with the needle at the back of the fabric. Take a small stitch and put the needle through the loop before it is pulled tight. This is called knotting off.
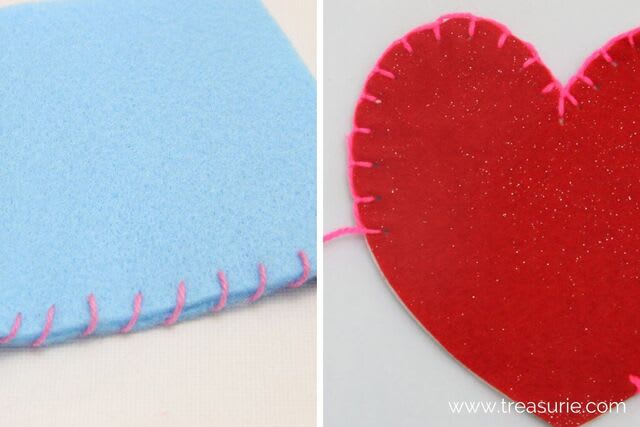 PinWhip Stitch and Blanket Stitch
No-Sew Options - Iron On Patches
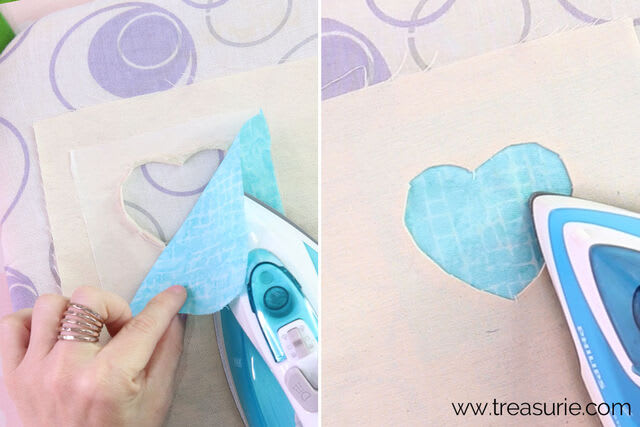
If you can`t sew your patch, then iron on patches are a good alternative.
Trim back the messy edges and then place the patch glue side down on the top of the fabric. Use your iron on the recommended settings to adhere the badge. It is a good idea to put a pressing cloth in between the patch and your fabric so nothing melts. Most patches are made from synthetic fibers. Some brands of patch come with a piece of tissue to use.
 Pin
PinHow to Sew a Patch - In Conclusion
Upcycling is a big part of our world today. Adding patches and decorative motifs to clothing is a great way to join in the fun of changing the image of a piece of favorite clothing. Clever patches look like they are an intentional decorative art. If you need a patch then be glad you could find a way to keep positive and re-purpose a loved item of clothing.
Related Articles
Blanket StitchRunning StitchWhip StitchHow to Fix a ZipperFabric Manipulation and Embellishment
4.9/5 - (28 votes)


