


@media (max-width: 1200px) { }
body .novashare-buttons.novashare-inline .novashare-button-icon { width: 100%; }
Share this Article:
TwitterFacebookPinterestPrint
body .novashare-pinterest-image{display:block;position:relative;margin:0;padding:0;line-height:0}figure>.novashare-pinterest-image{height:100%;width:100%}body .wp-block-image .novashare-pinterest-image+figcaption{display:block}body .novashare-pinterest-image-button{opacity:0;transition:.3s;position:absolute;height:18px;max-height:18px;width:auto!important;padding:10px;cursor:pointer;background:#c92228;color:#fff;font-size:16px;line-height:18px;z-index:1;text-decoration:none;box-sizing:content-box;top:50%;left:50%;transform:translate(-50%,-50%)}body .novashare-pinterest-image-button:hover{background:#b51f24}body .novashare-pinterest-image-button:visited{color:#fff}body .novashare-pinterest-image:hover .novashare-pinterest-image-button{opacity:1}body .novashare-pinterest-image-button svg{width:18px;height:18px;vertical-align:middle;pointer-events:none}
Fabric stenciling is a great way for the ‘not so artistic’ person to have the pleasure of decorating a piece of fabric and being creative. A pre-cut stencil is designed to give multiple opportunities to be the next Picasso and design your own fabric art. There are many points to consider to get this art form right. This article will cover tips and guidelines to better stenciling and open up an artistic forum that combines art and fabrics together.
 PinFabric Stenciling
Contents
Fabric StencilingSupplies Needed for Fabric StencilingTips for Fabric Stenciling PaintWhat Type of Fabric is Best Suited to Fabric Stenciling?How to Make Your Own StencilsChoosing Designs for Fabric StencilingMaterials to Make Stencils How to Do Fabric StencilingStep 1 - PreparationStep 2 - Spray the StencilStep 3 - Apply PaintStep 4 - DryingStep 5 - CleaningSetting Fabric Stenciling PaintFabric Stenciling VariationsFabric Stenciling - In ConclusionMore Fabric Embellishment Techniques
Fabric Stenciling
How do you get started? Here is some basic information and a start-up checklist.
Supplies Needed for Fabric Stenciling
PAINT - Fabric paint, acrylic paint or fabric dye. If you are using a non-fabric type of paint, you will also need an emulsion or medium to fix the paints to the fabric.TOOLS - A brush or roller to stencil the paint. A paint tray if you are using a roller.MESS REDUCTION - Paper towels and apron or an old t-shirt to protect your clothes.STENCILS - These are cheaply purchased from art and craft stores. Most are made from a medium thickness plastic. ADHESIVE - Spray adhesive that is repositional. There are various fabric sprays on the market that are usually used for quilting. This will hold the stencil in place. Alternatively you can use a painters tape. FABRIC - Your fabric to stencil.Tips for Fabric Stenciling Paint
Ready made fabric paint does not need a medium to be added to it because it is mixed and prepared with the medium.
Acrylic paint will adhere better with a medium added. The medium is a gel that is used to add to the paint to ensure it adheres to the fabric. It creates the ability for ordinary acrylic paint to become a fabric paint. A craft store will advise on the best medium to buy.
A general knowledge of the colour wheel and how colors mix is a great help. This gives you a better understanding of the colors that blend and those that mix together and become another colour. A good one for example, is red and yellow make orange. Blending colors that are compatible helps with planning and over lapping of the stencil.
What Type of Fabric is Best Suited to Fabric Stenciling?
Natural fabrics like cotton, linen, hemp and silk, make the best fabrics for dying.Tighter weaves of your fabric are easier to work with.Stretch fabrics are difficult to stencil. Ironing freezer paper to the wrong side of a difficult fabric helps to secure the fabric while you stencil.To wash or not to wash? Some experts say do not wash the fabric because unwashed fabrics are easier to work with. Others are of the opinion that pre-washed fabrics absorb the dye better. Try an experiment and decide for your self.
How to Make Your Own Stencils
Choosing Designs for Fabric Stenciling
Making your own design may seem rather challenging, but there are basic designs on the internet as well as designs in magazines and books. Once you have chosen a design make sure it is simple with easy-to-cut-out shapes. Broad outlines and no intricate detail is important.
The parts of the design that connect to each other and create the outline are called ties. These must be broad enough to prevent the fabric paint from oozing between the designs and the stencil.
If you want to create an abstract design then paper folding and cutting random shapes out of the paper works well. Fold a circle of paper into quarters and cut out along the folds without cutting right across the paper. This is rather like folding and cutting a doily. The result is an abstract circular design!
Materials to Make Stencils
Paper is not always the best material to use. Try these suggestions to cut and make your own stencil for fabric stenciling.
Masking tape - Applying masking tape directly onto the fabric to mask the area you do not wish to paint or to create an outline is a very simple way to start. The trouble with masking tape is because of its straight and unbending quality, it does not create interesting shapes.Transparent or acetate sheets - Thin see-through plastic like the kind used for overhead projectors makes a good stencil. Look for the variety that has a matt side and a glossy side. You can draw a design on the matt side with a pencil and then cut it out for the stencil. Cut the stencil out with a sharp craft knife. PinFabric Stenciling with AcetateThick paper or card - Thick paper or old greeting cards are useful for making stencils. Avoid intricate designs because they will not last and it will be irritating to keep remaking the stencil.Freezer paper - Freezer paper you buy from the supermarket makes good DIY stencils. This paper is plastic on one side and paper on the other. It is ideal for stencils. Mark the design on the paper side and cut out. Place the plastic side down on the fabric and secure with tape or press with a warm iron. Stencil the design using the fabric paint. Freezer paper designs can be used multiple times.Get creative at home - There are many things you may have at home that will make an interesting stencil. Lace is a great example of something to use for a stencil. Raid your kitchen and use cookie cutters or go out into the garden and collect leaves to make leaf prints for stencils.
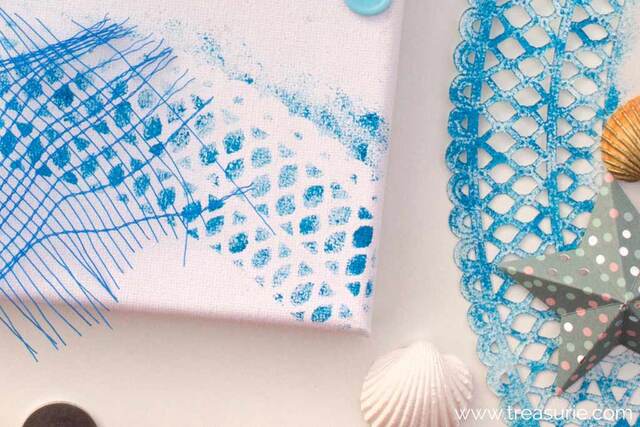 PinFabric Stenciling with Lace
How to Do Fabric Stenciling
Here are the steps to follow for a successful fabric stencil.
Step 1 - Preparation
Cover the surface you will be working on. Fabric stenciling can be messy! Stabilize the fabric ready to receive the stencil if necessary. Use freezer paper under stretchy fabrics to help with pulling your fabric out of shape. For t-shirts, place some cardboard inside, so the paint does not bleed through to the back.
Step 2 - Spray the Stencil
Use your adhesive spray to seal the edges of the stencil. Spray the sides and the back. This is important because the adhesive spray stops any paint bleeding into the fabric and keeps the stencil edges neat. The spray allows some movement of the stencil but keeps the edges smooth.
Don`t forget that it needs to be a repositionable spray. You don`t want to glue your stencil to your fabric permanently.
Step 3 - Apply Paint
Apply the fabric paint in layers. Dab, roll, or paint on the fabric paint. The first layer seals the surface of the fabric with paint but does not necessarily go through to the reverse side. Keep the brush or roller clear of too much paint by wiping excess on your paper towels. Start from the edges and move towards the center of the stencil.
 PinFabric Stenciling with Paint
Step 4 - Drying
Heat set the fabric once it is dry. It is at this point that the medium used in the fabric paint is fixed into the fabric. Use a pressing cloth to protect the fabric and the iron.
Step 5 - Cleaning
Be sure you have cleaned the surface area thoroughly. Leaving any blobs of paint or dirty brushes will certainly affect any other fabrics. Mop up and clean up well.
Setting Fabric Stenciling Paint
Here is how to set the fabric paint used for your stencil:
The most effective way to seal the fabric paint, and make sure it is colorfast, is using heat. Heat sealing with an iron and using a cloth to prevent paint from sticking to the iron is the best method. Remember the heat must penetrate the paint and it takes a bit of time to seal. Press the iron onto the painted area and leave it to seal. It is a hold and seal method not a side to side iron method. Always test your fabric afterward to see if it is colorfast before you add the stenciled item to your general wash.
Fabric Stenciling Variations
There are many other methods that can bring about interesting textures and effects. Here are 7 different ways to stencil and get different effects:
Single colour fabric stencil – A single colour to paint over the entire stencil makes this basic effect. Dab or brush on the paint to complete the stencilled shape.Multiple colour layered stencil – For this effect the same stencil is used, but two or more colors can create different shades or contrasts to the finished stencil pattern.Reverse fabric stenciling – Using the negative image cut from the original stencil. The portion cut out of the original stencil is laid down on the fabric and the fabric paint worked around the outside of the stencil. The edge of the stencil can be dabbed with paint or sprayed. When the stencil is removed a pattern of the outside of the shape is revealed.Stippling – Filling in the stencil area with small dots and not a full colour creates a textured effect called stippling. Sponging – Dipping a sponge into the paint and dabbing it over the stencil creates an uneven textured effect because the sponge is textured. Some original sea sponges are very rough and give interesting effects.Dry brush method – Load up your brush with paint then wipe most of the paint off leaving a dry, but colored brush. Use the brush with the intention to have uneven brush strokes and a dry texture.Textured paints – Look out for different kinds of commercial paints and use them to create texture.Fabric Stenciling - In Conclusion
Fabric stenciling can be a very rewarding and creative means to add some extra life and vitality to a piece of plain fabric. There are many items you could sew that would benefit from a bit of stenciling. T-shirts, table cloths and napkins, tea towels, and even your curtains are all suitable targets for some stenciled designs. Take a leap into this creative realm and enjoy fabric stenciling – nothing ventured nothing gained they say. Experiment on a scrap of fabric and see how much fun it is before you dive in and tackle a whole project.
More Fabric Embellishment Techniques
 PinTie Dye
 PinDye Fabric
 PinPotato Stamping
 PinPaint Fabric
How to Tie Dye - EASY Instructions for BeginnersBEST Fabric Manipulation Ideas to EmbellishFabric Painting | BEST Tips and TechniquesHow to Dye Fabric - The Right Way for Great ResultsPotato Printing and StampingFabric Stenciling
5/5 - (16 votes)


