goo blog サービス終了のお知らせ 

dak ブログ

python、rubyなどのプログラミング、MySQL、サーバーの設定などの備忘録。レゴの写真も。

二次関数のグラフをインタラクティブに描画

2023-09-10 13:22:47 | python
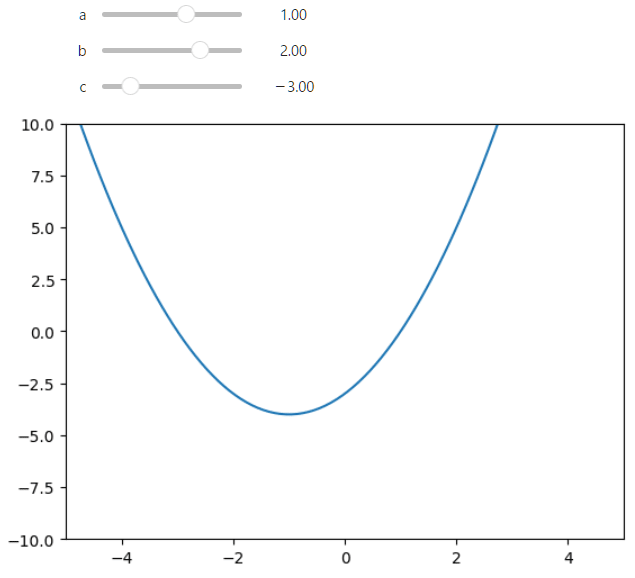
jupyter notebook で二次関数 f(x) = ax^2 + bx + c のパラメータ a, b, c をインタラクティブに変更してグラフを描画できるようにしてみました。
%matplotlib inline
import matplotlib.pyplot as plt
from ipywidgets import interact
import numpy as np

def f(a, b, c, x):
    return a * x**2 + b * x + c

def plot_f(a, b, c):
    x = np.linspace(-5, 5, num=100)
    y = f(a, b, c, x)
    
    fig, ax = plt.subplots()
    ax.plot(x, y)
    ax.set_xlim(-5, 5)
    ax.set_ylim(-10, 10)
    plt.show()

interact(plot_f,
	a=(-5.0, 5.0, 0.1),
	b=(-5.0, 5.0, 0.1),
	c=(-5.0, 5.0, 0.1))


Windows に jupyter notebook をインストール

2023-08-24 21:27:46 | python
Windows10 に jupyter notebook をインストールした際のメモです。
全体の手順は以下の通り。
1. pyenv のインストール
2. python のインストール
3. jupyter notebook のインストール

■1. pyenv のインストール
git clone https://github.com/pyenv-win/pyenv-win.git /Users/{ユーザ}/.pyenv/


インストール後に環境変数の設定を行います。
環境変数は 設定 > システム > 環境変数 で設定を行うことができます。
PYENV="/Users/{ユーザ}/.pyenv/pyenv-win"
PYENV_ROOT="/Users/{ユーザ}/.pyenv/pyenv-win"
PYENV_HOME="/Users/{ユーザ}/.pyenv/pyenv-win"

path に以下を登録します。
C:\Users\{ユーザ}\.pyenv\pyenv-win\bin
C:\Users\{ユーザ}\.pyenv\pyenv-win\shims

■2. python のインストール
pip を最新化しておきます。
pip install --upgrade pip

次に python をインストールします。
pyenv install 3.9.6
pyenv global 3.9.6


■3. jupyter notebook のインストール
pip install notebook

jupyter notebook を起動するには、コマンドプロンプトで以下を実行します。
jupyter notebook


BigQuery で array にデータを追加

2022-12-15 23:47:44 | python
BigQuery で array にデータを追加する方法のメモ。

■テーブル定義
create table test1.array_test1 (
  id        string,
  features  array<struct<key string, value string>>
);

■データ登録
insert into test1.array_test1 (id, features) values ('id_01', [struct('key_01' as key, 'value_01' as value)]);

■データ更新(array にデータを追加)
update
  test1.array_test1
set
  features = array_concat(features, [struct('new_key_01' as key, 'new_value_01' as value)])
where
  id = 'id_01'
;

■テーブル登録内容確認
id_01    key_01        value_01
         new_key_01    new_value_01

■データ登録
insert into test1.array_test1 (id) values ('id_02');
■データ更新
select ndores = array_concat(ifnull(features, []), [struct('new_key_02' as key, 'new_value_02' as value)])
where
  id = 'id_02'
;

■テーブル登録内容
id_01    key_01        value_01
         new_key_02    new_value_01
id_02    new_key_02    new_value_02


python で list の要素を置換

2022-11-04 23:41:47 | python
python で list の要素を置換する方法のメモ。
■プログラム
a[2:5] を 10 に置換します。
a = [i for i in range(10)]
print(a)

a[2:5] = [10]
print(a)

■実行結果
以下の通り、a[2:5] が 10 に置換されました。
[0, 1, 2, 3, 4, 5, 6, 7, 8, 9]
[0, 1, 10, 5, 6, 7, 8, 9]


lxml で xpath で text を検索した際の返却値のクラス

2022-10-12 23:07:41 | python
lxml で xpath で text を検索した際の返却値のクラスは lxml.etree._ElementUnicodeResult のリストです。
返却値を str クラスにするには、str(...) で str クラスに変換します。
import sys
import lxml.html

htmlstr = """
<html>
<body>
  <div class="d1">
    <div id="d2-1">
      <div id="d3-1">
        <p id="p4-1">p4-1 text</p>
        <p id="p4-2">p4-2 text</p>
      </div>
      <div id="d3-2"></div>
    </div>
    <div id="d2-2">
      <p id="p3-3">p3-3 text</p>
      <p id="p3-4">p3-4 text</p>
    </div>
  </div>
</body>
</html>
"""

dom = lxml.html.fromstring(htmlstr)

texts = dom.xpath("//div/p/text()")
for text in texts:
    print(f"text: {type(text)}: [{text}]")
    print(f"str:  {type(str(text))}: [{str(text)}]")


外接矩形で画像をクロップ

2022-09-24 22:57:10 | python
外接矩形で画像をクロップする方法のメモ。
import sys
import cv2

def main():
    in_file = sys.argv[1]
    out_file = sys.argv[2]
    
    img = cv2.imread(in_file)

    # グレースケール
    img_gray = cv2.cvtColor(img, cv2.COLOR_BGR2GRAY)
    res, img_bw = cv2.threshold(img_gray, 0, 255,
                                cv2.THRESH_BINARY_INV + cv2.THRESH_OTSU)

    # 輪郭
    cs, h = cv2.findContours(img_bw,
                             cv2.RETR_EXTERNAL,
                             cv2.CHAIN_APPROX_SIMPLE)
    
    # x, y の最小, 最大でトリミング
    min_x, min_y, w, h = cv2.boundingRect(cs[0])
    max_x = min_x + w
    max_y = min_y + h
    
    for i in range(1, len(cs)):
        x1, y1, w, h = cv2.boundingRect(c)
        x2 = x1 + w
        y2 = y1 + h

        if x1 < min_x: min_x = x1
        if y1 < min_y: min_y = y1

        if x2 > max_x: max_x = x2
        if y2 > max_y: max_y = y2

    # トリミング
    tgt_img = img[min_y:max_y, min_x:max_x]
    cv2.imwrite(out_file, tgt_img)
    
    return 0

if __name__ == '__main__':
    res = main()
    exit(res)


Selenium で User Agent を変更する方法

2022-09-23 19:53:46 | python
Selenium で User Agent を変更するには、set_preference() で
general.useragent.override に User Agent を指定します。
■プログラム
import time
from selenium import webdriver
from selenium.webdriver.firefox.options import Options

opts = Options()
opts.headless = True
opts.set_preference('general.useragent.override', 'test-user-agent')
driver = webdriver.Firefox(options=opts)

url = 'http://localhost/?ua_test'
driver.get(url)
time.sleep(3)
driver.close()

■web サーバのログ
127.0.0.1 - - [23/Sep/2022:03:49:58 -0700] "GET /?ua_test HTTP/1.1" 200 141 "-" "test-user-agent"


python で selenium を使ってクロール

2022-09-16 23:19:53 | python
python で selenium でウェブページをクロールする方法のメモ。
selenium でブラウザを使ってクロールすると、javascript も実行してくれます。

■firefox のインスト―ル
sudo yum install firefox


■gecodriver のインストール
https://github.com/mozilla/geckodriver/releases/tag/v0.31.0 から gecodriver をダウンロードします。
gtar zxvf geckodriver-v0.31.0-linux64.tar.gz
sudo cp geckodriver /usr/bin


■プログラム
import time
from selenium import webdriver
from selenium.webdriver.firefox.options import Options

opts = Options()
opts.headless = True
driver = webdriver.Firefox(options=opts)

urls = [
    'https://www.goo.ne.jp/',
    'https://news.goo.ne.jp/',
    'https://search.goo.ne.jp/',
]

for url in urls:
    print(url)
    driver.get(url)
    time.sleep(3)
    html = driver.page_source
    print(html)

driver.close()


Python で MySQL の blob にデータを登録

2022-09-12 23:51:03 | python
Python で MySQL の blob にデータを登録する方法のメモ。
■登録
import sys
import requests
import MySQLdb

def main():
    db = MySQLdb.connect(
        host='localhost',
        user='***',
        passwd='***',
        db='***'
    )

    url = 'https://www.goo.ne.jp'
    resp = requests.get(url)

    sql = f"insert into test_blob1 set url = %(url)s, body = %(body)s"
    cursor = db.cursor()
    cursor.execute(sql, {'url': url, 'body': resp.content})
    db.commit()
    cursor.close()

    db.close()

    return 0

if __name__ == '__main__':
    res = main()
    exit(res)

■検索
import sys
import requests
import MySQLdb

def main():
    db = MySQLdb.connect(
        host='localhost',
        user='***',
        passwd='***',
        db='***'
    )

    url = 'https://www.goo.ne.jp'
    sql = f"select * from test_blob1"
    cursor = db.cursor()
    cursor.execute(sql)
    rows = cursor.fetchall()
    for row in rows:
        print(f"url: {row[0]}")
        print(f"body: {row[1].decode('utf-8')}")
    cursor.close()
    db.close()
    return 0

if __name__ == '__main__':
    res = main()
    exit(res)

■実行結果
url: https://www.goo.ne.jp
body: <!DOCTYPE HTML>

<html lang="ja">
<head>
<meta charset="utf-8">
<meta name="referrer" content="unsafe-url">
<!--[if !IE]><meta http-equiv="X-UA-Compatible" content="IE=edge"><![endif]-->
...


python での例外発生時の except と finally の実行順序

2022-09-09 12:29:20 | python
python で例外が発生した場合の except と finally の実行順序を調べてみました。
例外発生時は except を実行後に finally を実行し、except 内の raise によろ呼び出し元で例外が補足されます。
以下のプログラムで検証を行いました。

■プログラム
def func1():
    try:
        print("func1: start")
        func2()
    except Exception as e:
        print("func1: except")
        raise
    finally:
        print("func1: finally")

    print("func1: end")


def func2():
    try:
        print("func2: start")
        func3()
    except Exception as e:
        print("func2: except")
        raise
    finally:
        print("func2: finally")

    print("func2: end")

def func3():
    try:
        print("func3: start")
        raise
    except Exception as e:
        print("func3: except")
        raise
    finally:
        print("func3: finally")

    print("func3: end")

try:
    func1()
except Exception as e:
    pass

■実行結果
func1: start
func2: start
func3: start
func3: except
func3: finally
func2: except
func2: finally
func1: except
func1: finally


python で xlsx ファイルから tsv ファイルを生成

2022-08-07 17:13:21 | python
python で xlsx ファイルから tsv ファイルを生成する方法のメモ。
pandas の to_csv() で sep='\t' でセパレータにタブを指定することで、xlsx ファイルを tsv に変換することができます。
import sys
import pandas as pd

xlsx_file = 'test1.xlsx'
df = pd.read_excel(xlsx_file, sheet_name=0)
df.to_csv(sys.stdout, header=True, index=False, encoding='utf-8', sep='\t')


python で実行中のメソッド名を取得する方法

2022-08-01 23:45:53 | python
python で実行中のメソッド名を取得する方法のメモ。
実行中のメソッド名は inspect.currentframe().f_code.co_name で取得できます。

■プログラム
import inspect

def method1():
    print(inspect.currentframe().f_code.co_name)
    return

def method2():
    print(inspect.currentframe().f_code.co_name)
    return

def main():
    method1()
    method2()
    return 0

if __name__ == '__main__':
    res = main()
    exit(res)

■実行結果
method1
method2


tsv ファイルから excel ファイルを生成

2022-07-30 00:03:23 | python
tsv ファイルから excel ファイルを生成する方法のメモ。

pandas の to_excel() で .xlsx ファイルを生成することができます。
header = False でヘッダを無効化し、index = False で行番号を無効かしています。
import sys
import pandas as pd

xlsx_file = sys.argv[1]
df = pd.read_csv(sys.stdin, sep='\t', header=None)
df.to_excel(xlsx_file, header=False, index=False)


unittest での Flask のテスト

2022-07-29 21:21:13 | python
unittest で Flask の request を含むプログラムを unittest でテストする方法のメモ。
プログラムの構成は以下の通りです。
・main.py: Flask のアプリケーション
・app_controller.py: リクエスト処理の本体
・test_app_controller.py: app_controller.py のテストプログラム

test_app_controller.py が unittest を用いた app_controller.py のテストプログラムとなっています。

■main.py
Flask アプリのメインで、リクエストは AppController が処理します。
from flask import Flask, request
from app_controller import AppController

app = Flask(__name__)
gctrl = AppController()

@app.route('/')
def api_sample():
    res_obj, status = gctrl.process_request()
    return res_obj, status

if __name__ == '__main__':
    app.run('0.0.0.0', port=8080)


■app_controller.py
リクエスト処理の本体。
リクエストパラメータの str1 と str2 を連結した文字列をレスポンスのオブジェクトに入れて返却します。
from flask import request

class AppController:
    def create_response(self, str1, str2):
        resp_obj = {
            'message': f"{str1}_{str2}",
        }
        return resp_obj

    def process_request(self):
        str1 = request.args.get('str1', '')
        str2 = request.args.get('str2', '')
        resp_obj = self.create_response(str1, str2)
        status = 200
        return resp_obj, status


■Flask アプリを起動
$ python main.py
...
 * Running on http://127.0.0.1:8080
 * Running on http://192.168.8.129:8080 (Press CTRL+C to quit)


■curl でレスポンスを確認
$ curl 'http://localhost:8080/?str1=abc&str2=def'
{"message":"abc_def"}


■unittest のプログラム(test_app_controller.py)
process_request() は request を利用しているため、app = Flask() で Flask を起動し、
app.test_request_context() でテスト用のリクエストの設定を行います。
import unittest
from flask import Flask, request
from app_controller import AppController

class TestAppController(unittest.TestCase):
    def test_create_response(self):
	ctrl = AppController()
        resp_obj = ctrl.create_response('abc', 'def')
        self.assertEqual(resp_obj['message'], 'abc_def')

    def test_process_request(self):
        with app.test_request_context('/?str1=abc&str2=def') as req:
            ctrl = AppController()
            resp_obj, status = ctrl.process_request()
            self.assertEqual(resp_obj['message'], 'abc_def')
            self.assertEqual(status, 200)

if __name__ == '__main__':
    app = Flask(__name__)
    unittest.main()


■unittest の実行
$ python test_app_controller.py
..
----------------------------------------------------------------------
Ran 2 tests in 0.006s

OK


<img src="data:..."> での画像指定

2022-06-18 23:35:37 | python
<img src="data:..."> で画像を指定する方法のメモ。
python で <img src="data:..."> で画像を指定するプログラムを作成してみました。

■サーバ
import sys
import requests
import io
import base64
from PIL import Image
from flask import Flask, jsonify

app = Flask(__name__)

def image_base64(bytes):
    inst = io.BytesIO(bytes)
    img = Image.open(inst).convert('RGB')
    inst.close()

    outst = io.BytesIO()
    img.save(outst, format='PNG')
    img_data = outst.getvalue()
    outst.close()

    img_base64 = base64.b64encode(img_data).decode('utf-8')

    return img_base64

@app.route('/')
def view_html():
    img_url = 'https://www.xgoo.jp/top2018/public/img/img_socialmark.png'
    res = requests.get(img_url)

    img_base64 = image_base64(res.content)

    html = f'''
<html>
<head>
<meta http-equv="Content-Type" content="text/html; charset=utf-8">
</head>
<body>
<img src="data:image/png;base64,{img_base64}">
</body>
</html>
'''
    return html


if __name__ == '__main__':
    app.run(host='0.0.0.0', port=8000)


■html
上記のサーバに "http://localhost:8000/" でアクセスした際のレスポンスは以下のようになります。
<html>
<head>
<meta http-equv=&quote;Content-Type&quote; content=&quote;text/html; charset=utf-8&quote;>
</head>
<body>
<img src="data:image/png;base64,...">
</body>
</html>