


FreeBSD 11にて、Apache + SSL(Let's Encrypt) + HTTP/2を動かす。
概要
FreeBSD 11にApacheをいれ、SSL証明書を取得し、HTTP/2の設定をした時の記録です。流れは、以下の通りです。
- Apache 2.4のインストールと設定
- SSL証明書(Let's Encrypt)の取得と設定
- HTTP/2の設定
OSなど前提条件は以下の通りです。
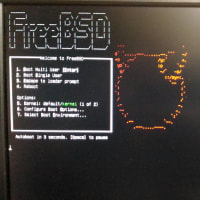
- OS: FreeBSD 11.0-RELEASE
- フォーマット: ZFS (RAID1 ミラーリング)
- (1)ドメインを取得済みであること(ここでは、hoge%hoge.mydns.jpというドメインを例に使用します)
- (2)ルータにて、グローバルIPが取得できること(動的割り当てでOK)。
- (3)ルータからFreeBSD機まで、80/443ポートの静的NAT設定ができていること。
- (4)DNSに、IPアドレスが取得したドメインに登録されていること。
簡単にセットアップしたいため、pkgを利用してインストールします。
Apache 2.4のインストールと設定
Apache 2.4のインストール
pkgを利用して、Apacheをインストールします。基本的にスーパーユーザで「pkg install apache24」と入力するだけです。以下、入力した部分は太字にしています。
% su
Password: XXX(実際には非表示です)
# pkg update
# pkg upgrade
# pkg install apache24
Updating FreeBSD repository catalogue...
FreeBSD repository is up-to-date.
All repositories are up-to-date.
The following 10 package(s) will be affected (of 0 checked):

New packages to be INSTALLED:
        apache24: 2.4.25_1
        libxml2: 2.9.4
        expat: 2.2.0_1
        apr: 1.5.2.1.5.4_2
        gdbm: 1.12
        indexinfo: 0.2.6
        gettext-runtime: 0.19.8.1_1
        db5: 5.3.28_6
        perl5: 5.24.1.r4_1
        pcre: 8.39_1

Number of packages to be installed: 10

The process will require 139 MiB more space.
33 MiB to be downloaded.

Proceed with this action? [y/N]: y
Fetching apache24-2.4.25_1.txz: 100%    5 MiB 546.6kB/s    00:09
Fetching libxml2-2.9.4.txz: 100%  803 KiB 411.0kB/s    00:02

(途中略)

[9/10] Extracting pcre-8.39_1: 100%
[10/10] Installing apache24-2.4.25_1...
===> Creating groups.
Using existing group 'www'.
===> Creating users
Using existing user 'www'.
[10/10] Extracting apache24-2.4.25_1: 100%
Message from perl5-5.24.1.r4_1:
The /usr/bin/perl symlink has been removed starting with Perl 5.20.
For shebangs, you should either use:

#!/usr/local/bin/perl

or

#!/usr/bin/env perl

The first one will only work if you have a /usr/local/bin/perl,
the second will work as long as perl is in PATH.
Message from apache24-2.4.25_1:
To run apache www server from startup, add apache24_enable="yes"
in your /etc/rc.conf. Extra options can be found in startup script.

Your hostname must be resolvable using at least 1 mechanism in
/etc/nsswitch.conf typically DNS or /etc/hosts or apache might
have issues starting depending on the modules you are using.

!!!!!!!!!!!!!!!!!!!!!!!!!!!!!!!!!!!!!!!!!!!!!!!!!!!!!!!!!!!!!!!!!

- apache24 default build changed from static MPM to modular MPM
- more modules are now enabled per default in the port
- icons and error pages moved from WWWDIR to DATADIR

   If build with modular MPM and no MPM is activated in
   httpd.conf, then mpm_pre style="line-height: 70%;"fork will be activated as default
   MPM in etc/apache24/modules.d to keep compatibility with
   existing php/perl/python modules!

Please compare the existing httpd.conf with httpd.conf.sample
and merge missing modules/instructions into httpd.conf!

!!!!!!!!!!!!!!!!!!!!!!!!!!!!!!!!!!!!!!!!!!!!!!!!!!!!!!!!!!!!!!!!!
以上で、インストールは終了です。FreeBSDにスタートアップ(rc.conf)に登録します。
# vi /etc/rc.conf

以下のコマンドを追記する。
apache24_enable="yes"
試しに起動してみます。下記の通り、警告が出ますが「Starting apache24.」と表示され、起動することは確認できます。
# /usr/local/etc/rc.d/apache24 start
Performing sanity check on apache24 configuration:
AH00557: httpd: apr_sockaddr_info_get() failed for www2
AH00558: httpd: Could not reliably determine the server's fully qualified domain name, using 127.0.0.1. Set the 'ServerName' directive globally to suppre style="line-height: 70%;"ss this message
Syntax OK
Starting apache24.
AH00557: httpd: apr_sockaddr_info_get() failed for www2
AH00558: httpd: Could not reliably determine the server's fully qualified domain name, using 127.0.0.1. Set the 'ServerName' directive globally to suppre style="line-height: 70%;"ss this message
Apache 2.4の設定
Apache 2.4に対して、取得しているドメイン名を設定します。
# vi /usr/local/etc/apache24/httpd.conf

ServerNameの部を書き換える。
#ServerName www.example.com:80
ServerName hoge%hoge.mydns.jp:80
HOSTS設定の127.0.0.1に、取得しているドメイン名を追加します。
# vi /etc/hosts

以下のように追記する。
::1                     localhost localhost.my.domain
127.0.0.1               localhost localhost.my.domain hoge%hoge.mydns.jp
Apacheを再起動して、先ほどの警告が消えることを確認します。
# /usr/local/etc/rc.d/apache24 restart
Performing sanity check on apache24 configuration:
Syntax OK
Stopping apache24.
Waiting for PIDS: 736.
Performing sanity check on apache24 configuration:
Syntax OK
Starting apache24.
以上の状態でブラウザからFreeBSD機に接続し、テスト用のページが見えるか確認します。ブラウザにてFreeBSD機のIPアドレスを入力し「It works!」と表示されれば成功です。

Apache 2.4の設定+α
FreeBSDでは、Apacheの性能を向上させる機能があるようなので、それを有効にします。
loader.confには、カーネルモジュールの「accf_http.ko」と「accf_data.ko」を有効にする設定を追加します。 これらのコマンドは、FreeBSD起動時に読み込まれます(すぐに有効にしたい場合は、kldloadコマンドを使います)。
# /boot/loader.conf

以下のコマンドを追記する。
accf_data_load="YES"
accf_http_load="YES"
有効になっているカーネルモジュールは、kldstatコマンドで確認できます。
# kldstat
Id Refs Address            Size     Name
 1   14 0xffffffff80200000 1fa7c38  kernel
 2    1 0xffffffff821a9000 30aec0   zfs.ko
 3    2 0xffffffff824b4000 adc0     opensolaris.ko
 4    1 0xffffffff824bf000 1620     accf_data.ko
 5    1 0xffffffff824c1000 2710     accf_http.ko
rc.confには、Apacheでhttp_acceptを有効にするコマンドを追加します。
# vi /etc/rc.conf

以下のコマンドを追記する。
apache24_http_accept_enable="YES"
FreeBSD機を再起動すると、性能向上機能が有効になります(私はまだ体感できていません)。
ご参考
参考にした記事は以下の通りです。
- FreeBSD 10.0にApache 2.4をインストールする(pkg install使用) http://symfoware.blog68.fc2.com/blog-entry-1214.html
- FreeBSDではApacheの性能アップができる? https://www.space-i.jp/wp/?p=2307
SSL証明書(Let's Encrypt)の取得と設定
Let's Encryptの取得ツールのインストール
無料のドメイン証明書発行機関:Let's Encrypt(https://letsencrypt.jp/)を使って、SSL証明書を取得します。 証明書の取得には、certbotというツールが便利なので、certbotをインストールして使用するものとします。
certbotはPythonを使っているため、certbotをインストールすると、Python関連ファイルもインストールされます。
# pkg install py27-certbot
Updating FreeBSD repository catalogue...
FreeBSD repository is up-to-date.
All repositories are up-to-date.
The following 34 package(s) will be affected (of 0 checked):

New packages to be INSTALLED:
        py27-certbot: 0.9.3,1
        python27: 2.7.13_1
        libffi: 3.2.1
        readline: 6.3.8
        py27-setuptools27: 32.1.0
        py27-openssl: 16.0.0
        py27-six: 1.10.0
        py27-cryptography: 1.6
        py27-enum34: 1.1.6
        py27-cffi: 1.7.0
        py27-pycparser: 2.10
        py27-pyasn1: 0.1.9
        py27-idna: 2.0
        py27-ipaddress: 1.0.17
        py27-psutil: 5.0.1
        py27-mock: 1.3.0_1
        py27-pbr: 1.8.1
        py27-pip: 9.0.1
        py27-funcsigs: 1.0.2
        py27-pyrfc3339: 1.0
        py27-pytz: 2016.10,1
        py27-parsedatetime: 2.1
        py27-zope.interface: 4.1.3
        py27-configobj: 5.0.6_1
        py27-zope.component: 4.2.2
        py27-zope.event: 4.1.0
        py27-acme: 0.9.3,1
        py27-requests: 2.11.1
        py27-werkzeug: 0.11.15
        py27-dnspython: 1.15.0
        py27-ndg_httpsclient: 0.4.2
        py27-python2-pythondialog: 3.4.0
        python2: 2_3
        py27-configargparse: 0.11.0

Number of packages to be installed: 34

The process will require 110 MiB more space.
17 MiB to be downloaded.

Proceed with this action? [y/N]: y
Fetching py27-certbot-0.9.3,1.txz: 100%  292 KiB 299.1kB/s    00:01
Fetching python27-2.7.13_1.txz: 100%   10 MiB 678.6kB/s    00:16

(途中略)

[34/34] Installing py27-certbot-0.9.3,1...
[34/34] Extracting py27-certbot-0.9.3,1: 100%
Message from python27-2.7.13_1:
===========================================================================

Note that some standard Python modules are provided as separate ports
as they require additional dependencies. They are available as:

bsddb           databases/py-bsddb
gdbm            databases/py-gdbm
sqlite3         databases/py-sqlite3
tkinter         x11-toolkits/py-tkinter

===========================================================================
Message from py27-pip-9.0.1:
============================== !!!! WARNING !!!! ==========================

pip MUST ONLY be used:

 * With the --user flag, OR
 * To install or manage Python packages in virtual environments

Failure to follow this warning can and will result in an inconsistent
system-wide Python environment (LOCALBASE/lib/pythonX.Y/site-packages) and
cause errors.

Avoid using pip as root unless you know what you're doing.

============================== !!!! WARNING !!!! ==========================
Message from py27-funcsigs-1.0.2:
===>   NOTICE:

The py27-funcsigs port currently does not have a maintainer. As a result, it is
more likely to have unresolved issues, not be up-to-date, or even be removed in
the future. To volunteer to maintain this port, please create an issue at:

https://bugs.freebsd.org/bugzilla

More information about port maintainership is available at:

https://www.freebsd.org/doc/en/articles/contributing/ports-contributing.html#maintain-port
Message from py27-certbot-0.9.3,1:
===========================================================================

The Let's Encrypt Client is BETA SOFTWARE. It contains plenty of bugs and
rough edges, and should be tested thoroughly in staging environments before
use on production systems.

This port installs the "standalone" Python client only, which does not use and
is not the letsencrypt-auto bootstrap/wrapper script.

To obtain certificates, use the 'certonly' command as follows:

 # sudo certbot --server  certonly

Note: The client currently requires the ability to bind on TCP port 80. If
you have a server running on this port, it will need to be temporarily stopped
so that the standalone server can listen on that port to complete
authentication.

The letsencrypt plugins to support apache and nginx certificate installation
will be made available soon in the following ports:

 * Apache plugin: security/py-letsencrypt-apache
 * Nginx plugin: security/py-letsencrypt-nginx

===========================================================================
以上で、インストールは終わりです。
SSL証明書の取得(certbotの使用)
certbotは、SSL証明書の取得と更新を自動的に行うツールです。certbotを実行すると対話形式にSSL証明書の取得を行うことが出来ます。
今回のcertbotは、standaloneオプションで実行します。standaloneオプションは、certbotが一時的にhttpサーバを立ち上げることからApacheと競合します。 そのため、Apacheを停止してからceetbotを実行します。Apacheなどcertbotと競合する状態では、certbotが競合を検知するため、Apacheを停止してからコマンドを再実行して下さい。
# /usr/local/etc/rc.d/apache24 stop
Stopping apache24.

# certbot certonly --standalone -d hoge%hoge.mydns.jp -m XXX@YYY.ZZZ  (※)
Note: 上記のコマンドでは、「-m XXX@YYY.ZZZ」でメールアドレスを指定しています。このメールアドレスは、何かあったとき(証明書の有効期限が間近のときなど)に 連絡が来るメールアドレスです。このコマンドに含めない場合は、対話形式でメールアドレスを聞かれます。
Let's Encryptの契約条件に同意するか聞かれます。ここでは、「Agree」(同意する)を選択します。

図のように、一般的には手動でOpenSSLなどを用いて証明書発行手続きを行うところを、自動で処理が行われます。

- Congratulations! Your certificate and chain have been saved at /usr/local/etc/letsencrypt/live/XXX/fullchain.pem. Your cert will expire on XXXX-XX-XX. To obtain a new or tweaked version of the certificate in the future, simply run Certbot again. To non-interactively renew *all* of your certificates, run "certbot renew"
 - If you like Certbot, please consider supporting our work by:

   Donating to ISRG / Let's Encrypt:   https://letsencrypt.org/donate
   Donating to EFF:                    https://eff.org/donate-le

以上の様に、「Congratulations!~」と言う文章が表示されれば、SSL証明書の取得が成功しています。
しかし、有名なDDNSのドメインでは、以下のようなエラーメッセージが表示され、SSL証明書の取得に失敗します。
An unexpected error occurred:
There were too many requests of a given type :: Error creating new cert :: Too many certificates already issued for: mydns.jp
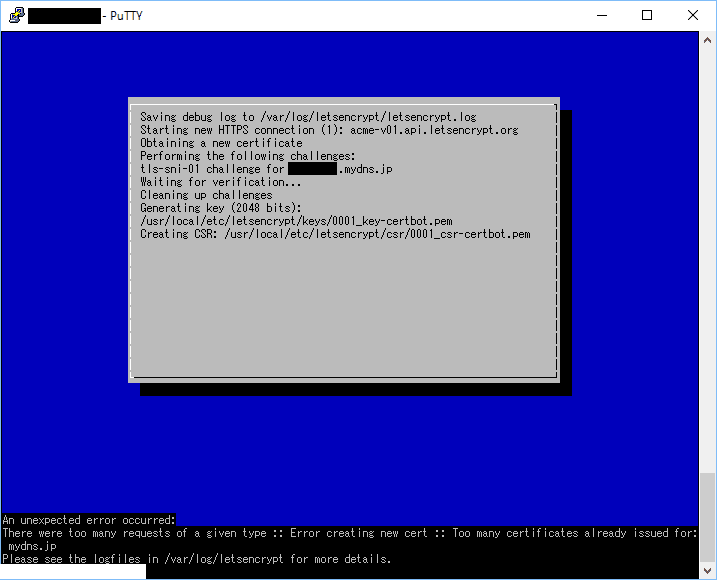
これは、Let's EncryptのSSL証明書発行上限(同一ドメイン(今回はmydns.jp)にて週に20個)に到達しているために、SSL証明書発行できない状態になっています。
私もこの状況に陥り、2週間空いた時間に証明書の取得を試み、hoge%hoge.mydns.jpのSSL証明書を取得することができました。
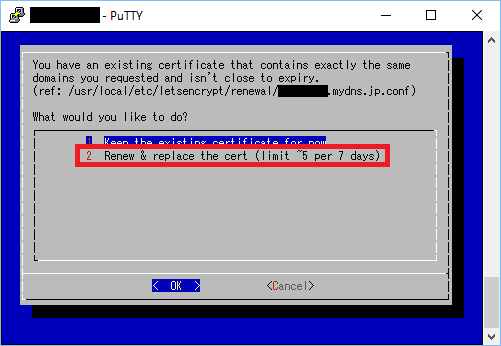
証明書の取得に失敗した場合は、(※)のコマンドを再度実行して下さい。途中、下記のように証明書を更新するかの問いかけがありますが、2のYESを選択します。
Note: 証明書がなかなか発行できない場合は、下記のコマンドにて正式ではない証明書を作成することができます(認証局証明が有効ではない証明書が発行されます)。 (この場合でも、後ほど(※)のコマンドを実行することで正式な証明書に置き換えることができます)
# certbot certonly --standalone -d hoge%hoge.mydns.jp -m XXX@YYY.ZZZ --test-cert
ApacheのSSL設定
ApacheにSSL証明書の設定を行います。始めに「httpd-ssl.conf」にて、SSLモジュールに対して設定を行います。
# cd /usr/local/etc/apache24/extra
# vi httpd-ssl.conf

SSLCertificateFileの行を、以下のように書き換える。
SSLCertificateFile "/usr/local/etc/letsencrypt/live/hoge%hoge.mydns.jp/fullchain.pem"

SSLCertificateKeyFileの行を、以下のように書き換える。
SSLCertificateKeyFile "/usr/local/etc/letsencrypt/live/hoge%hoge.mydns.jp/privkey.pem"

ServerNameの行を、以下のように書き換える。
#ServerName www.example.com:443
ServerName hoge%hoge.mydns.jp:443
※hoge%hoge.mydns.jpは、設定したドメイン名にて変わります。環境に合わせて適宜変更して下さい。
暗号の強度を上げるため、同じく「httpd-ssl.conf」に、以下の設定を追加・変更します(2017年1月現在)。 この設定では、古い暗号形式を禁止・OCSPStaplingを有効にしています。
暗号強度の設定は、サーバの用途によって適宜修正して下さい。また、日頃から 最新のセキュリティに関する情報を集めるようにして下さい。記載内容は、 私個人に用途に合わせて概ね問題ないような設定にしています(2017年5月加筆)。
#   SSL Cipher Suite:
#   List the ciphers that the client is permitted to negotiate,
#   and that httpd will negotiate as the client of a proxied server.
#   See the OpenSSL documentation for a complete list of ciphers, and
#   ensure these follow appropriate best practices for this deployment.
#   httpd 2.2.30, 2.4.13 and later force-disable aNULL, eNULL and EXP ciphers,
#   while OpenSSL disabled these by default in 0.9.8zf/1.0.0r/1.0.1m/1.0.2a.
SSLCipherSuite HIGH:MEDIUM:!LOW:!MD5:!RC4:!3DES:!IDEA
SSLProxyCipherSuite HIGH:MEDIUM:!LOW:!MD5:!RC4:!3DES:!IDEA


#   SSL Protocol support:
#   List the protocol versions which clients are allowed to connect with.
#   Disable SSLv3 by default (cf. RFC 7525 3.1.1).  TLSv1 (1.0) should be
#   disabled as quickly as practical.  By the end of 2016, only the TLSv1.2
#   protocol or later should remain in use.
SSLProtocol all -SSLv3 -SSLv2
SSLProxyProtocol all -SSLv3 -SSLv2

#   OCSP Stapling (requires OpenSSL 0.9.8h or later)
#
#   This feature is disabled by default and requires at least
#   the two directives SSLUseStapling and SSLStaplingCache.
#   Refer to the documentation on OCSP Stapling in the SSL/TLS
#   How-To for more information.
#
#   Enable stapling for all SSL-enabled servers:
SSLUseStapling On

#   Define a relatively small cache for OCSP Stapling using
#   the same mechanism that is used for the SSL session cache
#   above.  If stapling is used with more than a few certificates,
#   the size may need to be increased.  (AH01929 will be logged.)
SSLStaplingCache "shmcb:/var/run/ssl_stapling(32768)"

#   Seconds before valid OCSP responses are expired from the cache
SSLStaplingStandardCacheTimeout 3600

#   Seconds before invalid OCSP responses are expired from the cache
SSLStaplingErrorCacheTimeout 600


ファイル末尾に以下の1文を追加する。
Header set Strict-Transport-Security " max-age=315360000;"
Apacheに対しても、SSLのモジュールを読み込む設定を追加します。
# cd /usr/local/etc/apache24
# vi httpd.conf

以下は、コメントアウトされている場合は、コメントを外す。
LoadModule log_config_module libexec/apache24/mod_log_config.so
LoadModule setenvif_module libexec/apache24/mod_setenvif.so
LoadModule ssl_module libexec/apache24/mod_ssl.so
LoadModule socache_shmcb_module libexec/apache24/mod_socache_shmcb.so

LoadModuleの下に、以下の設定(SSL設定を読み込む)を追記する。
Include etc/apache24/extra/httpd-ssl.conf
上記の設定が完了したら、Apacheを再起動する。
# /usr/local/etc/rc.d/apache24 restart
Performing sanity check on apache24 configuration:
Syntax OK
Stopping apache24.
Waiting for PIDS: 1188.
Performing sanity check on apache24 configuration:
Syntax OK
Starting apache24.
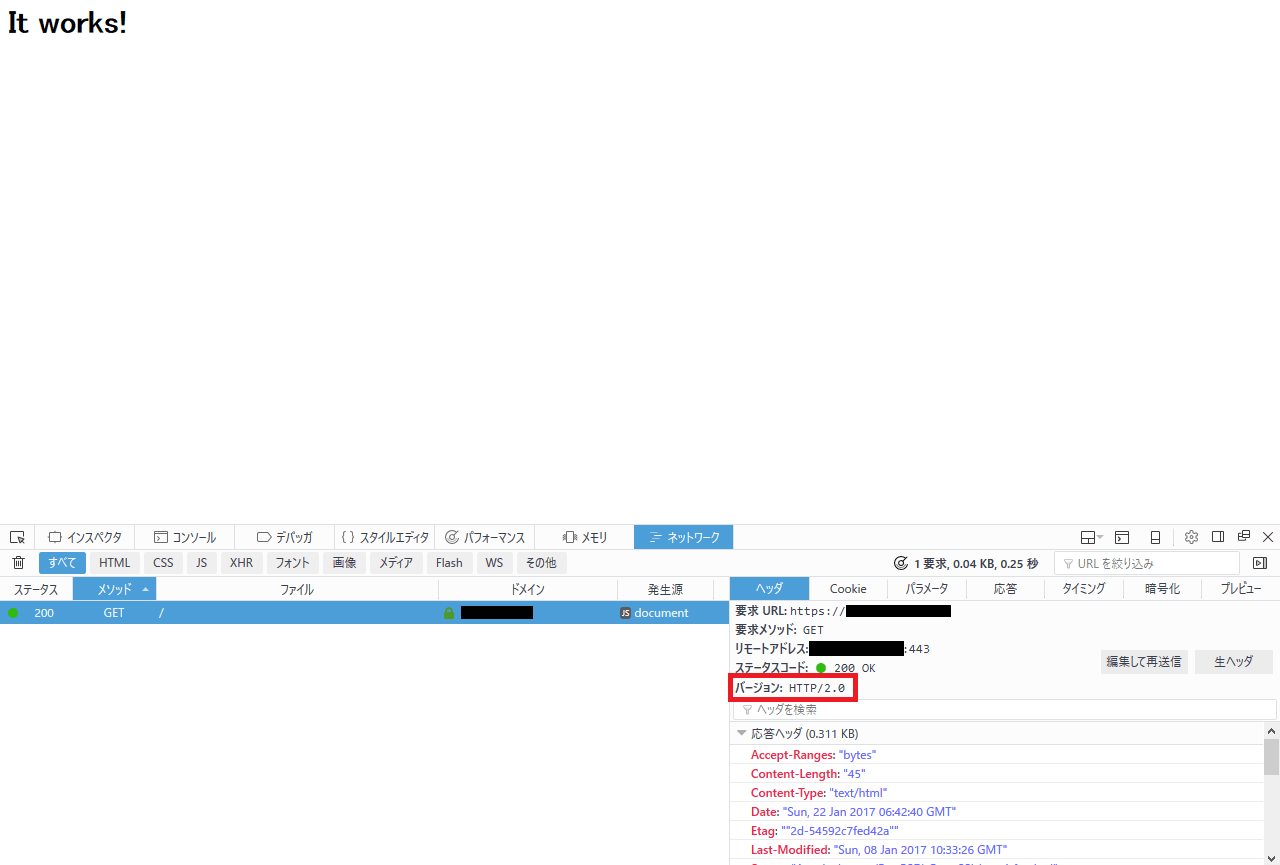
以上の状態でブラウザからFreeBSD機に接続し、テスト用のページが見えるか確認します。ブラウザにてFreeBSD機の httpsをつけてIPアドレスを入力(例:https://192.168.15.X)し「It works!」と表示されれば成功です。 途中、ドメイン名が一致しない旨のエラーが出ますが、例外として表示して下さい。
SSL証明書の更新設定
Let's Encryptの証明書は有効期間が90日となっています。ここでは、CronによってSSL証明書を更新することを考えます。
証明書の更新もcertbotにて行うことが出来ます。始めにSSL証明書の更新コマンドが動作するか「--dry-run」(動作確認)オプションを付加して確認します。
# certbot renew --webroot -w /usr/local/www/apache24/data/ --renew-by-default --dry-run
/usr/local/www/apache24/data/は、Apacheのドキュメントディレクトリを設定します。ドキュメントディレクトリを変更した場合は、 /usr/local/www/apache24/data/も修正する必要があります。

上記の様に「Congratulations, all renewals succeeded,」と表示されれば成功です。このコマンドを、Cronに設定します。
Let's Encryptの公式サイトでは、1日2回の更新確認が推奨されているため、cronでも2回更新確認を行います。
# crontab -e

以下のコマンドを追加します。
0 2,5 * * * /usr/local/bin/certbot renew --agree-tos --webroot -w /usr/local/www/apache24/data/ --renew-by-default && /usr/local/etc/rc.d/apache24 reload
※はじめ、Cronの時刻設定が「0 2/5 * * *」になっていましたが、コメントのご指摘通り誤りでした。正しくは「0 2,5 * * *」です。
ご参考
参考にした記事は以下の通りです。
- Let's Encryptが使えなかった件 http://blog.pcdiary.mydns.jp/pc/linux/post-451/
- Let's Encryptの証明書取得に成功 https://je1sgh.mydns.jp/je1sghblog/?p=6946
- Let's Encryptをcloudapp.azure.comで使おうとするときのハマりどころhttp://www.clear-code.com/blog/2016/6/16.html
http/2の設定
SSL証明書の設定が終わった後、http/2の設定を行います。http/2を簡単に言うと、ページの読み込みを高速化する技術です(http/2で動作するにはSSL通信が必須です)。
Apache用のhttp/2モジュール:mod_http2をインストールします。
# pkg install mod_http2-devel
Updating FreeBSD repository catalogue...
FreeBSD repository is up-to-date.
All repositories are up-to-date.
The following 2 package(s) will be affected (of 0 checked):

New packages to be INSTALLED:
        mod_http2-devel: 1.8.5
        libnghttp2: 1.18.0

Number of packages to be installed: 2

203 KiB to be downloaded.

Proceed with this action? [y/N]: y
Fetching mod_http2-devel-1.8.5.txz: 100%   99 KiB 101.3kB/s    00:01
Fetching libnghttp2-1.18.0.txz: 100%  104 KiB 106.4kB/s    00:01
Checking integrity... done (0 conflicting)
[1/2] Installing libnghttp2-1.18.0...
[1/2] Extracting libnghttp2-1.18.0: 100%
[2/2] Installing mod_http2-devel-1.8.5...
[2/2] Extracting mod_http2-devel-1.8.5: 100%
Message from mod_http2-devel-1.8.5:
If you want to have the h2 module enabled in your apache installation,
you need to add

   LoadModule http2_module modules/mod_h2.so

somewhere in your config files and add a line like

   H2Engine on

whereever you want the module to be active (general server of specific
virtual hosts).

NB: The shared libraries were renamed from mod_http2 to mod_h2 to
    avoid conflicts with the (now bundled) mod_http2 in www/apache24
http2_module(mod_h2.so)は、/usr/local/libexec/apache24/以下にインストールされます。
Apacheに対して、http2_moduleの読み込み設定を行います。
# vi /usr/local/etc/apache24/httpd.conf

以下、コメントアウトされていれば、コメントを外す。
LoadModule socache_shmcb_module libexec/apache24/mod_socache_shmcb.so

LoadModuleの最後尾に、http2_moduleのモジュール読み込みを追加する。
LoadModule http2_module libexec/apache24/mod_h2.so
SSL設定に対しても設定を行います。
# vi /usr/local/etc/apache24/extra/httpd-ssl.conf

<VirtualHost _default_:443>の下に、次のコマンドを追記する。
Protocols h2 http/1.1
以上の設定が終わったら、Apacheを再ロードします。
#/usr/local/etc/rc.d/apache24 reload
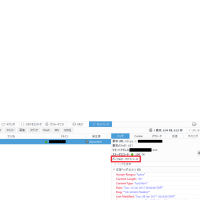
httpsでページを表示してhttp/2接続できているか確認します。FireFoxの場合は、メニューから「ツール─Web開発─開発ツールの表示」にあるネットワークタブで確認できます。

ご参考
参考にした記事は以下の通りです。
- Apache 2.4.17 + mod_http2 インストールメモ【HTTP/2】 https://blog.apar.jp/linux/3484/
以上で、Apache + SSL(Let's Encrypt) + HTTP/2の設定は終わりです。

ただ、1点気になるのは「SSL証明書の更新設定」のcronで、時刻が「2/5」になっていますけど、これだと「2時から23時までの間、5時間間隔で実行する」となって、1日5回実行してしまうのではないでしょうか?(2しか指定してないけど範囲の終わりに23時が入るのは、FreeBSDのcronのソースを見て確認しました。)
既にお気づきかもしれませんが、念のため。
コメント、ご指摘ありがとうございます。
cronの設定は、ご指摘通り誤りでした。本文も修正しました。
ありがとうございました。