goo blog サービス終了のお知らせ 

graphicdesign

xp-pen graphics drawing pen tablets

How to choose best drawing tablet for photoshop

2023-02-23 15:21:49 | 日記

drawing tablet


Creating art began with a pencil and paper for most artists. Paint and the paintbrush were introduced further down in the art journey. And with many crumpled-up canvases and unfinished ideas, many potential masterpieces fell by the wayside. Although nothing can replace traditional art material, drawing tablets for beginners are efficient pieces of technology to expand your ideas and store them digitally.


Drawing tablet are often called graphic tablets. They are unique devices that allow you to create digital hand-drawn images and edit photos. They use styluses that closely resemble the look and feel of pens. Using the stylus with the drawing tablet, you can create a wide variety of beautiful digital art and navigate photo editing software.


The tablet surface is connected to a computer, and the drawings are translated into digital form on the computer screen. Which are essential tools for artists, animators, and graphic designers, as they offer a more natural and intuitive way of creating digital art.


Stylus


best drawing tablet


No matter if have a screen or a non-screen tablet, it's also good to adjust the pressure sensitivity. The greatest advantage of a drawing tablet over a computer mouse is that the former is sensitive to pressure—it registers how hard you press the pen to the tablet. Just like with a pencil, you can push harder to draw thicker, darker lines, and lighter to draw thinner, lighter lines.


This refers to how closely the drawing tablet and pen can capture how hard you are pressing the pen. The best drawing tablet for Photoshop tend to have pressure sensitivity measured at around 8000 levels.


The pen tip and eraser, senses the amount of tilt between the tool and tablet. The standard values in which this function operates are ± 60 levels.


This is used to create natural-looking pen, brush, and eraser strokes in applications that support tilt-sensitivity.


Customizable Buttons


drawing pad for laptop


Some graphics tablets do not contain any customizable buttons, while others have a number of buttons and scrolling wheels on both the tablet and pen. I find these incredibly helpful in my day-to-day use of my editing pad for Photoshop.


Customizable buttons and dials add more control for each individual user to allow them to program their most used commands into them, allowing for a much more distraction-free experience when editing. The addition of buttons, jog dials, and wheels allow users to zoom, scroll, and swap tools quickly without having to go back to their keyboards, keeping their eyes on the task at hand.


Size


Size is more of a personal preference. Some people like smaller tablets because it’s more portable and space-saving for small working desks.


This refers to the area or surface you can actually draw, write, paint, or annotate on using a stylus. If the drawing tablet has a screen, this refers to the actual screen size (not the area surrounding the screen). If the drawing tablet doesn’t have a screen, the active area is the surface, which works with the stylus. Some tablets have buttons or controls surrounding the work surface.


Connectivity


To connect a drawing tablet to a PC, you will typically need a USB cable, and the appropriate driver software. The specific steps may vary depending on the brand and model of the tablet. Once the drivers are installed, and the tablet is connected, it should be recognized as a separate input device by the computer, and you can use it to draw or take notes in compatible software.


Screen


best drawing tablet for beginners


Seeing what you’re working on is vital when it comes to Photoshop. A good screen makes a huge difference, allowing you to get up close and personal with every aspect of your artwork. The display is one of the most important factors to consider when buying a tablet.


The screen size of your tablet will determine how much working area you have and the dimensions of the screen impact the overall size of the tablet. The size of the screen doesn’t affect the tablet’s capabilities but rather depends on your preference.


The screen resolution is measured in pixels and refers to how much detail is shown on the screen. The higher the resolution, the better the overall screen quality.


Conclusion


cheap drawing tablet


Choosing the right drawing tablet can be a daunting task, While there are some technical differences, most graphics tablets work in the same way. The drawing area of the tablet creates a magnetic field, and the pen draws on this to produce its own magnetic field, which is tracked by the sensors in the tablet.


A drawing tablet is an artist’s companion in the creative field. It is the perfect gadget for an artist’s ideation and doodling in a digitalized manner. Spending time bridling the creativity on a digitalized platform gives wings to imagination and ideas.


Photo editing tablets are one of the most valuable tools for your editing workflow. A drawing tablet is almost a second touchscreen for computer, making it possible to use a pen or stylus to input information onto a screen. Any creative task on a computer that requires pinpoint precision can benefit from a pen's tactile response. Drawing tablets can help presenters, artists, graphic designers, and Photoshop geeks.


Source:


https://www.xp-pen.com/forum-6310.html

XP-Pen Artist 12 (2nd Generation) Budget Pen Display Monitor Review

2022-02-22 10:54:14 | 日記


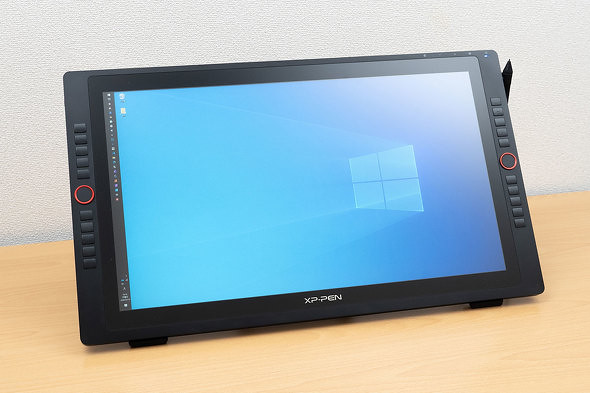
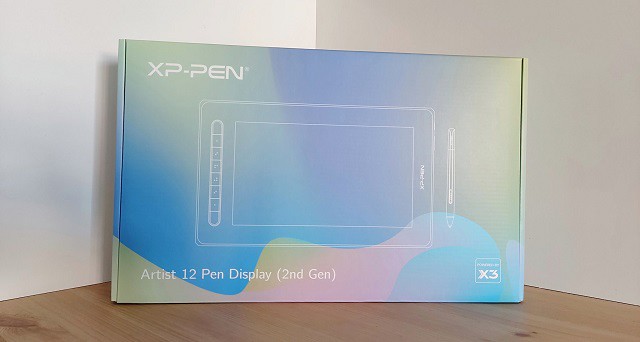
Remember the light pens that let you draw right on your screen? Take a look at XP-Pen's updated digitizing pad version - Artist 12 (2nd Generation).


Digitizing pads are wonderful things, but we're at our best when we can look at what we're drawing as we draw it. Looking down at your pad and then up at your monitor to see what the computer "saw" may be a great way to strengthen your neck muscles, but it's a tiring way to draw.


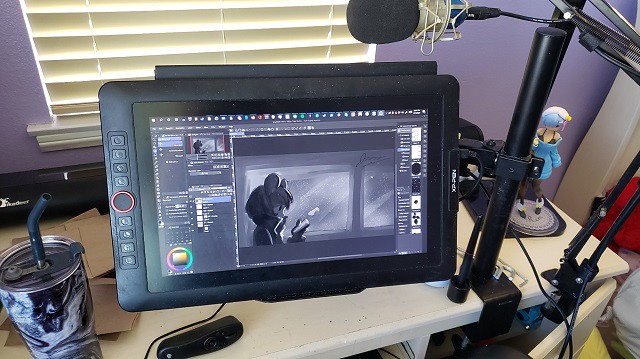
Designed to work in a multi-monitor environment or to be your only monitor, this tablet's display screen shows you what you're drawing as you draw it.


This is a huge upgrade for me. I have gone from the lower end XP-Pen tablets (Star, Deco...) to this. I am not a die-hard serious artist, but I do commissions from time to time and overall want to improve my work and the speed of my workflow.


My goal is to work on compiling coloring books at some point, so I really wanted to get serious without completely breaking the bank. I read each review on this product several times before finally making the decision to buckle down and buy this Artist 12 (2nd Generation) Pen display monitor .


Since XP-Pen is the only brand of tablet I have used and essentially the only brand that I trust, I had no concerns at least giving this tablet a try. And let me say, I am so very glad that I did!


Design


The XP-Pen Artist 12 (2nd Generation) combines the advantages of a high quality IPS LCD monitor with XP-Pen's patented, professional X3-Smart-chip pen technology to form the perfect interactive companion for your Mac or PC.


Thin and light, the new Artist 12 (2nd Generation) gives you the flexibility to work directly on screen as you would on paper.


Easily rotate your display when working flat on your desktop to find the right position for your hand, or for grater comfort, recline the Artist 12 (2nd Generation) on the desktop.


Ergonomically designed for maximum comfort, it's even light enough for use on your laptop.


Any way you choose to use it, the Artist 12 (2nd Generation) gives you a natural pen-on-paper feel in a digital environment.


The XP-Pen Artist 12 (2nd Generation) tablet is available in 4 beautiful colors: Black, blue, green, and pink.


There are four rubber feet on the tablet back to help it stay still on flat surfaces.


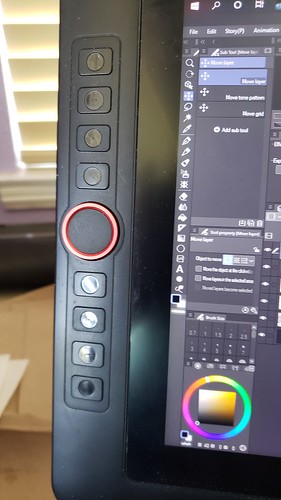
The bezel on the unit also sports 8 customizable keys. and the buttons are a productivity enhancing joy.


As well as being able to connect it to a Windows or Mac OS computer you can also use it with an Android device, like the Samsung Galaxy Smartphones.


Connection


The setup for the XP-Pen Artist 12 (2nd Generation) is technically simple. Plug in some cables, install the XP-Pen drivers which you can download from XP-Pen official site: https://www.xp-pen.com/product/1069.html , restart your machine, and you're good to go.


Admittedly, the set-up is a little daunting with all the cords that come with it.


The XP-Pen Artist 12 (2nd Generation) uses an all in one adapter that splits to 3 connectors for power, HDMI and USB.


The HDMI powers the display and the USB acts as an interface for the digitiser pen. The third cable ends in a jack, to which a cable to the power adapter connects.


you can also connect to any Mac or PC with a single USB-C cable (not included) to a USB-C port for both video and data.


I read over the instructions a couple of times before I started to ensure I had a good grasp on what I needed to do, and once I began plugging things in, it was a breeze.


Don't let the cords worry you too much. It is not pick-up-and-go portable, but not impossible to bring it with you on the go. Just set aside a little extra time for setting up everywhere you do go.


Driver Features and bundled drawing software


Like all XP-Pen tablets, the Artist 12 (2nd Generation) includes driver software that provides a variety of controls over the behavior of the tablet and individual pens.


This includes sensitivity adjustments for tip feel, and pressure sensitivity; button assignments for individual pens; and functions for the buttons on the tablet itself.


These settings can be made globally or assigned as custom settings for individual applications. This is useful, for example, when you want to set the button to scrub in Paint Tool SAI but zoom in Adobe Photoshop.


Like other XP-Pen Artists, the Artist 12 (2nd Generation) include a utility (built into the driver software) for calibrating the cursor with the position of the pen.


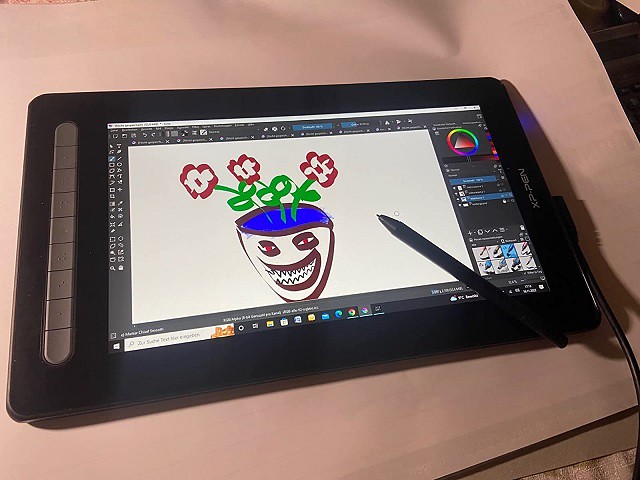
On the software side, it's also worth noting that the Artist 12 (2nd Generation) comes bundled with Artrage 6 , openCanvas, and Cartoon Animator 4 digital art software.


Color Accurate Screen


The Artist 12 (2nd Generation) sports a 11.6-inch IPS LCD display--a bit smaller than a Apple MacBook display. The screen has a resolution of FHD 1,920 x 1080 pixels and looks good at this size. so the images on screen appear sharp, crisp, and vibrant.


IPS display technology boasts bigger, better, and brighter colour contrast, visual and sound quality, and more robust viewing angles among other attributes than its predecessors (TN and VA monitors).


The viewing angle of this tablet is a whopping 178°, meaning that you are able to get the same crisp, colour saturated picture even when looking at the screen almost sideways.


The Artist 12 (2nd Generation) monitor have the capability of displaying a much wider range of colour of 94% Adobe RGB. What this all means in real world terms is the reproduction of much deeper more saturated, accurate and natural colours.


This enables better rendition of colour tones and better gradation in colour. For image processing and printing this is a key advantage and for photographers is critical to achieving the best possible results.


As a display designed specifically for visual artists, its quality is far superior to that of any notebook display I've seen. Colors, brightness, and contrast are even across the face of the screen. And the device calibrates up nicely using a colorimeter.


Above that, Artist 12 (2nd Generation) tablet has a laminated display, something that reduces parallax. This means there is no air gap between layers, thus there is no light refraction or light interference, making the screen clear and vibrant.


Many of the non-laminated display drawing tablets suffer from a common issue called parallax. In use there is a slight gap between the tip and the pen and the display when you draw, which allows for parallax error.


The tablet screen does not have a etched glass surface, but is covered with a matte film. As you'd expect from a matte screen protector, it does reduce glare considerably and it cuts down on fingerprints too.


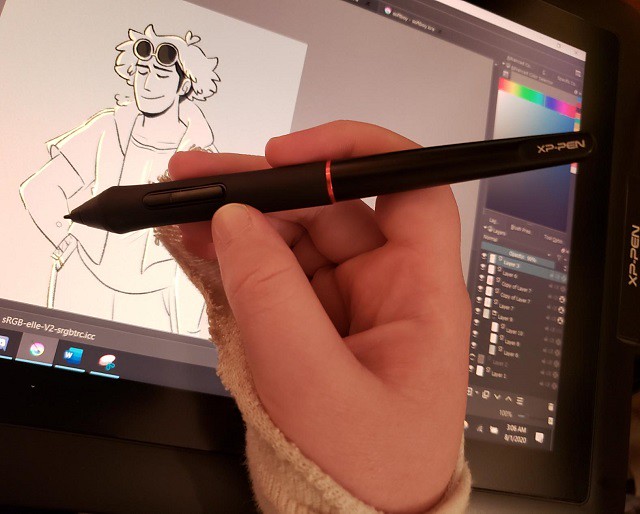
X3 smart chip powered Stylus


As for the pen which comes with the X3 smart chip. The initial activation force is lower than other XP-Pen stylus which is a huge plus.


X3 Elite Stylus requires as little as 3 gram-force and probably less which is about equal to simply resting the pen tip on the digitizer. It can even start writing and drawing without exerting force and only relying on the gravity of the pen itself.


As usual XP-PEN Stylus works without batteries and is lightweight, so there's no need to charge it at all.


It has 8,192 pressure sensitivity levels, placing it among the best styluses on the market.


Pressure sensitivity determines how much you can vary the width of the lines you paint. This is done by applying different pressure on the tablet surface.


When it comes to that. Pressure sensitivity helps you draw like you do with traditional media. Like pencils & brushes.


The 8192 levels of pen pressure sensitivity will provide you with ultimate precision and control with every art and illustration that you are doing.


This stylus also supports a tilt function of up to 60 degrees. It means that when you use the appropriate brushes in Photoshop, the line on the drawing file will change from what angle the pencil holds to the screen.


Using the XP-Pen Artist 12 (2nd Generation)


Couple this with a laptop or, say, a Mac mini, and you have yourself an excellent, compact, portable setup for visual arts. Or combine it with a higher-end workstation and additional displays, and it makes a great companion tool that can also be taken on the road when needed.


The XP-Pen Artist 12 (2nd Generation) is compatible with any drawing software, including Photoshop, Illustrator, Paint Tool SAI, Sketchbook, Clip Studio Paint, Gimp, Krita.... and etc. It works transparently and, it's completely plug-and-play.


The screen is the perfect size for the type of work that I do, so I have absolutely no complaints about that in the least. I was initially concerned that the size would be to small, but it is great!


However, if you are more serious about your art or currently seeking to become a professional, it probably wouldn't hurt if you got a larger size.


Others have commented that they were scared about the stylus not being able to go all the way to the edge of the screen, but I do not have this problem at all. I am able to easily click, write or draw at the very edges with no concerns.


The pen is great. It is not too large or bulky and when I am drawing, it feels just like I am using a pen on paper. The cursor goes exactly where I intend for it to go with no lag or jumping. I like that I do not feel disconnected from my picture as I did in the past with my previous screenless tablets.


I could not believe how comfortable and natural it felt, the fact you can make strokes directly on the screen and see the result right beneath provided greater control and comfort.


The buttons to the side are an excellent addition. I love being able to zoom in and out freely while I am working on my lineart or coloring. Eliminating the need to stop drawing, look for the magnifying glass to zoom in/out, then returning to drawing saves me a lot of time.


The tablet is only senstivity to the pen input. So I have no issues with where my hand lays on the XP-Pen Artist 12 (2nd Generation), as I can always see what I'm drawing without any problems.


The XP-Pen Artist 12 (2nd Generation) a joy to use for photographic and retouching work. Display your image on the main monitor, then use the Artist 12 (2nd Generation) and its HotKeys to touch up the details, while keeping an eye on what effect your changes are having on the overall image.


Conclusion


For the price of $250 USD this is a terrific device that I have used this every day since I got it. and It had really streamlined my work and gave everything a boost in quality because it is just natural to use a pen and draw right on the display.


Taking it on the road is not much of a hassle, and it truly allows me to be able to do the same type of work in the same way, and in the same amount of time, as I can from the comfort of my studio.


If you are looking for a portable pen display experience solution, or can't afford the larger units but still want a drawing monitor for your work, this is the ticket.


Overall, I would definitely recommend this product on the XP-Pen Artist line, despite a few minor concerns. If you are interested in designing anything, this is the way to go for way cheaper than its big brother the 21.5 inch model - XP-Pen Artist 22 (2nd Generation) .


For the professional designer the pay off period is very short and the question of whether to purchase is a no brainer. For the student it is a good investment for the future and will certainly prove its worth.


That is really everything that I can think of, but if anyone has a question I will be more than happy to do my best to answer it. I am sure I have forgotten something!


XP-Pen US official Store: https://www.storexppen.com/buy/artist-12-2nd.html


Do you use a graphic drawing tablet for pixel art?

2021-07-22 15:50:05 | 日記


Thanks to remakes and remasters of retro video games, pixel art has made a return to the spotlight. Although new video game graphics have reached a hyper-realistic level, it still can't beat the charm of pixel art. Which is why game developers and artists alike turn to pixel art tools to create throwback video games and artwork.


Pixel art is a discipline like any other, which means it takes time and practice to learn how to do it well. It helps to have a background in other visual arts, but it's not required, though it will then take longer to learn properly.


If you want to do pixel art professionally (as a freelance artist for example) you'll most likely need to learn about animation as well since most jobs will have you animate characters for a game.


It takes up the same concept as any other forms of art. For the most part, failures will be made and few successes to it, especially when someone is starting out. The great thing about pixel art is that you can use whatever style and size you desire!


Finally, even if you're very skilled, pixel art pieces can take a lot of time. Good pixel art is hard to make. It takes years of practice to get good. This is partly because pixel art is a very minutious discipline, but also because you'll end up redoing a lot of the same sprites over and over as revisions are needed due to the game changing.


It IS however very rewarding. Seeing your animated characters come to life in an interactive environment is very satisfying after you spend so much time and effort creating them!


Do you want to try your hand at creating pixel perfect artwork? Then these pixel art tools will help you get started.


Best pixel art software


art software that allows you to draw on a computer will be your best ally for making pixel art.


While there's great dedicated tools for making pixel art, you can use any drawing program to follow along.


Here's a list of software commonly used for pixel art:
Aseprite: Great professional editor with many time-saving features (paid).
GraphicsGale: A classic, used in many games. It's a little complex, but full of great features (free).
Piskel: Free online pixel art editor (free).
Photoshop: Powerful image editor not intended to make pixel art but you can set it up to use it (paid).
GIMP: comes with all the tools you'll need to make professional pixel art. best known as the “free alternative” to Photoshop (free).


my favorite software is Aseprite, but you should use whatever your're most comfortable with.


Aseprite is incredibly powerful, packed with features and yet simple to use. The main advantage of Aseprite is that you can export gifs (you can't in the free version of GG).


You can also get the free trial for Aseprite, but keep in mind it won't save your files, which I guess it's OK if you are just practicing.


You can use Photoshop or GIMP for pixel art, but in my opinion these are best relegated to very particular kinds of operations. Using a dedicated pixelart app for most of your pixelart stuff saves time setting up and avoids showing options that are ultimately pretty irrelevant to pixel art -- of which there are many. Some features -- like tile autocompletion -- are only found in pixel-art specific apps.


Best device for pixel art


Thanks to the computer, it is now possible to draw without limits and without having to spend hundreds of dollars in drawing materials consumed at a high pace.


There are many different ways to draw on a computer. While starting out with no specific hardware other than your laptop, investing in computer drawing pad tablet seems to be a must for those who want to improve their design process and draw more accurately and quickly than with a mouse.


A pen tablet is more ergonomic and better for your hand and wrist over long periods (trust me on this one). they have helped me in the past when I have RSI niggles.


It is much quicker navigating the screen when mapped “correctly” ( I think it is called corner to corner mapping) your hand starts to remover where certain button are on the screen and you can just move to them almost instantly. Selecting multiple things is also made much easier.


Big advantages to the tablet are, pressure sensitivity, it feels as if it were a pencil on paper, which is so lovely to work with.


A graphics tablet is worth it for pixel art, but I recommend also experimenting with non-pixel-art (eg CG or ink, with MyPaint, Krita, or Photoshop) -- tablets are very versatile, building up your skills in other areas will help your pixelart skills, and experimenting is VASTLY quicker with a tablet than basically anything else I've ever tried.


Shopping for a drawing tablet can be a bit overwhelming. The pricing is confusing, and important features like pressure sensitivity and latency aren't always easy to understand.


It can be intimidating to see all these expensive big screen displays by Wacom, or products by Apple. But You can get away with using a cheaper tablet when it comes to pixel art since you don't really need a super accurate pressure sensor!


The cheap drawing tablet will allow you to get a feel for digital art and begin building up your skill before you spend too much.


If you bought an iPad and decided you didn't like on-screen drawing, you'd be out a bit of money; likewise buying an expensive non-screen tablet and deciding you prefer on-screen.


A drawing tablet helps if you are already skilled/more comfortable with using a traditional pencil/paper and can be useful for drawing large scenes where you can do broad strokes.


personally I think it Depends on the size of art you're drawing. I prefer using a drawing pad for sizes 64x64px and above, otherwise a mouse works just fine for anything smaller than 64x64px. The mouse is definitely better for detail work, so use that to your advantage to clean up the sketchiness.


Advice on Graphics Tablet


Recommendations for drawing tablet? There are cheaper alternatives to wacom . Doesn't matter the brand, just check the reviews. I always recommend XP-Pen since I use their tablets daily and they never failed me. If you're looking for a premium drawing tablet at an affordable price, then the XP-PEN may be your best bet.


For starters get XP-Pen Deco or Star (see which size is best for you) - those are drawing tablets without screen, meaning you draw on them but look at your PC monitor, similar to a mouse but you have more control with drawing.


You can get a pretty cheap tablet, like a XP-Pen Star G640 for around $40 on Internet. It is pretty thing, but it works really well, and if you don't have a lot of money, it is a good start.


If you want drawing tablet with screen, meaning you draw direcly onto the screen, get XP-Pen Artist.


I have XP-Pen Artist 24 Pro which is a huge drawing tablet so when i draw high resolution pixel art or 2D animation or drawing in general I use my tablet. I find it works really well, especially for pulling lines.


The tablet has a screen with 2K resolution , battery-free stylus, 2 roller wheels and 20 hot keys, which I really like. The colors are good, and the pressure sensitivity is amazing. It is on the large side, but XP-Pen makes five different sizes of screen tablet, so if you're interested, you can think about which one works best for you, I have the 24 inch one, the others are 11 and 22 inches I believe.


Best of all, it is way less expensive than most screen tablets (Their older versions are a little cheaper, and of course the smaller one is quite a bit less and the larger quite a bit more).


I prefer to draw directly on the screen . I begin my sprites by drawing the lineart on a canvas about four times larger than the final sprite size. Then, after I shrink the lineart to the desired size and clean it up, I fill in the colors and shading.


I am used to digital drawing and painting, so when working with pixel art, it seems very "natural" for me. Of course, with this, it can get a bit messy, and you'll have to clean up your work. If you're working with Aseprite, there is an option to clean up your work a bit called "Pixel-perfect". I prefer just erasing pixels I'm not using.


Conclusion


You don't need anything fancy to make good pixel art, and you can do fine even with just a good mouse and free software.


If you're already used to a mouse then continue with it, a lot of artists use mice and there's no real draw back (I use a mouse myself).


Ultimately just use whatever you are most comfortable with and you should be fine.


The artist makes the art, not the tool. But your tool, as an artist is actually your body.


Design and Illustration with the XP-Pen Deco Fun Large Drawing Pad

2021-05-26 16:59:50 | 日記


For less than $50, XP-Pen proves you don't get what you pay for- sometimes you get a lot more.


For the graphic drawing tablet , I use a XP-Pen, they are fairly inexpensive and work pretty well for a beginner-medium level digital artists.


I'll link a few, and if you want I can tell you about the specific one I have which is the XP-Pen Deco Fun Large.


First impressions


With offices closed and remote working the way forward; a lot of us have set up offices at home. Desk space is at a premium, so the more compact the better.


With Their XP-Pen Deco Fun L, XP-Pen has managed to distil the responsive, pen and paper feel of their most expensive models to a drawing tray the size of an A4 piece of paper. Most of the tray is tactile drawing area, so no space is wasted. The result translates well on both a laptop screen, or a 4k monitor.


Add to that the pressure sensitive nib, and you have immediate control over your lines. The pen itself is responsive- giving immediate feedback in Photoshop, Kirita or even MyPaint.


As well as that, the pen does not need charging or batteries ( it's electromagnetic) so you just need to plug in the tablet itself and download the drivers.


Getting Started


USB cable is included in the box. One meter long, it will work with most set ups, though those with a computer under the desk, or further from their work station may need to buy a longer one.


Compatible with PC: Windows 7, 8.1 and 10, Mac: OS X 10.10, it should run on any home PC with a USB-A port. The majority of computers will install them immediately ( so long as they have an internet connection).


Download and install the latest driver from XP-Pen's site here ( https://www.xp-pen.com ). The provided software is easy to install and configuration of the tablet and pen and can easily be reached from the Control Panel. Reliability of the software and drivers was never a problem and always worked as desired. The tablet and pen are fully configurable and functional well with the newest version of Photoshop CC .


The Feel


The surface is smooth, with the same feel as paper, and the small surface means you can fill the screen quickly with just a flick of the wrist. The smooth feel does not last as long as we'd like. Repeated sketching and scribbling can lead to scuffs on the pad after only a few hours.


Those who like to press hard with their mark making or shade the same area over and over may find more wear. While these scuffs have little or no effect on the tablet's sensitivity, they impact how it feels to draw on and it can get a little scratchy in areas.


The pen is more resilient- and the nib should last around 2-3 years with repeated use. As the pack comes with ten replacement nibs, these should see you through the lifetime of the tablet. ( Unless you nibble or sit on it.)


The tablet can be used as a touchpad in place of a mouse. You can rotate, scroll, zoom, click on stuff, right click by tapping with two fingers.


Comparison


XP-Pen Deco mini 7 Tablet (Size: 7 x 4.37 inches working area ) - $50


The size is larger than Deco Mini7, though not necessarily better, alternative. As responsive as the XP-Pen Deco Fun L, and as just as prone to scuffing, the only real difference we noticed was the size.


For those who draw with wide brush strokes, this may suit them better. It isn't the perfect fit for everyone- as it dominates more desk space, and requires whole arm movements rather than wrist.


XP-Pen Deco Pro Medium Tablet (Size: 11 x 6 inch drawing area) - $99.99


At almost $99.99- nearly 2 times the price of the XP-Pen Deco Fun L, the Deco pro needs something special. 60 degrees of Tilt sensitive, 8192 pressure levels, it offers a different experience.


It has more friction than the XP-Pen Deco Fun L, thus more response and pressure sensitivity, but also wears your pen nibs faster.


In general, the XP-Pen Deco Fun L is the most economic all-rounder, and stands proud at the front of XP-Pen's product line.


Pros:


Smooth Surface (at least to begin with.)


Large surface for drawing. easy to fit on desk.


Good pen tracking and sensitivity.


Compatible with most computers and operating systems.


No charging or battery replacements needed.


Cons:


Surface gets scuffed easily with use.


USB cable may be too short for some.


Internet connection needed for drivers.


Conclusion


Overall this tablet is fun to use and works well.


It's nice to see XP-Pen continue creating great quality products.


With the new tablet the need for a mouse and keyboard is further reduced and I feel I gain further efficiencies in my Photoshop editing workflow by not having to reach for the keyboard as much and the mouse is never needed.


Available on XP-Pen online Official Store of all regions.


XP-Pen Deco Fun L Official Site : https://www.xp-pen.com/product/905.html


XP-Pen Artist 24 Pro Creative Drawing Screen 24nch Review: The Ultimate Tool for Graphic Designers

2021-05-12 20:25:40 | 日記


Are you looking for a Wacom Cintiq digital drawing pad review? You may have just gotten lucky, because Cintiq is no longer the only option on the market. The XP-Pen Artist 24 Pro is a budget alternative to the medium Cintiq, it's a tablet that lets you draw directly on the surface and can also be used as a third monitor. Read on to find out the nitty-gritty details about this intuitive tablet.


XP-PEN kindly sent me the Artist 24 Pro display tablet to make a review! This is my first display tablet of this size and it's huge. I've had to opportunity to use this tablet on-and-off over the course of the past several weeks, and while there were a few issues my overall impression is positive.


This tablet's interactive display is reminiscent of Wacom's Cintiq tablet at a fraction of the price. It works flawlessly in multiple graphics and editing programs. The impressive screen size leaves plenty of room for your most inventive ideas. Though a little bulkier than the competition, being able to draw directly on the screen makes it worth the weight trade-off.


If you want a cheaper alternative to a cintiq, the XP-Pen Graphic Drawing Tablet Monitor is a good investment. At a fourth of the cost of a comparable cintiq, this pen display monitor is a great choice for people short of cash.


Unboxing


Apart from the 24” display tablet itself, the package comes with the usual cabling peripherals, plus some bonus extras. If your machine supports a USB-C connection for display, you'll only need the one cable (plus the power connection). Otherwise, there's a HDMI and a USB-C to USB converter included as well.


The extras include: an additional stylus, a one-size-fits-all artist's glove, and a microfiber cloth.


The container for the stylus twists open to reveal 8 extra stylus nibs. Its cap can also be removed to use as a stylus holder.


Despite such weight, the adjustment stand is incredibly easy to use and I was changing the tablet's position a few times during the day for the first couple of weeks just because I liked the process.


Driver (Installation & General Use)


There were a few issues with installation, mostly tied to interactions between the driver, Windows 10 and Windows Ink.


Initially, brush strokes were offset from the stylus' point of contact with the screen by about 3-4 centimetres when attempting to draw in Photoshop CS6. Random straight strokes also occurred frequently. This same problem did not occur in MS Paint or Photoshop CC 2019. This was fixed by changing the UI scaling setting for the monitor in Windows settings from 125% (which was apparently the default) to 100%.


Initially, brush strokes had no pen pressure in Photoshop CC 2019. Photoshop CS6, on the other hand, did (but suffered from the previous offset problem). This was fixed by turning on the Windows Ink setting in the XP-Pen driver menu. So in other words: CC 2019 needs Windows Ink on to recognise pen pressure, while CS6 didn't, but was affected by UI scaling.


Interestingly, if Windows Task Manager was in focus and Windows Ink was not enabled in driver settings, stylus input was not recognised at all. There may be other programs that have this issue, but this was the only one I encountered so far.
I will say that I've had many problems with Wacom drivers interacting badly with Windows Ink and other things in the past before, so these types of issues are not exclusive to the XP-Pen drivers.


I'm currently using driver version 3.0.5, a beta build that has a lovely UI; it's clear and laid out well. I did also try version 1.6.4 initially, which was fine — the UI for that version was similar to the layout you find with Wacom drivers.


Apart from the issues during installation that required troubleshooting, I haven't had many major complaints with the driver in day-to-day use, I do think that there are a few areas for improvement, however.


The driver stops working correctly each time the computer is set to sleep and woken up again. To fix this the driver must be exited from the system tray and then relaunched.


There also doesn't seem to be a way to bind WIN+SHIFT+ARROW to any of the express keys. WIN+SHIFT+ARROW (left or right arrow) is the Windows shortcut to quickly move a focused window to another monitor, so it's something I use a lot if I'm on a multi-monitor setup. Unfortunately, attempting to set this shortcut in the express keys menu will simply move the actual driver window over to the other monitor while the custom input is not properly recognised in the text field.


The driver does offer a “switch monitor” option for the express keys that when clicked will transfer your stylus input to another monitor, which is extremely useful.


Screen


At 24” with a 2560x1440p QHD resolution, images are sharp and crisp even when viewed from a close range while drawing. Genuinely, it feels great to paint on based off this aspect alone.


The colour temperature is set to 6500K by default in the the driver settings. I think initially it felt just a touch too saturated, but overall I'm fairly happy with the colour display.


The monitor has touch-sensitive inputs on the top right corner: a -/+ for quickly adjusting the brightness, a menu for further settings, and power. I found myself using these to adjust the brightness throughout the day frequently. The power input requires a few seconds of continued contact from your finger to react, which prevents you from accidentally brushing it and turning the monitor on/off.


The monitor comes with a built-in stand. I found it easy to adjust to different viewing angles and also incredibly sturdy. I had no problems leaning on the monitor while drawing.


The monitor also comes with a pre-applied anti-glare screen protector. I wasn't bothered by it and it seems to be holding out well after several weeks of use. I think the screen itself definitely needs the additional anti-glare, as being a display tablet means that it's significantly more reflective than my main display.


I think that the screen protector also has some oil resistance thing, because even though I wasn't using the glove that comes with the tablet - it still remains quite clean. It also makes the drawing process very comfortable, providing a paper-like feel.


I highly recommend calibrating the tablet before use with the original software. It's very easy to do and makes the drawing process very easy and comfortable. When I received the tablet, I was afraid that it would have a big gap between stylus and display, as most tablets of this type do, but Artist 24 Pro is very precise and it's a great pleasure to draw with it!


Stylus


My first impression of the stylus was that it's lighter in comparison to the Wacom styluses that I'm used to — there is very little to no weighting on the back end of the stylus, which makes it feel noticeably different when gripped. To be honest, though, I forgot about it when I was actually painting. Still, I would prefer a bit more weighting because I do think it makes the stylus more comfortable to hold overall for long periods of time.


There's also no eraser nib, but I've personally never used those on Wacom tablets (I always use shortcuts to switch between brush and eraser instead) so this was a non-issue for me.


The two shortcut buttons on the side of the stylus sit quite flat to the surface, so I think they would be less likely to bother people who don't use them. I use them a lot, however, and found that they were still easy to click despite being quite flat.


The buttons seem to otherwise work completely fine for any other functions that don't require the stylus to send two simultaneous messages, so unless you're like me and like to bind “alt” to a stylus trigger, this won't affect you.


Pen Pressure & Activation Force


Most current-gen tablets flash a big number for the pen pressure levels as a selling point. Having used tablets with 512, 2k, 4k and 8k levels of pressure sensitivity, I'd say I noticed the biggest difference when switching from 512 to 2k, but in my opinion beyond 2k the change is minimal and has no real impact on the way I draw.


The XP-Pen Artist Pro 24 comes with 8192 levels of sensitivty, which is a very big number, but in practical application all I can say is that it works the way I expect it to and I don't have any complaints regarding the transition between pressure levels on the default linear pressure curve.


More importantly I did notice that the IAF (initial activation force) was not as low as I would have liked. Very light input is not recognised, or only partially recognised before dropping off and on again. In a practical sense this doesn't actually impact me through most of (perhaps 97%) of the painting process, but it did give me pause once in a while when I wanted to make a really light stroke and had to adjust my method.


The drivers for this tablet do come with a pressure curve you can adjust to your preferences, so this can help a little, although after some tests I preferred to leave mine on the default setting.


Digital Art Landscape Painting Step By Step Using Sketchbook With XP-Pen ARTIST 24 PRO By me


Summary of Drawing Experience


I think the mark of a good tool or piece of hardware is that it does not draw attention to itself during the course of its use. An ideal drawing experience allows me to be fully immersed in the act of drawing without having my focus shifted to dealing with the tool. With this in mind the XP-Pen Artist Pro performed very well for the most part, but was held back by a couple of issues.


Pros:


The monitor resolution honestly feels great to look at; the pixel density means that I can basically forget about pixels even with my face positioned closer to the screen.


The parallax between the tip of the stylus and the actual position of input was very minimal and basically not noticeable for me, especially after the simple calibration process offered by the driver.


At normal room temperature (say up to about mid-20's celsius) the monitor screen stays impressively cool to the touch and I was never bothered by resting my drawing hand on its surface even when painting for long sessions.


The 20 express keys and 2 roller rings are extremely helpful and I actually found myself using all of them, despite initially thinking that I'd only need half of them. The keys are also comfortable and responsive to click (which sounds like it should obviously be so, but having used some Intuos iterations in the past which had some very annoying-to-click express keys, I don't take this feature for granted anymore).


Cons:


The driver needs to be restarted everytime the computer wakes from sleep in order to work.


Higher IAF was noticeable when very light strokes were desirable. Also, the input will on rare occasions glitch by performing a completely straight max opacity + max brush size stroke. This seemed to happen primarily when I was trying to get light strokes to register.


The issue with eyedropping using “alt” mapped to a stylus trigger as detailed above. Quite unlucky for someone like me who has over a decade of muscle memory for this particular mapping.


Overall, as I said at the beginning, my impression of the tablet is positive. While I think it has room for improvement when it comes to driver performance and the initial activation force especially, it also has a lot to offer at a highly competitive price point ($900USD at retail), and it would've been amazing if something like this had been available to me back when I first started digital painting. As I do enjoy using it for the most part I'll probably continue to use it in future.