■ArduinoについているLEDを光らせる
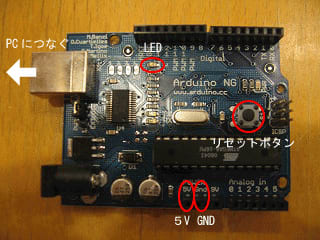
(↑Arduino)
まず、Arduinoを立ち上げ、
File→Sketchbook→Examples→led_blink を開きます。
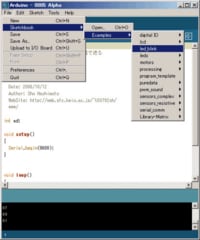
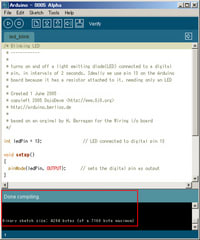
「Verify」ボタンを押し、コンパイルします。
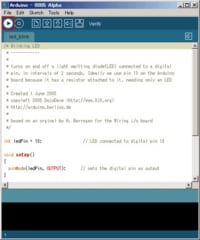
「Done Compiling」と表示されたらコンパイル成功です。
「Upload to I/O Board」ボタンを押し、
その後すばやくArduino基盤上の「リセットボタン」を押します。
(リセットボタンの位置は上の写真を参照)
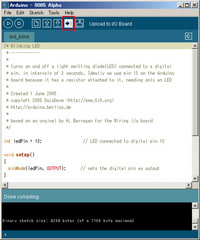
Arduino基盤にプログラムが書き込まれます。
成功すると「Done Uploading」と表示されます。
LEDが点滅します。
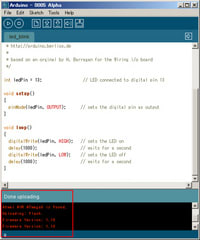
void loop()
{
digitalWrite(ledPin, HIGH); // sets the LED on
delay(1000); // waits for a second
digitalWrite(ledPin, LOW); // sets the LED off
delay(1000); // waits for a second
}
delay(1000)は「1秒待つ」という意味なので、
()内の数字を変えると点滅のタイミングを変えることが出来ます。
■LEDを交互に光らせる
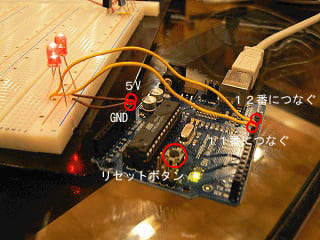
ブレッドボードとArduinoをつなぎます。
LEDを2個用意し、
LEDのプラスをそれぞれArduinoの11番と12番に、
LEDのマイナスをArduinoのGNDにつなぎます。
さっき使ったプログラムを次のように変えます。
(青くなっているところが変えたところです)
int ledPin1 = 11; // LED connected to digital pin 11
int ledPin2 = 12; // LED connected to digital pin 12
void setup()
{
pinMode(ledPin1, OUTPUT); // sets the digital pin as output
pinMode(ledPin2, OUTPUT); // sets the digital pin as output
}
void loop()
{
digitalWrite(ledPin1, LOW); // sets the LED on
digitalWrite(ledPin2, HIGH); // sets the LED off
delay(1000); // waits for a second
digitalWrite(ledPin1, HIGH); // sets the LED on
digitalWrite(ledPin2, LOW); // sets the LED off
delay(1000); // waits for a second
}
これを実行するとLEDが交互に点滅します。

(↑Arduino)
まず、Arduinoを立ち上げ、
File→Sketchbook→Examples→led_blink を開きます。

「Verify」ボタンを押し、コンパイルします。

「Done Compiling」と表示されたらコンパイル成功です。

「Upload to I/O Board」ボタンを押し、
その後すばやくArduino基盤上の「リセットボタン」を押します。
(リセットボタンの位置は上の写真を参照)

Arduino基盤にプログラムが書き込まれます。
成功すると「Done Uploading」と表示されます。
LEDが点滅します。

void loop()
{
digitalWrite(ledPin, HIGH); // sets the LED on
delay(1000); // waits for a second
digitalWrite(ledPin, LOW); // sets the LED off
delay(1000); // waits for a second
}
delay(1000)は「1秒待つ」という意味なので、
()内の数字を変えると点滅のタイミングを変えることが出来ます。
■LEDを交互に光らせる

ブレッドボードとArduinoをつなぎます。
LEDを2個用意し、
LEDのプラスをそれぞれArduinoの11番と12番に、
LEDのマイナスをArduinoのGNDにつなぎます。
さっき使ったプログラムを次のように変えます。
(青くなっているところが変えたところです)
int ledPin1 = 11; // LED connected to digital pin 11
int ledPin2 = 12; // LED connected to digital pin 12
void setup()
{
pinMode(ledPin1, OUTPUT); // sets the digital pin as output
pinMode(ledPin2, OUTPUT); // sets the digital pin as output
}
void loop()
{
digitalWrite(ledPin1, LOW); // sets the LED on
digitalWrite(ledPin2, HIGH); // sets the LED off
delay(1000); // waits for a second
digitalWrite(ledPin1, HIGH); // sets the LED on
digitalWrite(ledPin2, LOW); // sets the LED off
delay(1000); // waits for a second
}
これを実行するとLEDが交互に点滅します。


