


ご無沙汰しております。
Boot Campには、Apple純正キーボードやMacBookなどノート用キーボードを動作させるための、ドライバと常駐ソフトウェアが提供されています。しかし、最新のキーボードしかサポートされていないため、Mac Miniなどで古いUSBキーボードを流用する場合など、インストールができないというご指摘をいただきました。
そこで今回はApple Pro Keyboard(M7803)を例に、対応外のキーボードを使えるようにする方法をご紹介いたします。Wirelessを除くほかのApple純正キーボードや、完全互換のサードパーティ製キーボードも、同じ方法で動作可能と思われます。
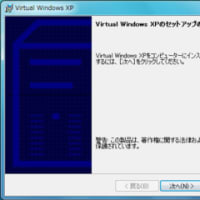
あらかじめ、「Boot Camp 1.1.2でWindows Vista製品版をセットアップするには(1)」で、ドライバソフトウェアを展開しておいてください。フリーウェアを利用するため、インターネットに接続できる環境も必要です。
それでは毎度のお約束ですが、いちおうお読みください。
【注 意!】これらの手順は、一部製品ではないベータ版で行われています。インストールされたWindows Vistaは私の環境での動作実績はありますが、必ずしも皆様の環境で同様に行えることを保証するものではありません。 Apple、Microsoft、各種ソフトウェア作者、ならびにパソコンよろずQ&A管理人のいずれも、この情報を元に実施した作業のいかなる 責任の一切を負わないことを、あらかじめご承知おきください。
■Apple Pro Keyboardの情報を調べる
Model NumberがM7803のキーボードをお使いの方は、紹介する手順通り行なっていただけますが、それ以外のキーボードでお試しになる方は、お使いのキーボードの情報をあらかじめ調べておく必要があります。
これで、Model NumberがM7803のApple Pro Keyboardは、PIDが「0206」で、「MI_」が「00」と「01」の2種類であることがわかりました。ちなみに、VIDはApple社の場合「05AC」で固定ですが、サードパーティ製のキーボードの場合はVIDが異なりますので注意してください。
■Apple Keyboard Suportソフトウェアを展開する
Apple Keyboard Supportソフトウェアのインストール時にキーボードチェックがかけられるため、そのままではファイルを抽出できません。そこで、インストールプログラムに内包されるファイルを展開するためのソフトウェアを利用します。
続けて次の記事「Boot Campのキーボードドライバがインストールできないときは(2)」にお進みください。
Boot Campには、Apple純正キーボードやMacBookなどノート用キーボードを動作させるための、ドライバと常駐ソフトウェアが提供されています。しかし、最新のキーボードしかサポートされていないため、Mac Miniなどで古いUSBキーボードを流用する場合など、インストールができないというご指摘をいただきました。
そこで今回はApple Pro Keyboard(M7803)を例に、対応外のキーボードを使えるようにする方法をご紹介いたします。Wirelessを除くほかのApple純正キーボードや、完全互換のサードパーティ製キーボードも、同じ方法で動作可能と思われます。
あらかじめ、「Boot Camp 1.1.2でWindows Vista製品版をセットアップするには(1)」で、ドライバソフトウェアを展開しておいてください。フリーウェアを利用するため、インターネットに接続できる環境も必要です。
それでは毎度のお約束ですが、いちおうお読みください。
【注 意!】これらの手順は、一部製品ではないベータ版で行われています。インストールされたWindows Vistaは私の環境での動作実績はありますが、必ずしも皆様の環境で同様に行えることを保証するものではありません。 Apple、Microsoft、各種ソフトウェア作者、ならびにパソコンよろずQ&A管理人のいずれも、この情報を元に実施した作業のいかなる 責任の一切を負わないことを、あらかじめご承知おきください。
■Apple Pro Keyboardの情報を調べる
Model NumberがM7803のキーボードをお使いの方は、紹介する手順通り行なっていただけますが、それ以外のキーボードでお試しになる方は、お使いのキーボードの情報をあらかじめ調べておく必要があります。
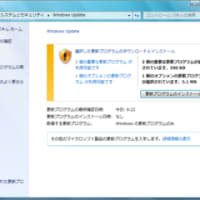
1 使用するApple Pro Keyboardを接続して正しく認識されたことを確認してから、左下のスタートボタンをクリックし、「コントロールパネル」をクリック

2 「コントロールパネル」の画面が表示されたら、「ハードウェアとサウンド」をクリック

3 「ハードウェアとサウンド」の画面が表示されたら、「デバイスマネージャ」をクリック

4 「ユーザーアカウント制御」の画面が表示されたら、「続行」ボタンをクリック

5 「デバイスマネージャ」の画面が表示されたら、メニューの「表示」-「デバイス(接続別)」をクリック

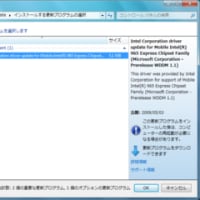
6 「ACPI x86ベースPC」-「Microsoft ACPI-Compliant System」-「PCIバス」の順に開き、配下に「USBルートハブ」-「汎用USBハブ」-「USB複合デバイス」-「USBヒューマンインターフェイスデバイス」-「HIDキーボードデバイス」を持つ「Intel(R) 82801G(ICH7 Family) USB Universal Host Controller」を開く
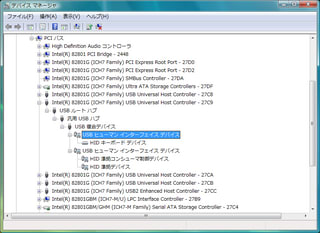
※「Intel(R) 82801G(ICH7 Family) USB Universal Host Controller」の名称は異なる場合があります。
7 1つめの「USBヒューマンインターフェイスデバイス」をダブルクリックして表示し、「詳細」タブをクリックして、「ハードウェアID」の「VID_」と「PID_」、「MI_」のそれぞれに続く値をメモしておく

※M7803では「USB¥VID_05AC&PID_0206&MI_00」と表示されているので、「VID_」が「05AC」、「PID_」が「0206」、「MI_」が「00」となります。
8 2つめの「USBヒューマンインターフェイスデバイス」をダブルクリックして表示し、「詳細」タブをクリックして、「ハードウェアID」の「PID_」の値が1つめと同じであることを確認し、「MI_」の値をメモしておく

※M7803では「USB¥VID_05AC&PID_0206&MI_01」と表示されているので、「MI_」が「01」となります。
2 「コントロールパネル」の画面が表示されたら、「ハードウェアとサウンド」をクリック
3 「ハードウェアとサウンド」の画面が表示されたら、「デバイスマネージャ」をクリック
4 「ユーザーアカウント制御」の画面が表示されたら、「続行」ボタンをクリック
5 「デバイスマネージャ」の画面が表示されたら、メニューの「表示」-「デバイス(接続別)」をクリック
6 「ACPI x86ベースPC」-「Microsoft ACPI-Compliant System」-「PCIバス」の順に開き、配下に「USBルートハブ」-「汎用USBハブ」-「USB複合デバイス」-「USBヒューマンインターフェイスデバイス」-「HIDキーボードデバイス」を持つ「Intel(R) 82801G(ICH7 Family) USB Universal Host Controller」を開く
※「Intel(R) 82801G(ICH7 Family) USB Universal Host Controller」の名称は異なる場合があります。
7 1つめの「USBヒューマンインターフェイスデバイス」をダブルクリックして表示し、「詳細」タブをクリックして、「ハードウェアID」の「VID_」と「PID_」、「MI_」のそれぞれに続く値をメモしておく
※M7803では「USB¥VID_05AC&PID_0206&MI_00」と表示されているので、「VID_」が「05AC」、「PID_」が「0206」、「MI_」が「00」となります。
8 2つめの「USBヒューマンインターフェイスデバイス」をダブルクリックして表示し、「詳細」タブをクリックして、「ハードウェアID」の「PID_」の値が1つめと同じであることを確認し、「MI_」の値をメモしておく
※M7803では「USB¥VID_05AC&PID_0206&MI_01」と表示されているので、「MI_」が「01」となります。
これで、Model NumberがM7803のApple Pro Keyboardは、PIDが「0206」で、「MI_」が「00」と「01」の2種類であることがわかりました。ちなみに、VIDはApple社の場合「05AC」で固定ですが、サードパーティ製のキーボードの場合はVIDが異なりますので注意してください。
■Apple Keyboard Suportソフトウェアを展開する
Apple Keyboard Supportソフトウェアのインストール時にキーボードチェックがかけられるため、そのままではファイルを抽出できません。そこで、インストールプログラムに内包されるファイルを展開するためのソフトウェアを利用します。
9 下記のURLにアクセスして、「UniExtract Installer」のリンクをクリック
・Universal Extractor(Jared Breland様 作、フリーウェア)
http://www.legroom.net/(トップページ)
http://www.legroom.net/modules.php?op=modload&name=Open_Source&file=index&page=software&app=uniextract(配布ページ)

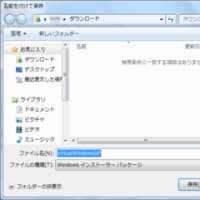
10 「ファイルのダウンロード」の画面が表示されたら、「保存」ボタンをクリック

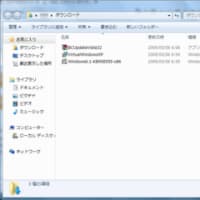
11 「名前を付けて保存」の画面が表示されたら、「保存」ボタンをクリック

※標準では、(ユーザー名)フォルダ内の「ダウンロード」フォルダに保存されます。
12 「ダウンロードの完了」の画面が表示されたら、「実行」ボタンをクリック

13 「セキュリティの警告」の画面が表示されたら、「実行する」ボタンをクリック

14 「ユーザーアカウント制御」の画面が表示されたら、「許可」をクリック

15 「Universal Extractorセットアップ」の画面が表示されたら、「次へ」ボタンをクリック

16 インストール先は特に変更せずに「次へ」ボタンをクリック

17 「Browse」ボタンをクリックして、Debug Fileの保存先をデスクトップ(表示上は「C:¥Users¥(ユーザー名)¥Desktop」)に変更し、「次へ」ボタンをクリック

18 「ファイルの右クリックメニューに統合する」のチェックをはずして、「次へ」ボタンをクリック

19 「インストール」ボタンをクリック

20 インストールが完了したら「完了」ボタンをクリック

21 左下のスタートボタンをクリックし、「すべてのプログラム」-「Universal Extractor」をクリックして、起動する

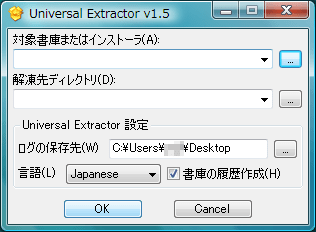
22 「対象書庫またはインストーラ」右横の「...」ボタンをクリックし、表示された画面で「(ユーザー名)」-「ドキュメント」-「program files」-「Macintosh Drivers for Windows XP 1.1.2」-「Apple Keyboard」を開き、「Setup」を選択して、「開く」ボタンをクリック

23 続けて「解凍先ディレクトリ」右横の「...」ボタンをクリックし、表示された画面で「デスクトップ」を選択して、「OK」ボタンをクリック

24 「OK」ボタンをクリック

25 「InstallShield Installer解凍」の画面が表示されたら、「isxunpack解凍」を選択して「OK」ボタンをクリック

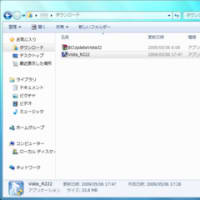
26 デスクトップに「Disk1」フォルダが展開されたことを確認する

27 再度左下のスタートボタンをクリックし、「すべてのプログラム」-「Universal Extractor」をクリックして、起動する
28 「対象書庫またはインストーラ」右横の「...」ボタンをクリックし、表示された画面で「デスクトップ」-「Disk1」を開き、「data1」(Cabinet File)を選択して、「開く」ボタンをクリック

29 「解凍先ディレクトリ」は変更せずに、そのまま「OK」ボタンをクリック

30 「data1」(Cabinet File)と同じ場所に「data1」フォルダが展開されたことを確認する

・Universal Extractor(Jared Breland様 作、フリーウェア)
http://www.legroom.net/(トップページ)
http://www.legroom.net/modules.php?op=modload&name=Open_Source&file=index&page=software&app=uniextract(配布ページ)
10 「ファイルのダウンロード」の画面が表示されたら、「保存」ボタンをクリック
11 「名前を付けて保存」の画面が表示されたら、「保存」ボタンをクリック
※標準では、(ユーザー名)フォルダ内の「ダウンロード」フォルダに保存されます。
12 「ダウンロードの完了」の画面が表示されたら、「実行」ボタンをクリック
13 「セキュリティの警告」の画面が表示されたら、「実行する」ボタンをクリック
14 「ユーザーアカウント制御」の画面が表示されたら、「許可」をクリック
15 「Universal Extractorセットアップ」の画面が表示されたら、「次へ」ボタンをクリック
16 インストール先は特に変更せずに「次へ」ボタンをクリック
17 「Browse」ボタンをクリックして、Debug Fileの保存先をデスクトップ(表示上は「C:¥Users¥(ユーザー名)¥Desktop」)に変更し、「次へ」ボタンをクリック
18 「ファイルの右クリックメニューに統合する」のチェックをはずして、「次へ」ボタンをクリック
19 「インストール」ボタンをクリック
20 インストールが完了したら「完了」ボタンをクリック
21 左下のスタートボタンをクリックし、「すべてのプログラム」-「Universal Extractor」をクリックして、起動する
22 「対象書庫またはインストーラ」右横の「...」ボタンをクリックし、表示された画面で「(ユーザー名)」-「ドキュメント」-「program files」-「Macintosh Drivers for Windows XP 1.1.2」-「Apple Keyboard」を開き、「Setup」を選択して、「開く」ボタンをクリック
23 続けて「解凍先ディレクトリ」右横の「...」ボタンをクリックし、表示された画面で「デスクトップ」を選択して、「OK」ボタンをクリック
24 「OK」ボタンをクリック
25 「InstallShield Installer解凍」の画面が表示されたら、「isxunpack解凍」を選択して「OK」ボタンをクリック
26 デスクトップに「Disk1」フォルダが展開されたことを確認する
27 再度左下のスタートボタンをクリックし、「すべてのプログラム」-「Universal Extractor」をクリックして、起動する
28 「対象書庫またはインストーラ」右横の「...」ボタンをクリックし、表示された画面で「デスクトップ」-「Disk1」を開き、「data1」(Cabinet File)を選択して、「開く」ボタンをクリック
29 「解凍先ディレクトリ」は変更せずに、そのまま「OK」ボタンをクリック
30 「data1」(Cabinet File)と同じ場所に「data1」フォルダが展開されたことを確認する
続けて次の記事「Boot Campのキーボードドライバがインストールできないときは(2)」にお進みください。


It surprised me to find that there are very few dead-simple guides to creating a bootable USB thumb/pen/flash drive for a Vista and/or Windows 7 installation. I cobbled together the following from VistaPCGuy and another source I don’t remember right now.
This will walk through the steps to create a bootable USB flash drive for the purpose of installing a Vista or Windows 7 OS. These instructions assume that you have a computer with Windows Vista installed on it.
Required:
USB Flash Drive (4GB+)
Microsoft OS Disk (Vista / Windows 7)
A computer running Vista / Windows 7
Step 1: Format the Drive
The steps here are to use the command line to format the disk properly using the diskpart utility. [Be warned: this will erase everything on your drive. Be careful.]
Plug in your USB Flash Drive
Open a command prompt as administrator (Right click on Start > All Programs > Accessories > Command Prompt and select “Run as administrator”
Find the drive number of your USB Drive by typing the following into the Command Prompt window:
diskpart
list disk
The number of your USB drive will listed. You’ll need this for the next step. I’ll assume that the USB flash drive is disk 1.
Format the drive by typing the next instructions into the same window. Replace the number “1” with the number of your disk below.
select disk 1
clean
create partition primary
select partition 1
active
format fs=NTFS
assign
exit
When that is done you’ll have a formatted USB flash drive ready to be made bootable.
Step 2: Make the Drive Bootable
Next we’ll use the bootsect utility named ISOLEADER (download here : http://netdisk.moy.su/softs/IsobootCreator3.rar ) to make the flash drive bootable. In the same command window that you were using in Step 1:
Insert your Windows Vista / 7 DVD into your drive.
Use isoleader to set the USB as a bootable NTFS drive prepared for a Vista/7 image. I’m assuming that your USB flash drive has been labeled disk G:\ by the computer:
You can now close the command prompt window, we’re done here.
Step 3: Copy the installation DVD to the USB drive
The easiest way is to use Windows explorer to copy all of the files on your DVD on to the formatted flash drive. After you’ve copied all of the files the disk you are ready to go.
Step 4: Set your BIOS to boot from USB
This is where you’re on your own since every computer is different. Most BIOS’s allow you to hit a key at boot and select a boot option.
I used these instructions to get my new Dell Mini 9 laptop loaded with Windows 7 (the PDC bits). HTH.