Google SketchUp Ruby APIについては、今まで多くのサイトで取り上げられ、チュートリアルのサイトもありますが、たまたま今回グーグルのサイトにGoogle SketchUp Ruby APIのページがあったのでちょっとのぞいてみました。
プログラマーでもSEでもなく、Rubyについての知識のまったくない私の出番はありませんが、どんなことができるのか、という興味に誘われかじってみました。
そのページのURLは、http://code.google.com/intl/ja/apis/sketchup/で、APIの参考資料のページ(英語)のURLは、http://code.google.com/intl/ja/apis/sketchup/docs/developers_guide/index.htmlとなっています。
Google MapsのAPIの場合は、私のような素人でも、グーグルが提供しているサンプルを見ると、だいたい見当をつけることができて、ある程度カスタマイズが容易にできます。でもRubyに関する知識が全くない私のような者にとって、Google SketchUp APIは正直言って「ちんぷんかんぷん」、といったところです。
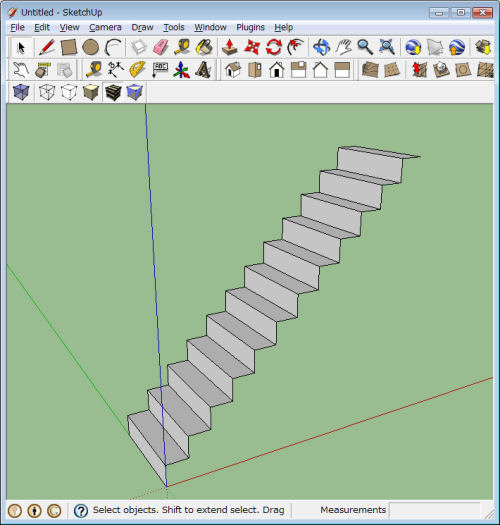
Google SketchUp Ruby APIのDeveloper's Guideのサイトにもサンプル(英語)があって、それを単純にコピーして拡張子「.rb」で保存し、SketchUpのPluginフォルダーに放り込めば、確かに動くことは確認できます。実行した結果は、グーグルのサイトにもありますが、以下の通り12段の単純な階段です。
このサンプル・コードの内容は以下の通りです。(グーグルのサイトよりコピーしたもの)
************************************************************************
require 'sketchup'
def draw_stairs
# variables to control the maximum step height and depth
max_step_height = 8
max_step_depth = 12
step_width = 36
p1 = Geom::Point3d.new(0, 0, 0)
p2 = Geom::Point3d.new(100, 0, 100)
h = (p2 - p1).z
puts "height = #{h}"
p3 = Geom::Point3d.new(p2.x, p2.y, p1.z)
v2 = p3 - p1
l = v2.length
puts "length = #{l}"
n1 = (h / max_step_height).to_i
puts "n1 = #{n1}"
n2 = (l / max_step_depth).to_i
puts "n2 = #{n2}"
numSteps = [n1, n2].max
puts "numSteps = #{numSteps}"
v1 = Geom::Vector3d.new 0, 0, (h/numSteps)
v2.length = l/numSteps
v3 = v1 * v2
v3.length = step_width
model = Sketchup.active_model
entities = model.entities
edges = []
model.start_operation "Stairs"
pt1 = p1
for i in 1..numSteps
# create the front of the step
pt2 = pt1 + v1
pt3 = pt2 + v3
pt4 = pt1 + v3
edges[0] = entities.add_line(pt1, pt2)
edges[1] = entities.add_line(pt2, pt3)
edges[2] = entities.add_line(pt3, pt4)
edges[3] = entities.add_line(pt4, pt1)
entities.add_face edges
# now make the top
pt1 = pt2
pt4 = pt3
pt2 = pt1 + v2
pt3 = pt4 + v2
edges[3] = edges[1]
edges[0] = entities.add_line(pt1, pt2)
edges[1] = entities.add_line(pt2, pt3)
edges[2] = entities.add_line(pt3, pt4)
entities.add_face edges
# move to the next step
pt1 = pt2
end
model.commit_operation
end # def draw_stairs
UI.menu("PlugIns").add_item("Draw stairs") { draw_stairs }
************************************************************************
さっぱりわかりません。まずは、Rubyの基本的な勉強から始める必要があるみたいです。
ということで、基本から勉強することにしました。と言っても今からRubyを一から勉強してもとても追いつけないので、グーグルのサイトで紹介されているサンプルを少しづつ修正しながら、実験しながら、まずは四角形ぐらい描けるようになりたいと思います。
次回から数回勉強したいと思います。
=======================================================================
記事一覧表==>>ここをクリックして下さい。
ビデオ・ギャラリー==>>こちらをクリックして下さい。
=======================================================================
プログラマーでもSEでもなく、Rubyについての知識のまったくない私の出番はありませんが、どんなことができるのか、という興味に誘われかじってみました。
そのページのURLは、http://code.google.com/intl/ja/apis/sketchup/で、APIの参考資料のページ(英語)のURLは、http://code.google.com/intl/ja/apis/sketchup/docs/developers_guide/index.htmlとなっています。
Google MapsのAPIの場合は、私のような素人でも、グーグルが提供しているサンプルを見ると、だいたい見当をつけることができて、ある程度カスタマイズが容易にできます。でもRubyに関する知識が全くない私のような者にとって、Google SketchUp APIは正直言って「ちんぷんかんぷん」、といったところです。
Google SketchUp Ruby APIのDeveloper's Guideのサイトにもサンプル(英語)があって、それを単純にコピーして拡張子「.rb」で保存し、SketchUpのPluginフォルダーに放り込めば、確かに動くことは確認できます。実行した結果は、グーグルのサイトにもありますが、以下の通り12段の単純な階段です。
このサンプル・コードの内容は以下の通りです。(グーグルのサイトよりコピーしたもの)
************************************************************************
require 'sketchup'
def draw_stairs
# variables to control the maximum step height and depth
max_step_height = 8
max_step_depth = 12
step_width = 36
p1 = Geom::Point3d.new(0, 0, 0)
p2 = Geom::Point3d.new(100, 0, 100)
h = (p2 - p1).z
puts "height = #{h}"
p3 = Geom::Point3d.new(p2.x, p2.y, p1.z)
v2 = p3 - p1
l = v2.length
puts "length = #{l}"
n1 = (h / max_step_height).to_i
puts "n1 = #{n1}"
n2 = (l / max_step_depth).to_i
puts "n2 = #{n2}"
numSteps = [n1, n2].max
puts "numSteps = #{numSteps}"
v1 = Geom::Vector3d.new 0, 0, (h/numSteps)
v2.length = l/numSteps
v3 = v1 * v2
v3.length = step_width
model = Sketchup.active_model
entities = model.entities
edges = []
model.start_operation "Stairs"
pt1 = p1
for i in 1..numSteps
# create the front of the step
pt2 = pt1 + v1
pt3 = pt2 + v3
pt4 = pt1 + v3
edges[0] = entities.add_line(pt1, pt2)
edges[1] = entities.add_line(pt2, pt3)
edges[2] = entities.add_line(pt3, pt4)
edges[3] = entities.add_line(pt4, pt1)
entities.add_face edges
# now make the top
pt1 = pt2
pt4 = pt3
pt2 = pt1 + v2
pt3 = pt4 + v2
edges[3] = edges[1]
edges[0] = entities.add_line(pt1, pt2)
edges[1] = entities.add_line(pt2, pt3)
edges[2] = entities.add_line(pt3, pt4)
entities.add_face edges
# move to the next step
pt1 = pt2
end
model.commit_operation
end # def draw_stairs
UI.menu("PlugIns").add_item("Draw stairs") { draw_stairs }
************************************************************************
さっぱりわかりません。まずは、Rubyの基本的な勉強から始める必要があるみたいです。
ということで、基本から勉強することにしました。と言っても今からRubyを一から勉強してもとても追いつけないので、グーグルのサイトで紹介されているサンプルを少しづつ修正しながら、実験しながら、まずは四角形ぐらい描けるようになりたいと思います。
次回から数回勉強したいと思います。
=======================================================================
記事一覧表==>>ここをクリックして下さい。
ビデオ・ギャラリー==>>こちらをクリックして下さい。
=======================================================================